background image

Virtual Cash Controller product guide – page 10

Network upgrade utility

The preferred method for updating firmware in the

VCC is using our network upgrade utility. The

latest version can be downloaded from

http://virtualcash.biz/ftp/2nd%20gen%20board/

Once you have installed the utility, all instructions

are included in the help file. You will also need to
download the latest version of our firmware from

the same location or have it e-mailed to you by

our support team. You will need a regular Cat5e or
crossover cable to complete the upgrade.

Call 603-744-2188 Ext 1 for live help.

Serial upgrade utility

In the unlikely event the network utility fails to

upgrade your terminal you will need to use our
older serial upgrade.

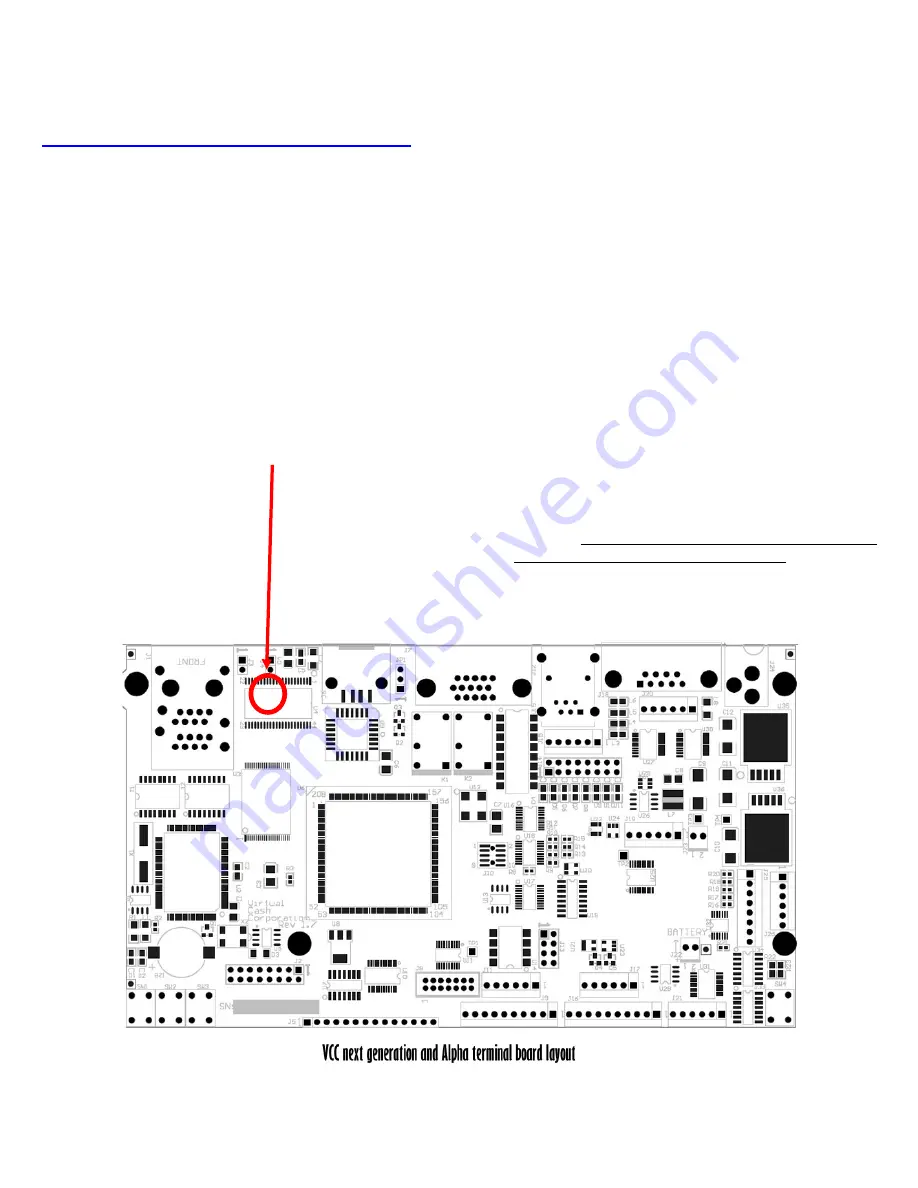
This is the location of jumper J4 (you will need a

medium Philips type screwdriver to open the case)

Open the VCC and install jumper J4 (at end of arrow).
This jumper is located just to the right of the RJ45

network port

Connect a serial cable between the VCC’s DB9 and the

PC and activate a serial terminal program such as

HyperTerminal. Set the communication interface to
57600-8-N-1 and specify hardware flow control. The

serial cable should be a straight through male to

female.

Apply power to the VCC which will send a menu to

HyperTerminal. From this menu choose “C” to flash
current firmware location. The VCC will then erase the

flash memory which will take about 15 seconds.

The HyperTerminal display should now read, “Send

ASCII Intel Hex File To Begin Download…”. At this

point the board is waiting to receive the Intel hex file.
In order to send the hex file using HyperTerminal, go

to the Transfer

SendTextFile and select the hex file

sent to you by Boscop. During the download, the
terminal window will display a list of addresses. At the

end of the download you should receive a message

indicating there were no errors found and that the PCB
should be reset. The download should take about 3.5

minutes.

When completed, move jumper J4 onto

just one of the pins for safe keeping.

This completes the firmware upgrade. Power cycle

the unit and the new software should load.

Summary of Contents for VCC

Page 1: ...rtual Cash Controller product guide page 1 VCC Copy Print controller PRODUCT GUIDE Conforms to FCC CFR 47 part 15 and European Community EMC Directive 89 336 EEC RoHS compliant under EU Directive 2002 95 ...

Page 2: ...tings Ping utility Card reader test Hostname Network settings Page 7 Static IP DHCP Server Subnet Gateway Domain server DNS MAC broadcast filter Change settings Troubleshooting Page 8 Initial installation Post installation Copier set up Timing parameters Page 9 Leading trailing edge debiting Sense blind time Reset eject delay Firmware upgrade Page 10 Network utility Serial upgrade PCB diagram Page...

Page 3: ...p for details Keypad The touch screen is fitted with an anti splash membrane to try and prevent accidental spill damage Any liquid caused damage is however not covered by our warranty program Power supply The switching power supply meets worldwide standards and covers universal supplies from 90 to 264 VAC at either 50 Hz or 60 Hz In the event of failure or theft please contact Boscop Inc 1 VCC ter...

Page 4: ...rietary HID formats we will need the consent of the format owner EM4102 proximity card reader Mostly used in Europe we have fully integrated the 125kHz EM4102 and can supply readers to special order Impro 125kHz proximity card reader We have integrated the Impro Omni Scan reader module this read only device has a scan range of up to 6 It reads Impro Standard Impro Slim and Impro Pico credentials B...

Page 5: ...er s support staff or help des k before calling Boscop Connection Power cord to wall socket 90 VAC to 264 VAC Ethernet cable not supplied Copier interface harness ordered separately All the connection points are on the rear of the VCC terminal Be sure that the copier interfac e is correctly connected BEFORE powering up the VCC and the copier connecting the copier while power is on may severely dam...

Page 6: ... on and off by pressing 1 for relay one and pressing 2 for relay two Meters roll over at 10 In steering mode debit pulses should come in only on opto 1 Optos 2 4 provide the steering signal as the copier selections change In this mode Mtrs 1 8 may change Press C CE to exit this selection Test card reader This menu selection provides a way to test the card reader whether it s a mag swipe bar code o...

Page 7: ...are supported the VCC will only read and save the characters to the left of the first space character To change the settings Static IP mode When the terminal is off line network cable unplugged and the unit is fully booted up swipe your parameters card and select Network settings If you want to manually control your VCC IP pool select Static IP otherwise select DHCP Select Static IP and this will ...

Page 8: ...rom the print software server a Yes Check all software settings b No Run the VCC diagnostic tool from your laptop through the Ethernet port you will need a standard Cat5e cable to run the connection through a hub c Replace the terminal if the problem persists change the local hub and get the network connectivity verified to your position 3 The most common fault is caused by the terminal setting ha...

Page 9: ...e after a valid pulse when any further pulses registered by that opto are ignored The valid range is 0 30 seconds in 10ms increments Blind Time masks unwanted pulses i e double pulses or glitches If this parameter is set too short double debits could occur but if set too long vends could be missed The VCC boots with Blind Time set to 10ms Reset Delay This is the length of time that the relays stay...

Page 10: ...nnect a serial cable between the VCC s DB9 and the PC and activate a serial terminal program such as HyperTerminal Set the communication interface to 57600 8 N 1 and specify hardware flow control The serial cable should be a straight through male to female Apply power to the VCC which will send a menu to HyperTerminal From this menu choose C to flash current firmware location The VCC will then era...

Page 11: ...oller product guide page 11 VCC PCB LAYOUT In the event that you need to contact our technical support department the following diagram may be helpful There are no components shown on the PCB just the component locations ...

Page 12: ...ide the warranty period will be subject to our normal rates for parts and labor Shipping costs are your responsibility Please use your shipping account to return your repairs otherwise the return shipping will be at the standard UPS rates All products should be returned to us in their original packaging A charge of 10 will be levied if products are shipped in unsuitable packaging All products rece...

Reviews: