background image

Installation

39

User Manual | 2902.5569.01 - 03

Initial Setup

SpycerNode SC

Initial Setup

For initial setup the device must be integrated into a network to establish 
access to the R&S

®

Device Manager. The Device Manager is the tool that 

allows you to configure and monitor all R&S devices connected within a local 
network. 

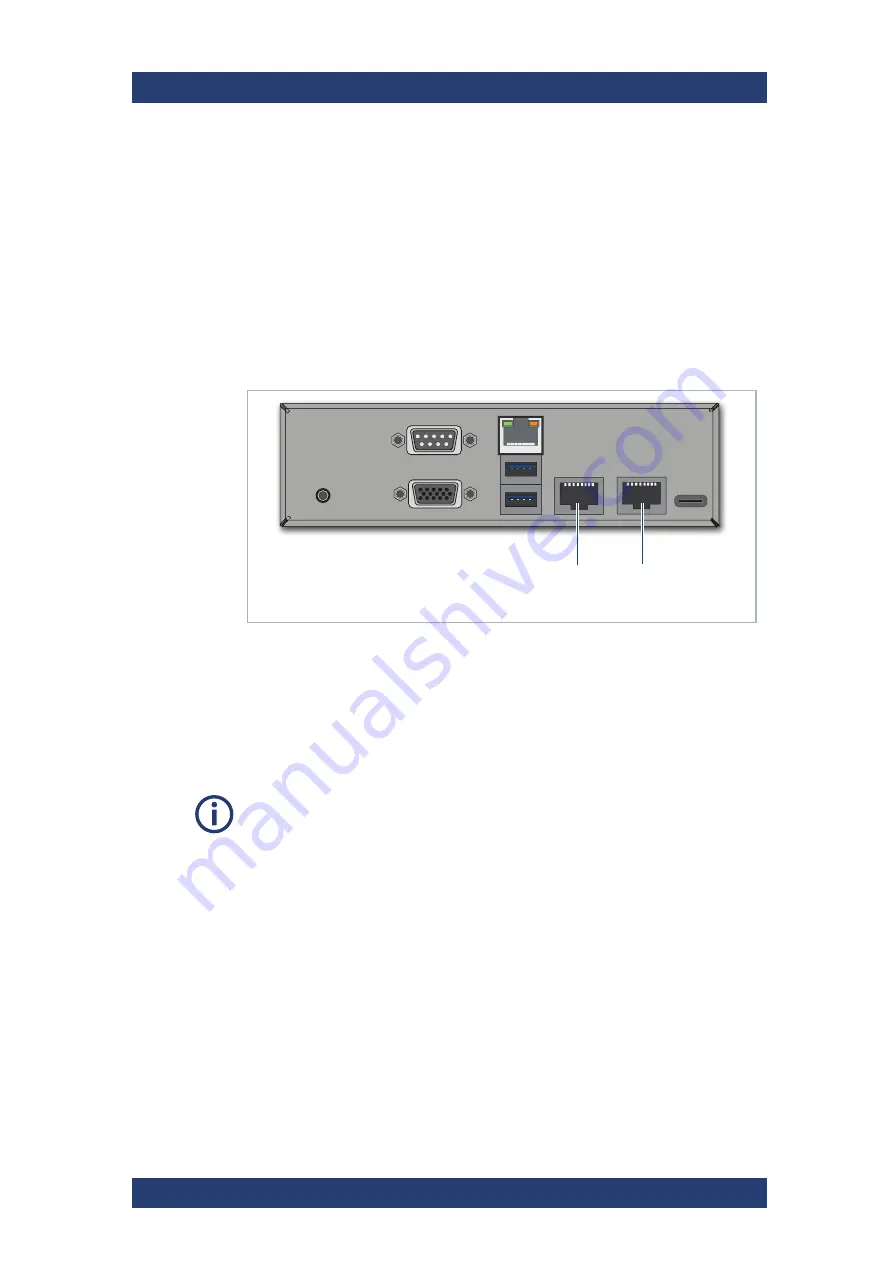
The network connection can be done via either of the two 10Gbit network 
ports (also compatible to 1Gbit and 100Gbit connection ports) at the rear of 
system. However, depending on which one you choose, different settings 
must be applied, since the first one is set to DHCP (Dynamic Host Configu-
ration Protocol) and the second one to static IP (10.0.0.4).

The following topics are covered:

Using Dynamic Host Configuration Protocol (DHCP)  (page 39)

Using Static IP  (page 45)

Using Dynamic Host Configuration Protocol (DHCP)

enp65s0f0 - 
DHCP

enp65s0f1 - 
static IP 
10.0.0.4

With a zeroconf capable PC/MAC it is possible to automatically detect 
network services. You can also use a zeroconf browser to view all zeroconf 
capable devices in your network. If your PC is not zeroconf capable use 
tools such as Bonjour.exe for the automatic detection of network services or 
connect your system using a static IP address ("Using Static IP"  (page 45)).

Summary of Contents for SpycerNode SC

Page 1: ...R S SpycerNode SC Storage Solution User Manual Version 03 2902 5569 02...

Page 2: ...rt media rohde schwarz com Internet https www rohde schwarz com Subject to change Data without tolerance limits is not binding R S is a registered trademark of Rohde Schwarz GmbH Co KG Trade names are...

Page 3: ...ions 18 Additional HBA Options 18 Certified Clients for SpycerNode SC 19 The Front of the System 20 Front Panel 20 Operating Panel 21 Backplane Status LEDs 21 Drives 22 Carriers 22 Disks Layout 22 Sta...

Page 4: ...System 75 Maintenance 77 Safety Instructions 78 Removing the Top Cover 79 Replacing a Power Supply Unit 80 Fan Maintenance 82 Monitoring the Fans 82 Replacing a Fan 83 Replacing a Drive 84 Identifying...

Page 5: ...General SpycerNode SC 5 User Manual 2902 5569 01 03 General This chapter includes the following sections About this Documentation page 6 Appropriate Use page 8...

Page 6: ...ork you should have experience as a network administrator and know how to set up the required network connections on the installation site both in hard and software When performing maintenance tasks o...

Page 7: ...r and information on additional documentation Chapter Safety on page 11 Provides all required safety instructions and important notes you must adhere to protect your equipment and avoid personal injur...

Page 8: ...se a wrist strap connected to ground when accessing electronic parts and take care of grounding the system Avoid touching the internal components of the R S system whenever possible Computer hardware...

Page 9: ...r a radiator Do not cover or obstruct the ventilation holes of the system When installing the R S system in a rack take care that warmed up air is conducted to the rear of the rack and properly vented...

Page 10: ...General Appropriate Use SpycerNode SC 10 User Manual 2902 5569 01 03...

Page 11: ...ut the potential dangers and gives instructions how to prevent personal injury or damage caused by dangerous situations In this chapter you will find infor mation on basic safety issues grouped accord...

Page 12: ...if you think it has become damaged in any way In order to comply with applicable safety emission and thermal require ments no covers should be removed and all bays must be populated with plug in modu...

Page 13: ...earth connection must be provided to the power supply cords Check the grounding of the casing before applying power Provide a suitable power source with electrical overload protection to meet the req...

Page 14: ...ecured connections if applicable such as HTTPS SFTP FTPS instead of HTTP FTP Ensure that the network settings comply with the security policies of your company Contact your local system administrator...

Page 15: ...andling follow these rules Do not short circuit the battery Do not mechanically damage the battery Do not open or disassemble the battery Do not expose the battery to high temperatures such as open fl...

Page 16: ...unpopulated casing can weigh up to 48kg 106lbs Use appropriate lifting methods A fully populated casing weighs 95kg 210lbs 60 x HDDs or 72kg 159lbs 60 x SSDs Do not attempt to lift the casing when po...

Page 17: ...and status indicators for all key components alarms and lockable carriers With the compact design and advanced file system functionality the R S SpycerNode SC is ready to fulfill a wide range of appli...

Page 18: ...erNode SC basic unit has 60 media drive bays organized in two LUNs 30 drives per LUN Storage Capacity Options The following drive bundle options are available Additional HBA Options The following HBA...

Page 19: ...ed and is designated to operate as a client Physically reading or writing user data to the SAN disks is done on behalf of the NSD clients that trigger the disk operations The following operating syste...

Page 20: ...wing topics are covered Front Panel page 20 Operating Panel page 21 Front Panel The front of the system is equipped with a front cover for mechanical protec tion and sufficient air circulation Front P...

Page 21: ...ing the storage drives with 20 drive trays each The status of each backplane is displayed on the lower front panel of the system Backplane Status LEDs Power On Off System Power LED H System HDD Activi...

Page 22: ...in line with the SCSI specifications Carriers Drive carriers are used to hold the storage disks A drive carrier houses a single 3 5 SAS drive or with an adapter a 2 5 inch SAS SSD Drive carrier SAS d...

Page 23: ...ode SC Drive mapping Status LED The drive carriers have a status LED to indicate the current state of the drive HB and EB drive carrier LEDs Blue ON Disk connected Blue blinking Disk activity Red blin...

Page 24: ...pply units see also Power Supply Units page 25 ATX connector panel Provides the standard connectors of the computer system see also ATX Panel page 26 Storage network connection Provides optional conne...

Page 25: ...e require an input of 200 to 240 VAC at 50 to 60 Hz The IEC C14 AC connector requires a C13 AC jack System Damage Replacement of a PSU can be performed while the system is running but the procedure mu...

Page 26: ...vices to the system ID System Indicator Press to trigger the green ID LED located on the front of the system Useful e g to locate the system within a rack among many other systems VGA DB 15 connector...

Page 27: ...loss in case a disk fails they are RAID1 protected The system SSDs are connected to the system with the help of disk carriers which make the removal of a disk easy for example in the event of a failur...

Page 28: ...Product Description The Rear of the System SpycerNode SC 28 User Manual 2902 5569 01 03...

Page 29: ...allation This chapter is divided into the following sections Unpacking the System page 30 Mounting the System into a Rack page 32 Installing the Drives page 36 Connecting the Power Source page 38 Init...

Page 30: ...in case of a return transportation Environmental Conditions For error free working and a long service life SpycerNode SC needs some basic environmental conditions Do not expose the SpycerNode SC to s...

Page 31: ...5 Place the system on a flat surface to prepare it for mounting into the rack Risk of Injury Make sure the openings on the handles completely embrace the hooks Also the openings must be attached at th...

Page 32: ...l number of units installed in the rack When addressing these concerns consideration should be given to the electrical power consump tion rating shown on the nameplate The electrical distribution syst...

Page 33: ...the inner rail 3 Release the latch and slide back the middle rail Electronic discharge Computer hardware contains components that are sensitive to electrostatic discharge If you touch them without pre...

Page 34: ...9 01 03 4 Align the front bracket of the outer rail with the mounting hole Attach the rail to the rack frame and secure it with the screws from both the front and the rear 5 Attach the outer rails to...

Page 35: ...Rack SpycerNode SC 6 Pull the middle rails on the frame to fully extended position Align the inner slides with the outer slides 7 Slide the case into the frame When hitting a stop push the blue relea...

Page 36: ...g the Drives Perform the following steps 1 Simultaneously push the lock buttons on both sides of the casing and remove the top cover on the front side 2 Insert the disk drives into the associated slot...

Page 37: ...01 03 Installing the Drives SpycerNode SC 3 The drives are divided into two drives sets 01 30 and 31 60 for a total of 60 drives The layout of the drive sets is as follows A system with half capacity...

Page 38: ...e system Loss of Data Corrupt Data In the event of a power failure the device will be abruptly switched off This can result in corrupt data loss of data and equipment damage Connect the system to an u...

Page 39: ...different settings must be applied since the first one is set to DHCP Dynamic Host Configu ration Protocol and the second one to static IP 10 0 0 4 The following topics are covered Using Dynamic Host...

Page 40: ...ame of the system in the Chrome web browser to open the R S Device Manager on your local system http snosc serial number local The host name itself consists of the keyword snosc followed by a dash the...

Page 41: ...Easy Setup Wizard of the Device manager initiates automatically right after the first login 5 Define hostname and password for the system 6 Specify date and time settings for the system The password...

Page 42: ...of the setup is completed Time zone Select your time zone from various predefined selection options Be master time server Set the checkbox if you want to designate this particular system as the main N...

Page 43: ...city and RAID level Zone 2 Zone 3 Shows the installed storage drives type their capacity and the level of RAID protection Each zone represents a single drive set which consists always of 30 drives A s...

Page 44: ...he settings Windows drive letter Define the drive letter designation for the your file system at your connected Windows native clients File system alloca tion type Defines the type of allocation Perfo...

Page 45: ...age of the Device Manager select the corresponding system 13 Navigate to System Restart and shutdown and opt for the reboot option The SpycerNode SC hardware is now properly installed and ready for fi...

Page 46: ...your PC Mac to 10 0 0 1 3 Enter the static IP in the Chrome web browser to open the R S Device Manager on your local system i e http 10 0 0 4 4 Locate the serial number of the device which is to be fo...

Page 47: ...Easy Setup Wizard of the Device manager initiates automatically right after the first login 6 Define hostname and password for the system 7 Specify date and time settings for the system The password...

Page 48: ...ield With this step the first part of the setup is completed Time zone Select your time zone from various predefined selection options Be master time server Set the checkbox if you want to designate t...

Page 49: ...acity and RAID level Zone 2 Zone 3 Shows the installed storage drives type their capacity and the level of RAID protection Each zone represents a single drive set which consists always of 30 drives A...

Page 50: ...he settings Windows drive letter Define the drive letter designation for the your file system at your connected Windows native clients File system alloca tion type Defines the type of allocation Perfo...

Page 51: ...ial Setup SpycerNode SC 13 On the main page of the Device Manager select the corresponding system 14 Navigate to System Restart and shutdown and opt for the reboot option The SpycerNode SC hardware is...

Page 52: ...default alert delivery methods for each severity level 2 Click the Mail Server tab The Mail Server tab appears and displays the current mail server settings 3 Enter a sender s email address in the SEN...

Page 53: ...3 Installing under Windows page 55 Adding a Native Spectrum Scale Client page 62 Removing a Native Spectrum Scale Client page 63 Installing under Linux Preparations Perform the following steps 1 In th...

Page 54: ...l version of your system e g 3 10 0 514 The version can be queried with uname a If the system has a different kernel version the gpfs gplbin package must be generated with mmbuildgpl build package DIR...

Page 55: ...Change directory 2 Create file 3 Open the repo file with an editor 4 Enter the description of the configuration into the file Installing under Windows Preparations Perform the following steps etc yum...

Page 56: ...e Windows Control Panel to disable the Windows firewall 2 Select Turn Windows Firewall on or off 3 Select Turn off Windows Firewall in Private network settings and in Public network settings 4 Confirm...

Page 57: ...n 5 Select Complete Installation 6 Change the directory to 7 In administration mode execute 8 Follow the onscreen instruction of the installation routine 9 Open a Windows command shell cmd in administ...

Page 58: ...can proceed with the network settings Mellanox Network Card Configuration Perform the following steps 1 Open the Mellanox ConnectX 5 VPI Adapter Properties 2 Disable IPv6 in the Ethernet properties 3...

Page 59: ...Installation 59 User Manual 2902 5569 01 03 Installing the Spectrum Scale Client SpycerNode SC 4 Disable Power Management 5 Disable Flow Control...

Page 60: ...l 2902 5569 01 03 6 Set the Jumbo Packet to 9014 The configuration of the network card is complete Installing Spectrum Scale Perform the following steps 1 In the R S Device Manager navigate to Mainten...

Page 61: ...de SC 2 Execute the client installer on your client device and accept th license agreement 3 Select all components to install 4 Create a local root account with password if this hasn t been done 5 Con...

Page 62: ...ge client specific Spectrum Scale settings 5 Set the pagepool size 6 Optional if required Change the drive letter of the file system Windows clients Unmount the file system from all nodes first Change...

Page 63: ...ycerNode SC Removing a Native Spectrum Scale Client Perform the following steps 1 Login to a R S storage system that is part of the cluster 2 Shutdown Spectrum Scale on the client node 3 Remove the cl...

Page 64: ...Installation Installing the Spectrum Scale Client SpycerNode SC 64 User Manual 2902 5569 01 03...

Page 65: ...eration SpycerNode SC 65 User Manual 2902 5569 01 03 Operation This chapter includes the following section Using the R S Device Manger page 66 System Monitoring page 68 Shutting down the System page 7...

Page 66: ...me of the system in the Chrome web browser to open the R S Device Manager on your local system http snosc serial number The host name itself consists of the keyword snosc followed by a dash and the se...

Page 67: ...ration 67 User Manual 2902 5569 01 03 Using the R S Device Manger SpycerNode SC 5 Select the corresponding system host name to get access to the menu options After login the complete menu becomes visi...

Page 68: ...methods to monitor the system Monitoring through SNMP page 68 Monitoring through the Device Manager page 70 Monitoring the Drives via Broadcom UI page 71 Monitoring through SNMP The Simple Network Man...

Page 69: ...8 1 2 10000 2 2 0 Fan2 speed RPM rounds per minute 1 3 6 1 4 1 2566 127 1 4 1 8 1 2 10000 2 3 0 Fan2 state ok warning failure unknown 1 3 6 1 4 1 2566 127 1 4 1 8 1 2 10001 1 1 0 Temperature 1 name t...

Page 70: ...00 1 6 0 RAID controller 1 BBU state ok warning failure unknown 1 3 6 1 4 1 2566 127 1 4 1 8 2 2 10000 2 6 0 RAID controller 2BBU state 1 3 6 1 4 1 2566 127 1 4 1 8 2 2 10000 1 9 1 2 0 Virtual disk 1...

Page 71: ...he details on any single component Each dropdown bar signals the status of the contained components OK green Warning yellow Error red Monitoring the Drives via Broadcom UI Perform the following steps...

Page 72: ...elect Storage RAID monitoring in the settings menu A new tab opens 4 If you open this tab for the first time you will get a Privacy error in the browser Select Advanced to continue 5 Select Proceed to...

Page 73: ...alled controllers opens It allows you to monitor and manage the storage drives in use through the controllers 7 Choose a controller to check its status Select the Drives tab and expand the Configured...

Page 74: ...t s actions Start locating The LED status indicator on the corresponding physical drive will start blinking 10 To get access to all severity events in the Controller dashboard navigate to the ACTIONS...

Page 75: ...tting down the System Perform the following steps 1 Open the R S Device Manager on your local system as described in Using the R S Device Manger on page 66 2 Select Restart and Shutdown in the SYSTEM...

Page 76: ...Operation Shutting down the System SpycerNode SC 76 User Manual 2902 5569 01 03...

Page 77: ...intenance This chapter is divided into the following sections Safety Instructions page 78 Removing the Top Cover page 79 Replacing a Power Supply Unit page 80 Fan Maintenance page 82 Replacing a Drive...

Page 78: ...y measures they can be destroyed It is recommended that you fit and check a suitable anti static wrist or ankle strap and observe all conventional ESD precautions when handling plug in modules and com...

Page 79: ...ve storage drive or a cooling fan Perform the following steps 1 Simultaneously press the cover release buttons on both sides of the casing 2 Push and slide the top covers in the direction shown Push i...

Page 80: ...o you can safely replace it with the system running Perform the following steps 1 Press the ejector to release the power supply unit 2 Pull the handle to remove the module out of the casing System Dam...

Page 81: ...Maintenance 81 User Manual 2902 5569 01 03 Replacing a Power Supply Unit SpycerNode SC 3 Insert the new power supply module into the casing Ensure that the module is properly hooked within the cage...

Page 82: ...ored by and displayed in the Device Manager To get access to the fan monitoring navigate to Maintenance Health status and expand the Fan speed drop down section The following table and illustration wi...

Page 83: ...as described in Removing the Top Cover page 79 2 Unplug the cables and connectors of the fan to the motherboard 3 Pull the fan from the node Make sure to carefully dislodge the rubber connectors from...

Page 84: ...ge 88 Identifying a Defective Drive Perform the following steps 1 Open the R S Device Manager on your local system as described in Using the R S Device Manger on page 66 Navigate to the storage sectio...

Page 85: ...now accessible 5 Enter the username and password as defined in Initial Setup page 39 and confirm with the Sign In button The Web UI Application for the installed controllers opens It allows you to mon...

Page 86: ...lect the checkbox of the corresponding virtual drive 7 In the Element s Actions menu on the right side select Start locating Subsequently you have the option to customize the locating procedure before...

Page 87: ...84 The status LED of a defective disk drive will be lit in red or not at all total failure 2 Push the drive carrier latch upwards to unlock and pull the drive carrier out of the casing The disk drive...

Page 88: ...e sliding the drive carrier plate in the direction 3 Push the drive carrier latch inwards to lock the drive in place Data Loss Before you start this operation be sure that an available unconfigured re...

Page 89: ...ve the status REBUILD 5 To monitor the rebuild process navigate back to the Controller tab and expand the Background Process in Progress menu The new drive is successfully installed The Rebuild proced...

Page 90: ...ou want to update Identify the system with the serial number on the controller label or type plate 7 Follow the instructions given on the screen During the installation procedure all necessary files a...

Page 91: ...following steps 1 If not already registered in GLORIS the Rohde Schwarz Service and Support portal please do so to get access to the download area https gloris rohde schwarz com rs com extnet app regi...

Page 92: ...d in the previous step to prepare a bootable flash drive Perform the following steps 1 Prepare an empty USB drive The device should have the following specifications 2 Unzip the archive on your Window...

Page 93: ...the system 4 Execute the Rufus 3 4 exe software version 3 4 1430 or higher 5 Click the SELECT button to navigate to the ISO file 6 Enter RUSBACKUP as volume label select FAT32 as file system and 16 k...

Page 94: ...er the boot menu The boot menu is displayed on the screen 4 Select the USB flash drive as the boot device 5 Press Enter The system will boot from the USB flash drive You will see a window on the scree...

Page 95: ...sting backup image you can overwrite it 9 Type in the name of the image you want to save to the USB flash drive for a later recovery To confirm your entry press Enter The system will ask you to confir...

Page 96: ...flash drive created in Preparing a Bootable USB Drive page 91 3 Turn on the SpycerNode SC At the indicated moment during start up you have to press F11 to enter the boot menu The boot menu is displaye...

Page 97: ...nment and the process itself will both try to initialize hardware that may not be present on your system Any error messages dis played during loading initialization e g Failed or Warning can be disre...

Page 98: ...er you want to continue 10 To start the recovery process type in y for yes and press Enter The program starts the recovery process Its progress will be indicated on the screen When the system has fini...

Page 99: ...Appendix SpycerNode SC 99 User Manual 2902 5569 01 03 Appendix This chapter includes the following sections Dimensions page 100 Technical Data page 101...

Page 100: ...s SpycerNode SC 100 User Manual 2902 5569 01 03 Dimensions The following figures show the dimensions of the system Dimensions front view Dimensions top view Front 48 cm 18 9 in 17 7 cm 7 in 43 5 cm 17...

Page 101: ...1600W 1480W average with HDD drives 1370W average with SSD drives Cooling capacity 7510 BTU h Casing 4U rack mount Total number of drives 30 or 60 data drives per casing CPU AMD EPYC processor second...

Page 102: ...lative humidity 10 to 80 Altitude 0 to 3000 m operating 100 to 12192 m non operating Mechanical resis tance Vibration Frequency range 5 Hz to 55 Hz Displacement 0 3 mm pk pk 1 8g at 55 Hz Frequency ra...

Page 103: ...per chassis x AMD EPYC processor second generation x DDR4 RDIMM x redundant SSDs for operating system x redundant SSDs for meta data x enterprise class drive technology x PCIe 4 0 technology Controll...

Page 104: ...rsal rack mount kit Ordering information Designation Type Order No R S SpycerNode 4u60 SC main unit R S SNOSC 2902 5217 02 R S SpycerNode SC HDD bundle 120 Tbyte 30 data drives R S SNO B130 2902 5330...

Page 105: ...Appendix 105 User Manual 2902 5569 01 03 CE Declaration of Conformity SpycerNode SC CE Declaration of Conformity...

Page 106: ...Appendix CE Declaration of Conformity SpycerNode SC 106 User Manual 2902 5569 01 03...

Page 107: ...closure 84 Drives 22 E environmental conditions 102 F Front 20 Front panel 20 I Identifying Drive carrier 84 initial setup 39 dhcp 39 static IP 45 Installation 29 Installing Drive carrier 5U Enclosure...

Page 108: ...network 14 transportation 16 size 100 SNMP 68 specifications 103 spetrum scale installation 53 system config 101 system dimensions 100 system disk 27 recovery 91 System monitoring 68 System updates 90...

Reviews: