background image

Roger Technology Swing Gate Brushless B70-2DCHP Control Panel 

Quick Start Guide Extended Mode 


STEP 4) 

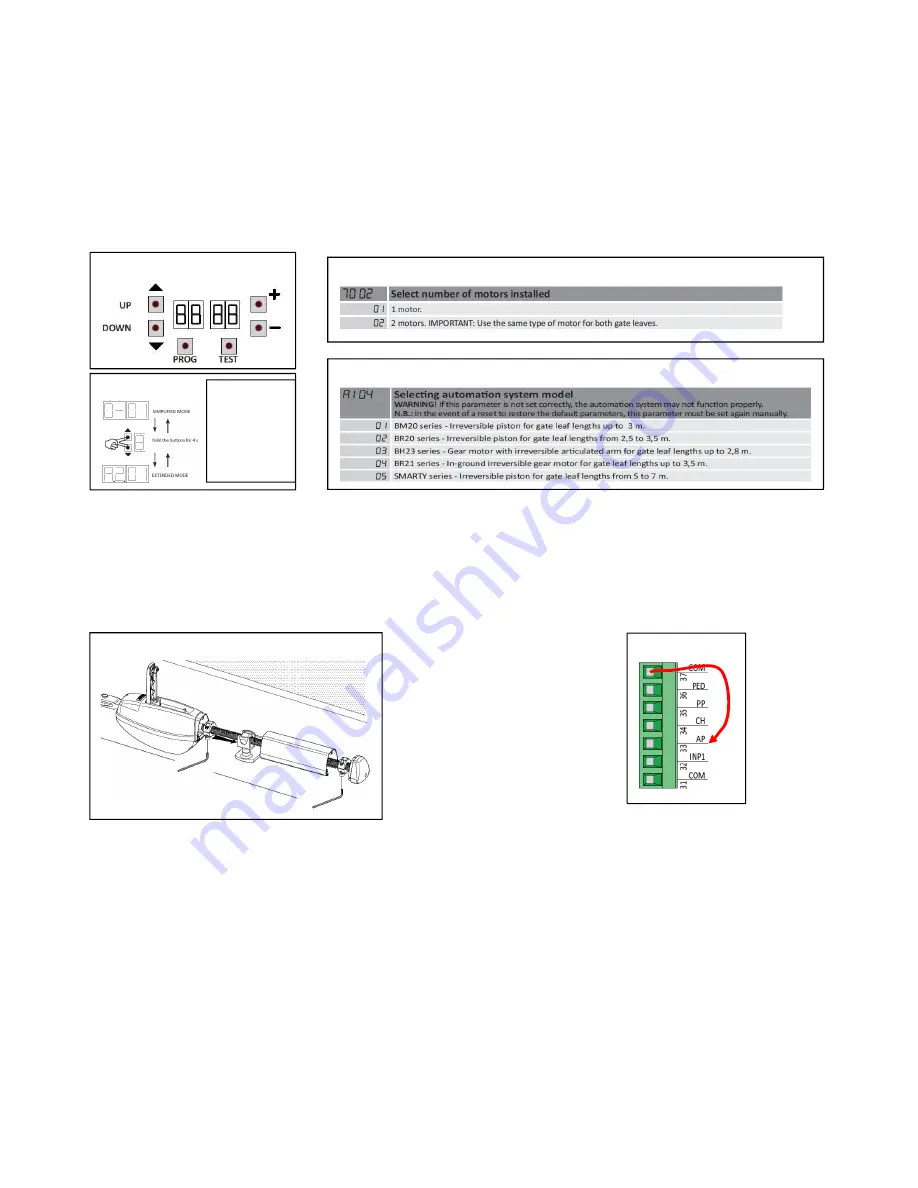
Using  the  control  panel  buttons  UP/DOWN,  Fig.7  Scroll  down  to  menu  70  Fig.8  and  select  1  motor  or  2  motors.  

Change the parameter using the 

+ -

 buttons.  After a few seconds the board will realise the change automatically. 

From the chart in Fig.9, scroll down to 

A1

 , select the correct parameter for the motor you have connected using the 

+ -

 buttons, make sure the panel realises the change.  It should do this again automatically after a few seconds of the 

change. 

(See Fig7b for B70-2DC with dual menu)


Step 5) 

Using a hex key tool, and the unlock lever, set the maximum open and closed stop positions of the motor, to give the 

correct corresponding gate open and closed positions for each gate as shown in Fig.10.  Double check the positions 

of the collars by swinging the gate open/closed with the motor unlocked. 


Step 


Step 6) 

You should now be ready to carry out the stroke programming sequence. But first you should check that the motors 

are traveling in the correct direction in relation to the control panel. To do this it will be necessary to give the panel a 

brief open or close command and compare the command to the movement of the gate direction, but then quickly 

turn off the power once you realise the movement.  Attach a temporary cable to COM as FIG.11 then, briefly touch 

the other end into the AP terminal.  The AP terminal is the open command, so the gates should open. Turn off the 

power to the panel as soon as you see the movement.  If the gates close with the AP input, the gates are going the 

wrong way. It will be necessary to swap around any two wires to the incorrect motor (ZYX) as detailed in Fig.2. 


Fig.7  


Fig.8 


Fig. 9 


Fig. 10)  


Fig. 11) 


Fig.7b   


With (B70-

2DCHP), with dual 

menu version it 

may be necessary 

to toggle into the 

extended mode 

first. 

Summary of Contents for B70-2DCHP

Page 1: ...cables XYZ and earth to the XYZ points inside the control panel for each motor respecting that brushless motors need a minimum of 2 5mm cross section cable size If the cables to be connected to the motor are extended over 10 metres in total length a 4 0mm cross section cable must be used In the case on just 1 motor connect to Step 3 Connect the power supply to the control panel Press the test butt...

Page 2: ...rossed on opposite sides so that you do not have two receivers at the same side The set on the gate posts 3 are on the outside of the gates For this purpose 5 core BT type cable is recommended for use CW1128 with conduit Follow the wiring diagram provided to wire both the receiver and transmitting photocells At the control box end wire the colour coded cables up as per the diagram provided showing...

Page 3: ... positions of the collars by swinging the gate open closed with the motor unlocked Step Step 6 You should now be ready to carry out the stroke programming sequence But first you should check that the motors are traveling in the correct direction in relation to the control panel To do this it will be necessary to give the panel a brief open or close command and compare the command to the movement o...

Page 4: ...ogramming press the PROG button for 4 s the display will show AP P at this point you can programme the stroke by pressing the PROG button again or by pressing the radio control button enabled by the step by step function The display shows the indication AUTO and motor 1 starts opening after the phase shift time Programming is performed automatically Wait for the completion of the cycles avoiding c...

Page 5: ...red codes NOTE it s recommended to delete all codes at the first installation before starting storing codes Step 9 Test the system You can now test run the system with the fob If necessary reduce the impact force level with the menus 30 to 33 in the parameters These settings are explained in the manufacturers B70 2DCHP manual Step 10 Add in the necessary safety photocells safety edges and other de...

Page 6: ...e 6 Connecting gate release devices Volt free release connections only The communication part of the intercom must use its own power supply Check that powered your devices will accept 24VDC Connection of the inductive loop detector PD132 230VAC for use as an exit device All dips off Road Loop ...

Page 7: ...nology Swing Gate Brushless B70 2DCHP Control Panel Quick Start Guide Extended Mode 7 Connecting magnetic locks Connecting a 12V time clock GL Series Mag locks wiring detail N C White COM Green Not normally used ...

Page 8: ...r safety if necessary integrating those in the manual for installation of the door gate and give the user a copy Compile the proof book and give the user a copy see facsimile in Annex 1 Draft the EC declaration of conformity see facsimile in Annex 2 and give the user a copy Fill in the label or plate with CE marking and attach it to the motorised door gate N B The technical file must be held and m...

Page 9: ...E MACHINERY DIRECTIVE 98 37 EEC AND THE STANDARDS EN 13241 1 EN 12453 EN 12445 The risks listed below follow the sequence of the installation process These risks are those which are commonly present in motorised doors gates systems According to the various situations consideration therefore has to be made of any possible additional risks and exclude those which are not applicable The solutions to ...

Page 10: ... force should be measured one leaf at a time Check that the values measured by the instrument are below those indicated in the graph Carry out the measurements in the following points L 50 300 and 500 mm H 50 mm at mid height of the leaf and at the height of the leaf minus 300 mm max 2500 N B The measurement should be repeated three times in each point and the average value considered The graph in...

Page 11: ...tective device in accordance with the standard EN 12978 for example a sensitive edge and repeat the measurement 5 Impact in the area of closure Figure 1 risk C F Install a pair of photocells recommended height 500 mm so as to sense the presence of the test parallelepiped height 700 mm positioned as illustrated N B The test specimen for presence sensing is a parallelepiped 700 x 300 x 200 mm with 3...

Page 12: ... Use CE marked components and materials pursuant to the Low Voltage Directive 73 23 EEC F Carry out the electrical connections connection to the mains earth connections and relevant checks in accordance with current regulations and as indicated in the installation manual of the drive unit N B If the electrical supply line is already set up via both a socket and a connector block declarations of co...

Page 13: ...safety devices installed 1 7 1 1 7 2 1 7 3 1 7 4 1 6 1 1 1 2 Integration principles for safety and information 20 Signalling equipment 21 Warnings 22 Marking 23 Operating instructions 23 Maintenance 24 Unprotected residual risks F A flashing light should be installed in a visible position to indicate movement of the leaf F Traffic lights can be installed to control vehicle traffic F Reflectors can...

Reviews: