


Mounting the Drive
3-3
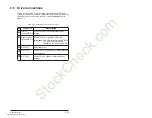
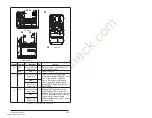
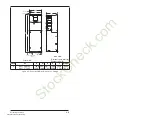
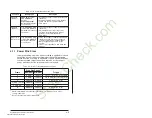
Frames Jumper
Component
No.
Action
2-4
PEA
Common Mode
Capacitors
1
Remove jumper located above the
Power Terminal Block.
PEB
MOV’s
2
Same as above.
5
6
Wire
Common Mode
Capacitors
MOV’s
Input Filter
Capacitors
3
4
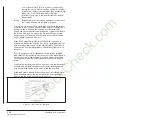
Remove the I/O Cassette. The
yellow/green jumper is located on the
back of the chassis in the area
shown. Disconnect, insulate and
secure the wire to guard against
unintentional contact with chassis or
components.
Wire
Common Mode
Capacitors
MOV’s
Input Filter
Capacitors
Remove the wire guard from the
Power Terminal Block. Disconnect
the three green/yellow wires from the
two “PE” terminals shown. Insulate
and secure the wires to guard
against unintentional contact chassis
or components.
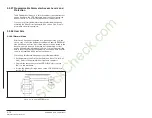
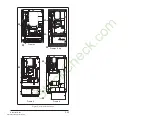
Figure 3.1 – Typical Jumper Locations
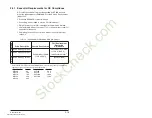
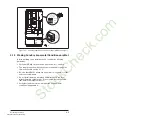
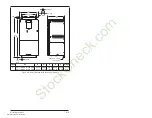
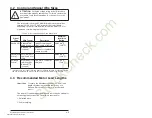
BR1 BR2 DC+ DC- U/T1 V/T2 W/T3
SHLD
SHLD
PE R/L1 S/L2 T/L3
PE 2
MOV-PE JMPR
PE 1
AUX IN+ AUX OUT–
75C Cu Wire
6 AWG [10MM
2
] Max.
12 IN. LBS.
1.4 N-M
} TORQUE
WIRE
STRIP
CONTROL
POWER
PE 4
PE 3
DC FILTER CAP-PE JMPR
Frame 2
Frame 5
BR1 BR2 DC+ DC- U/T1 V/T2 W/T3 R/L1 S/L2 T/L3
PE B
PE A
75C Cu Wire
3 AWG [25MM
2
] Max.
16 IN. LBS.
1.8 N-M
} TORQUE
WIRE
STRIP
CONTROL
POWER
AUX IN
+ –
SHLD
SHLD
PE
75C Cu Wire
6 AWG [10MM2] Max.
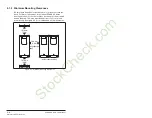
BR1 BR2
12 IN. LBS.
1.4 N-M
} TORQUE
WIRE RANGE: 14-1/0 AWG (2.5-35 MM2)
TORQUE: 32 IN-LB (3.6 N-M)
STRIP LENGTH: 0.67 IN (17 MM)
USE 75
°
C CU WIRE ONLY
POWER TERMINAL RATINGS
WIRE RANGE: 6-1/0 AWG (16-35 MM2)
TORQUE: 44 IN-LB (5 N-M)
STRIP LENGTH: 0.83 IN (21 MM)
GROUND TERMINAL RATINGS (PE)
300 VDC EXT PWR SPLY TERM (PS+, PS-)
WIRE RANGE: 22-10 AWG (0.5-4 MM2)
TORQUE: 5.3 IN-LB (0.6 N-M)
STRIP LENGTH: 0.35 IN (9 MM)
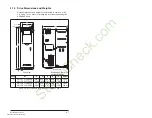
17
21
INPUT AC
OUTPUT
Optional
Communications
Module
9
Frames 3 & 4
StockCheck.com
Downloaded from StockCheck.com
Summary of Contents for Reliance electric 6SB401 Series
Page 10: ...VIII SP600 AC Drive User Manual S t o c k C h e c k c o m Downloaded from StockCheck com ...
Page 14: ...1 2 SP600 AC Drive User Manual S t o c k C h e c k c o m Downloaded from StockCheck com ...
Page 48: ...Mounting the Drive 3 12 S t o c k C h e c k c o m Downloaded from StockCheck com ...
Page 86: ...Installing Control Wiring 7 14 S t o c k C h e c k c o m Downloaded from StockCheck com ...
Page 102: ...10 8 SP600 AC Drive User Manual S t o c k C h e c k c o m Downloaded from StockCheck com ...
Page 232: ...Technical Specifications A 8 S t o c k C h e c k c o m Downloaded from StockCheck com ...
Page 248: ...B 16 SP600 AC Drive User Manual S t o c k C h e c k c o m Downloaded from StockCheck com ...
Page 256: ...C 8 SP600 AC Drive User Manual S t o c k C h e c k c o m Downloaded from StockCheck com ...
Page 258: ...D 2 SP600 AC Drive User Manual S t o c k C h e c k c o m Downloaded from StockCheck com ...
Page 260: ...E 2 SP600 AC Drive User Manual S t o c k C h e c k c o m Downloaded from StockCheck com ...
Page 266: ...F 6 SP600 AC Drive User Manual S t o c k C h e c k c o m Downloaded from StockCheck com ...
Page 273: ...S t o c k C h e c k c o m Downloaded from StockCheck com ...