background image

MP-Series Low Inertia Servo Motor Installation Instructions     

15

Publication MP-IN002C-EN-P - April 2009

3.

Carefully align the flat surface on the feedback or the power/brake cable 
plug (shown in the diagram) with the flat surface on the motor connector. 

4.

Hand tighten the collar on the plug to fully seat it on the connector. 

• Threaded plug requires five to six revolutions. 

• Quick-lock plug requires approximately one-quarter of a revolution. 

Do not apply excessive force when mating the cable plug with the motor 
connector. If the plug and connector do not go together with light hand 
force, realign the flat surfaces and try again. 

IMPORTANT

The motor orientation shown is used to clearly show the alignment marker on 
each cable socket. 

The recommended motor orientation when installed positions the connectors at 
the bottom of the motor. 

TIP

A threaded plug leaves a small opening, approximately 1…4 mm 
(0.04…0.16 in.), between the connector and the plug when fully 
seated. 

ATTENTION

Keyed connectors and cable plugs must properly align and be hand-tightened the 
recommended number of turns. 

Improper alignment is indicated by the need for excessive force, such as the use 
of tools, to fully seat a plug. 

Failure to observe safety precautions could result in damage to the motor and 
cable, and their components. 

Summary of Contents for MP-Series

Page 1: ...880 MPL B960 MPL B980 Topic Page Important User Information 2 Catalog Number Explanation 3 Before You Begin 4 Install the Motor 8 Verify Connector O ring and Backshell Seal 8 Change Connector Orientation 9 Mount the Motor 13 Connector Data 16 Product Dimensions 17 Motor Load Force Ratings 20 Accessory Kits 22 Specifications 24 Additional Resources 25 ...

Page 2: ...icular installation Rockwell Automation Inc cannot assume responsibility or liability for actual use based on the examples and diagrams No patent liability is assumed by Rockwell Automation Inc with respect to use of information circuits equipment or software described in this manual Reproduction of the contents of this manual in whole or in part without written permission of Rockwell Automation I...

Page 3: ...80 Rotatable 7 Circular DIN Right Angle 180 Rotatable ENCLOSURE SHAFT KEY SHAFT SEAL J Shaft Key K No Shaft Key FEEDBACK M Multi turn High Resolution Encoder S Single turn High Resolution Encoder RATED SPEED A 500 rpm B 1000 rpm C 1500 rpm D 2000 rpm E 2500 rpm F 3000 rpm G 3250 rpm H 3500 rpm J 3750 rpm K 4000 rpm MAGNET STACK LENGTH 80 8 0 in FRAME SIZE IEC 72 1 flange number 6 215 mm 8 265 mm 9...

Page 4: ...r maintenance can increase the life of a servo motor Follow these guidelines to maximize the life of a servo motor within a food processing environment Always provide a drip loop in each cable to carry liquids away from the connection to the motor If design requirements permit provide shields that protect the motor housing shaft seals and their junctions from contamination by foreign matter or flu...

Page 5: ...g for the motor requires the use of shaft seals connectors and cables that provide an environmental seal equal to or exceeding the rating Refer to Specifications for a brief description of the IP ratings Refer to Shaft Seals to find the catalog numbers of seal kits for your motor Refer to the Kinetix Motion Control Selection Guide publication GMC SG001 to find environmentally sealed connectors and...

Page 6: ...ons of the motor Refer to Shaft Seals for guidelines to achieve 20 000 hours of motor bearing life A shaft key provides a rigid mechanical connection with the potential for self alignment when the key is properly installed These sections provide additional information Refer to Product Dimensions for information about the key and shaft keyway Refer to Shaft Key for recommendations on how to remove ...

Page 7: ...the effects of EMI Isolate the power transformers or install line filters on all AC input power lines Physically separate signal cables from motor cabling and power wiring Do not route signal cables with motor and power wires or over the vent openings of servo drives Ground all equipment using a single point parallel ground system that employs ground bus bars or large straps If necessary use addit...

Page 8: ... out Before applying power to the motor remove the shaft key and other mechanical couplings which could be thrown from the shaft Failure to observe safety precautions could result in personal injury ATTENTION Make sure that cables are installed and restrained to prevent uneven tension or flexing at the cable connections Excessive and uneven lateral force on the cable can result in the environmenta...

Page 9: ...connector and cable plug and slowly rotate them to the outside of the motor ATTENTION Connectors are designed to be rotated into a fixed position during motor installation and remain in that position without further adjustment Strictly limit the applied forces and the number of times the connector is rotated to make sure that connectors meet the appropriate International Protection IP rating as ou...

Page 10: ...wire bundles prevents rotation of the connector you can gain access to the internal motor wiring as described in the following steps a Remove the four screws from the rear cover of the motor b Reposition the wires with care around the perimeter of the motor feedback device under the rear cover c Verify that wires are not close to any rotating parts and then replace the rear cover d While replacing...

Page 11: ... coil the excess length of a power cable Heat is generated within a cable whenever power is applied Always position a power cable so it may freely dissipate any heat A power cable should not be coiled except for temporary use when building or testing a machine If you temporarily coil a power cable you must also derate the cable to meet local code or follow a authoritative directive such as Enginee...

Page 12: ... surrounds the signal wires dissipates an induced voltage and reduces the effects of EMI ATTENTION If any shield on a power cable is not grounded high voltage can be present on that shield Make sure there is a connection to ground for all shield wires inside a power cable and for the overall power cable shield Failure to observe safety precautions could result in personal injury or damage to equip...

Page 13: ...ach of the four mounting holes in the motor faceplate The mounting hole diameter is specified in the Product Dimensions table 5 Align the motor on the machine using the mounting pilot hole to verify the correct alignment 6 Tighten the fasteners within the recommended torque range 7 Rotate the shaft for electrical phasing and encoder alignment The index pulse occurs on a single turn encoder when th...

Page 14: ...e to motor connection and creates a more secure connection for a cable with a threaded plug O rings interior to the cable plug provide complete environmental sealing for a cable with a quick lock plug or a cable with a threaded plug ATTENTION Make sure that cables are installed and restrained to prevent uneven tension or flexing at the motor to cable connections Excessive and uneven lateral force ...

Page 15: ... not go together with light hand force realign the flat surfaces and try again IMPORTANT The motor orientation shown is used to clearly show the alignment marker on each cable socket The recommended motor orientation when installed positions the connectors at the bottom of the motor TIP A threaded plug leaves a small opening approximately 1 4 mm 0 04 0 16 in between the connector and the plug when...

Page 16: ...or M40 or M58 Power with Brake Connector Pin MPL B6xx MPL B8xx and MPL B9xx Pin MPL B6xx MPL B8xx and MPL B9xx 1 Sin U Phase U 2 Sin V Phase V 3 Cos W Phase W 4 Cos Ground 5 Data BR 6 Data BR 7 Reserved 1 Reserved 8 2 9 10 11 9V DC 12 Common 13 TS 14 TS 15 Reserved 16 17 V U W 1 2 Intercontec P N CEDE271NN00000051000 M40 DEWC61MT03000001000 M58 1 2 3 4 5 6 7 8 9 10 11 12 13 14 17 15 16 Intercontec...

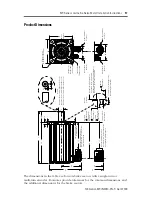
Page 17: ... 551 x 0 354 x 3 11 in M40 Power Brake Connector on MPL B6xx xx7xAA MPL B8xx xx7xAA and MPL B9xx xx7xAA MPL B6xx Flush 0 84 0 033 in with 3 86 mm 0 152 in Pilot Surface MPL B8xx and MPL B9xx Flush 0 84 0 033 in with 3 73 mm 0 147 in Mounting Surface 3 73 mm 0 147 in Mounting Surface MPL B8xx and MPL B9xx Only 3 86 mm 0 152 in MPL B6xx Only 3 86 0 152 Tooling Cut for MPL B6xx Only MPL B6xx 39 90 05...

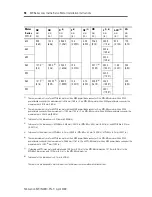
Page 18: ...303 8 11 96 80 0 3 150 17 8 0 70 660 354 6 13 96 680 405 4 15 96 860 127 0 1 5 0 1 These measurements are for a MPL Bxxx motor with an M58 power brake connector On a MPL B8xx motor with an M40 power brake connector the measurement is 93 6 mm 3 68 in On a MPL B9xx motor with an M40 power brake connector the measurement is 93 8 mm 3 69 in 189 5 2 7 46 2 These measurements are for a MPL Bxxx motor wi...

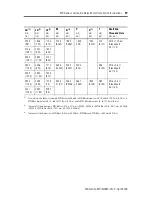
Page 19: ...0 016 0 013 mm 0 0005 0 0006 in P mm in S 3 mm in 3 Tolerance for the dimension is MPL B6xx 0 43 mm 0 008 in MPL B8xx and MPL B9xx 0 52 mm 0 010 in T mm in Shaft End Threaded Hole mm in 223 8 8 81 183 6 7 23 112 5 3 15 215 0 8 465 180 0 7 0867 184 9 7 28 14 50 0 579 3 73 0 147 M12 x 1 75 6H thread depth 28 1 10 274 6 10 81 234 4 9 23 163 3 6 43 325 4 12 81 285 2 11 23 214 1 8 43 284 4 17 45 242 6 ...

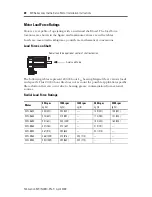
Page 20: ...ife at various loads and speeds This 20 000 hour life does not account for possible application specific life reduction that can occur due to bearing grease contamination from external sources Radial Load Force Ratings Motor 500 rpm kg lb 1000 rpm kg lb 1500 rpm kg lb 2000 rpm kg lb 3000 rpm kg lb MPL B640 253 557 200 442 159 351 139 307 MPL B660 275 607 219 482 173 382 151 334 MPL B680 291 641 23...

Page 21: ... 217 72 159 54 118 45 99 MPL B680 104 230 77 169 57 125 47 104 MPL B860 145 320 107 237 79 175 MPL B880 153 338 113 250 84 185 MPL B960 142 314 105 232 88 194 MPL B980 153 338 113 249 94 207 Motor 500 rpm kg lb 1000 rpm kg lb 1500 rpm kg lb 2000 rpm kg lb 3000 rpm kg lb MPL B640 136 300 99 219 74 163 62 137 MPL B660 136 300 99 219 74 163 62 137 MPL B680 136 300 99 219 74 163 62 137 MPL B860 201 44...

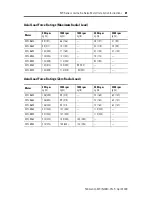
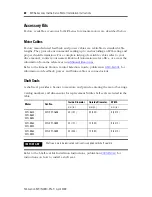
Page 22: ...urces Refer to the Kinetix Motion Control Selection Guide publication GMC SG001 for information on feedback power and brake cables or connector kits Shaft Seals A shaft seal provides a barrier to moisture and particle entering the motor bearings Catalog numbers and dimensions for replacement Nitrile shaft seals are listed in the table Refer to the Shaft seal Kit Installation Instructions publicati...

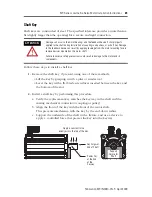
Page 23: ...g mechanical connection coupling or pulley b Align the front of the key with the front of the motor shaft This prevents interference with the key by the end of cut radius c Support the underside of the shaft with a fixture and use a device to apply a controlled force that presses the key into the keyway ATTENTION Damage can occur to the motor bearings and the feedback device if sharp impacts appli...

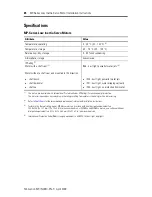
Page 24: ...dity storage 5 95 noncondensing Atmosphere storage noncorrosive IP Rating 1 Motor with a shaft seal 2 Motor without a shaft seal and mounted in this direction shaft down shaft horizontal shaft up 1 The motors are dual rated with International Protection Codes IP Ratings for environmental protection The motor rating excludes any reduction in the rating resulting from cables or their plugs with a lo...

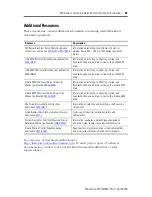
Page 25: ... installing configuring startup and troubleshooting a servo drive system with an Ultra3000 drive Kinetix 2000 Multi axis Servo Drive User Manual publication 2093 UM001 Information on installing configuring startup and troubleshooting a servo drive system with a Kinetix 2000 drive Kinetix 6000 Multi axis Servo Drives User Manual publication 2094 UM001 Information on installing configuring startup a...

Page 26: ...26 MP Series Low Inertia Servo Motor Installation Instructions Publication MP IN002C EN P April 2009 Notes ...

Page 27: ...MP Series Low Inertia Servo Motor Installation Instructions 27 Publication MP IN002C EN P April 2009 Notes ...

Page 28: ...s of installation please review the information that s contained in this manual You can also contact a special Customer Support number for initial help in getting your product up and running New Product Satisfaction Return Rockwell Automation tests all of its products to ensure that they are fully operational when shipped from the manufacturing facility However if your product is not functioning a...

Reviews: