54
Rockwell Automation Publication 750-IN118A-EN-P - May 2021
Chapter 3 Mechanical and Electrical Installation
Remove Lifting Hardware
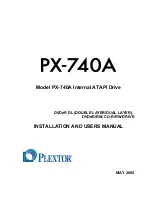
1. Once all bays are properly positioned and leveled, remove structural
angles from the bays. Structural angles are on all shipping sections that
include multiple bays and are also on some bays that are shipped as a
single bay.
Figure 50 - Removing Structural Angles from a Shipping Section
2. Remove eyebolts. Eyebolts are on some bays that are shipped as a single
bay.
Place the IP54, UL Type 12
Roof Assemblies
If your product has IP21, UL Type 1 bays, the roof assemblies are installed at the
factory. If your product has IP54, UL Type 12 bays, you must place each roof
exhaust vent assembly that came with a configured bay using one of the
following procedures.
Roof Panel with Roof Vents Assembly
1. Remove the shipping roof panel from the bay.
2. Lower the IP54, UL Type 12 roof assembly onto the bay. Do not secure the
roof assembly to the bay during this step. Wait until after installing the
bay joining hardware.
Figure 51 - Replacing the Shipping Roof Panel with an IP54, UL Type 12 Roof Assembly
M12
19 mm
38 N•m (336 lb•in)
IMPORTANT
Use care not to damage the factory-installed gasket material on the
roof assembly.
When lifting and handling these components, follow all applicable local,
national, and international codes, standards, regulations, or industry
guidelines for safe practices.