background image

5

Jig and Workpiece Setup

Recommended maximum material thickness (for through routing) 

is 1/2". 

1.  Attach your compact plunge router to the Jig Arm (1) with the 

  included 10mm Pan-Head Machine Screws (8) and install 

  the desired bit. 

 Note: We recommend using a 1/4" diameter spiral up-cut 

  bit (82652, sold separately).

2.  Set up your workpiece on a solid, stable surface.
3.  If making through cuts, elevate your workpiece to prevent 

  damage to the surface underneath. Secure the workpiece 

  to a sacrificial board, or use spacers to hold and support the 

  workpiece, including any sections that will be cut free. Make 

  sure that all parts of the workpiece will remain stationary 

  during cuts to avoid potentially dangerous and damaging 

  shifts, and position any spacers out of the path of the cutter.


Routing an Ellipse

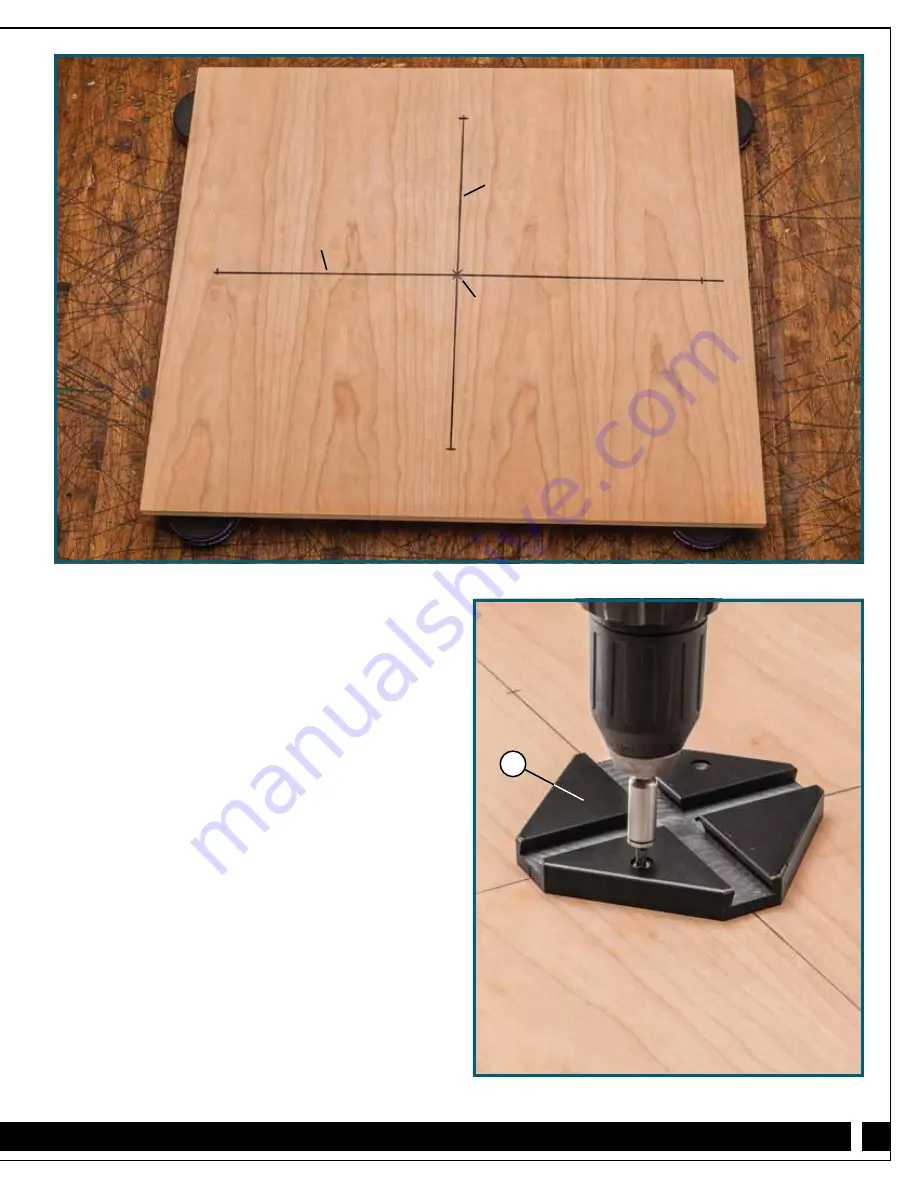
1.  Mark a center point on your workpiece. Lay out the 

  major (long) and minor (short) axes of your ellipse so that 

  they’re perpendicular and intersect at the center point. The 

  major axis can be a maximum of 24" long and a minimum 

  of 11". The minor axis can be a maximum of 19" long and a 

  minimum of 6". (The maximum difference in length between 

  the major and minor axes is 5".)


Fig. 1.

2.  Use the scribe lines machined into the Jig Base to center it on 

  the intersection of the major and minor axes. Secure the Jig 

  Base (2) to the workpiece with the included #6 Wood 

  Screws (7). 

Fig. 2.

Fig. 1

Major Axis

Minor Axis

Center point

2

Fig. 2

Summary of Contents for Ellipse/Circle Jig

Page 1: ...he Compact Router Ellipse Circle Jig allows you to use your compact plunge router to easily cut precise ellipses and circles for picture frames mirrors signs and more For safe and effective operation...

Page 2: ...by medications alcohol drugs or fatigue Dress appropriately and remove all jewelry secure loose clothing and tie up long hair before using this tool It is the sole responsibility of the purchaser of t...

Page 3: ...rm 1 2 Jig Base 1 3 Dovetail Key 2 4 5 16 18 x 1 Knobs 2 5 5 16 Washers 2 6 5 16 18 x 1 T Bolts 2 7 6 Wood Screws 4 8 10mm Machine Pan Head Screws 4 PARTS LIST COMPACT ROUTER ELLIPSE CIRCLE JIG 4 5 6...

Page 4: ...4 ROUTER MOUNTING HOLE KEY Porter Cable 450PK DeWalt DWP611PK Bosch Colt PR20EVS Kits 2 696 2 992 3 125 2 696 2 992 2 6 3 125 2 6...

Page 5: ...t all parts of the workpiece will remain stationary during cuts to avoid potentially dangerous and damaging shifts and position any spacers out of the path of the cutter Routing an Ellipse 1 Mark a ce...

Page 6: ...adjust it in or out until the bit is positioned as desired to make the cut Tighten the Locking Pivot on Dovetail Key B Fig 5 Note The maximum distance between Locking Pivots A and B is 21 2 7 With th...

Page 7: ...and secure with two of the included 6 Wood Screws 7 Fig 6 5 Loosen the Locking Pivot on the Jig Arm 1 and position it so it mounts on the pin in the Dovetailed Key 3 6 Adjust the Jig Arm 1 in or out u...

Page 8: ...Distributed by Rockler Companies Inc 2016 Rockler Woodworking and Hardware 55819 Rev 09 16...

Reviews: