16
10.Water leakage check
(1) Turn the Open/Close handle of the water shutoff
valve to the fully open position and turn on the flow
of water to the shower toilet.
(2) Check to make sure there is no water leakage.
1) Operate the remote control unit, flushing the toilet
several times.
2) Check each of the connections for water leakage.
At the same time, check if there is anything
abnormal about the operation of the flush lever,
etc.
CAUTION:
Repeat the test to check on water leakage from the
water supply and drain connections several times. If
water doesn't flow, the confirmation can be
troublesome.
(3) Check the toilet's flushing action.
Place 7 pieces of toilet paper, each about 760 mm
long, crumpled into balls, into the toilet bowl. Check
if all the balls can be flushed down the drain in one
flush.
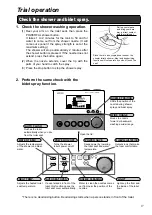
11.Trial operation
Before proceeding to the next step, be sure to perform
trial operation. Follow the procedure given under "Trial
operation" following "12. Installing the side panels".
12.Installing the side panels
(1) Insert the projections on each of the side panels in
the holes in the sides of the shower toilet body.
(2) Press the bottom of the side panel, lowering it to the
bottom of the toilet. It fastens securely in place.
Side Hole in Body
Insert
Projection
Side Panel
Projection
Side Panel
Side Hole
in Body
Side Panel
(1) Support.
(2)Lower to the
bottom.
Water
Shutoff
Valve
Open/Close
Handle
Open


