7
GB
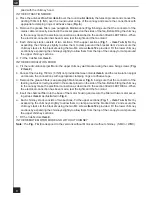
markings identifying the terminals in your plug, proceed as follows.
- The wire which is coloured green and yellow must be connected to the terminal in the plug which is
marked with the letter
E
or by the earth symbol or coloured green or green and yellow.
- The wire which is coloured blue must be connected to the terminal which is marked with the letter
N
or
coloured black.
- The wire which is coloured brown must be connected to the terminal which is marked with the letter
L
or
coloured red.
ATTENTION: Do not forget to use adequate plugs to the support brackets. Enquire after the
manufacturers. Do an embedding if necessary. The manufacturer accepts no responsibility in
case of a faulty hanging due to the drilling and the setting up of plugs.
GB
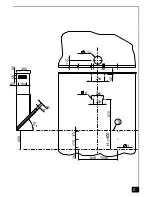
1) Draw a vertical line onto the wall from the centre of the cooking appliance up to the ceilling, using a
spirit level and a marker pen as illustrated in
Fig. 1 - item 1
. This is to ensure the correct alignment
of the chimney hood.
2) Place the brackets
item 2
on the wall about 1 or 2 mm from the ceiling or from the upper limit, aligning
its centre on the vertical line. Mark the two eyelet holes of the bracket onto the wall. Drill the holes
for the fixing bracket using an 8 mm masonry bit. Fix the chimney bracket
item 2
using the 4.5 x 50
mm screws and rawl plugs supplied.
3) Mark a point on the vertical line at a distance from the cooking appliances of:
d =
1070 mm
(Measurement without splashback).
d = height of the splashback (
400 mm
) +
670 mm
(Measurement with splashback).
The distance H is the minimum height in mm from the cooking appliances to the bottom edge item 3 of
the front panel of the hood. Draw a horizontal line through the vertical as illustrated in
Fig. 1.
Splashback (optional): When a splashback is to be fitted, the distance between the hood and the cook
-
ing appliances will be determined by the height of the splashback
item B
and whether or not there
is a raised back on the worktop. The splashback is to be installed before installing the canopy. If
the splashback is to be fixed to the wall using both the top and bottom fixing holes, Care must be
taken to ensure that the splashback is fitted at the correct height before fixing the base units or at
least the worktop covering them. As this is a complex operation, it should only be undertaken by
the technician installing the kitchen units or by a competent person who knows the final dimensions
of the units.
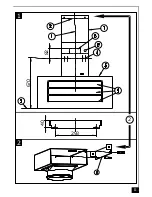
Mark the hole centres for the canopy fixing brackets
item 4
at
item B
mm as illustrated in
Fig. 3
.
Drill the 4 holes for the fixing brackets using an 8 mm masonry bit. Fix the wall brackets
item 4
using
the 4.5 x 45 mm screws and rawl plugs supplied.
4) Hook the canopy
item 5
onto the wall brackets
item 4
as illustrated in
Fig. 3
. To ensure the cooker
hood is aligned correctly adjust the screws on the top of the canopy as illustrated in
Fig. 3
. When the
hood is aligned correctly mark the hole centre on the wall for the security fixing screw
item8
, which
is located in the right hand bracket on the top of the canopy. Unhook the canopy from the wall and
drill the hole for the security fixing screw. Hook the canopy onto the wall and fix the No 4,5 x 50mm
headed screw and rawl plug to secure the canopy to the wall.
5) Ducting:
The hood is more effective when used in the extraction mode (ducted to the outside). When the cooker
hood is ducted to the outside, charcoal filters are not required.The ducting used must be 150 mm (6
INS), rigid circular pipe and must be manufactured from fire retardant material, produced to BS.476
or DIN 4102-B1. Wherever possible use rigid circular pipe which has a smooth interior, rather than
the expanding concertina type ducting.
Maximum length of ducting run:
- 4 metres with 1 x 90° bend.
- 3 metres with 2 x 90° bends.
- 2 metres with 3 x 90° bends.
The above assumes our 150 mm (6 INS) ducting is being installed. Please note ducting components
and ducting kits are optional accessories and have to be ordered, they are not automatically sup
-
Summary of Contents for Lido 2 Murale
Page 14: ......
Page 18: ...8 175 8 175 8 8 9 898 1098 409 12 27 8 4 848 1048 405 A A...
Page 19: ...B...
Page 20: ...45 Composants Components Bauelemente Componenti Componentes Onderdelen 2 R 8 4 6 5 7 9...
Page 21: ...285 40 164 50 56 4 0 4 5 6 400 170 113 6 260 40 293 35 175 175 3 848 1048 670 200 3 H 400...
Page 22: ...359 285 40 164 50 56 4 0 122 6 4 5 473 752 mini maxi 1484 1205 898 1098 438 475 723 150 400 35...
Page 23: ...2 2 1 82 670 293 40...
Page 24: ...3 4 10 10 30 1070 260 4 A...
Page 25: ...A11 5 6 6 R 7a 7b...
Page 27: ...400 6 301 5 35 175 175 3 8 4 8 8 4 1 1 397 251 5 340 97 184 DESSOUS HOTTE PLAN TRAVAIL 41 5...
Page 28: ...4 VIZIO 3 900 SMC 475 4 5 6 473 898 470 285 175 88 42 359 4 0 438 400...
Page 29: ...VIZIO 3 1100 SMC 473 1098 438 475 175 359 6 4 5 285 42 88 470 4 0 400...
Page 30: ...7 397 400 301 5 251 5...
Page 31: ...8 4 10 10 301 5 25 5 1 4...
Page 34: ...A20 Beleuchtung Lighting Eclairage Luci Luz Verlichting LEDS 2 x 7 W Fig 9 Fig 10 1 2 1 1 2 2...
Page 35: ...A21 LEDS 2 x 7 W...


