5
WIRING
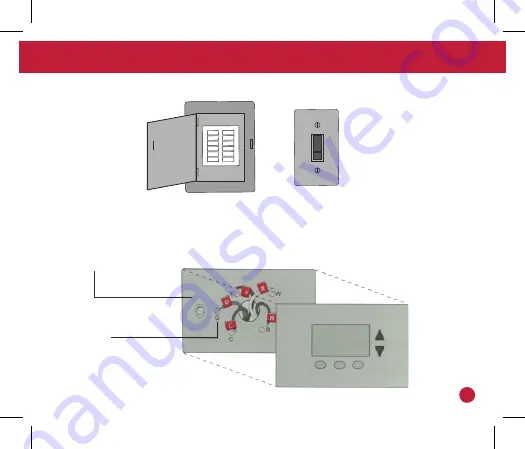
1 Turn Off Power to Heating/Cooling System
2 Remove Old Thermostat
or
Heating/cooling system
power switch
Circuit breaker box
Remove old thermostat but leave wallplate with wires attached.
Do not remove wallplate
Terminal
designation
Page 1: ...RS9110 Installation Manual...
Page 2: ......
Page 3: ...ems Floor or Wall Furnace Yes Cool Only Systems Yes Millivolt Yes Installation Tips 2 Thermostat Quick Reference 3 Subbase Installation 4 Wiring 5 12 Technician Setup Menu 13 17 Attach Faceplate Insta...
Page 4: ...to hot or cold air ducts That are in direct sunlight With an outside wall behind the thermostat In areas that do not require heating and or cooling Where there are dead spots or drafts in corners or...
Page 5: ...ected setpoint temperature Days of the week and time Indicates the current room temperature Programmable Time Periods This thermostat has 4 programmable time periods per day Button Options LCD Hold Is...
Page 6: ...ctions on recycling and proper disposal Caution Electrical Hazard Failure to disconnect the power before beginning to install this product can cause electrical shock or equipment damage SUBBASE INSTAL...
Page 7: ...ower to Heating Cooling System 2 Remove Old Thermostat or Heating cooling system power switch Circuit breaker box Remove old thermostat but leave wallplate with wires attached Do not remove wallplate...
Page 8: ...appropriate terminal designation as you remove it from the existing thermostat B B Y2 Y2 G R V VR X AUX G R V VR X AUX H RC W X1 H RC W X1 C C E E F F L L O O P P RH RH T T U U W1 W1 W2 W2 W3 W3 X2 X2...
Page 9: ...WIRING 7 5 Mount Wallplate for New Thermostat Mount the new wallplate using the included screws and anchors Drill 3 16 in holes for drywall Drill 3 16 in holes for plaster...
Page 10: ...els If labels do not match letters on the thermostat check Alternate Wiring Conventional Systems on page 9 and connect to terminal as shown see notes below SCREW INSERT WIRES AND TIGHTEN SCREWS Remove...
Page 11: ...etal jumper If C or X wire is available then you can connect with C terminal If there is no C or X wire then no need to connect with C terminal If you have a heat pump without auxiliary backup heat co...
Page 12: ...ten terminal block screws Wiring Terminal Designations W Heat relay G Fan relay Y Compressor relay O Heat pump reversing valve energized in cooling RC Transformer power for cooling RH Transformer powe...
Page 13: ...N RELAY HEAT RELAY COMPRESSOR RELAY Power supply Factory installed jumper Remove only when installing on 2 transformer systems Use either O or B terminals for reversing valve Use a small piece of wire...
Page 14: ...system Typical heat only system Typical heat only system with fan Typical cool only system FAN RELAY COOL REVERSING VALVE HEAT REVERSING VALVE COMPRESSOR RELAY HOT HEAT RELAY HOT FAN RELAY HEAT RELAY...
Page 15: ...cess the installer settings 3 Configure the installer options as desired using the table below Use the or keys to change settings and the NEXT STEP or PREV STEP key to move from one option to another...
Page 16: ...ng of 4 will force the compressor to run for at least 4 minutes every time the compressor turns on regardless of the room temperature You can adjust the filter change reminder from OFF to 2000 hours o...
Page 17: ...djustable A smaller differential setting will cause more frequent cycles and a larger differential setting will cause fewer cycles Selecting ON will not allow the compressor to be turned on for 5 minu...
Page 18: ...C for Celsius readout You can select either a 12 or 24 hour clock setting Select GAS for sytems that control the fan during a call for heat Select ELEC to have the thermostat control the fan during a...
Page 19: ...le Note If 7d is selected in set schedule you will program all seven days individually If 5d is selected in set schedule you will program Monday Friday together and Saturday and Sunday individually If...
Page 20: ...responding slots on the back of the thermostat then push gently until the thermostat snaps in place Battery Installation Battery installation is optional if thermostat is hardwired C terminal connecte...
Page 21: ...sure the correct a m or p m choice is selected 6 Press NEXT STEP 7 Minutes are now flashing Use the or or key to select current minutes 8 Press DONE when completed 19 Programming All programmable the...
Page 22: ...62 F 17 C 83 F 28 C Return 6 p m 70 F 21 C 75 F 24 C Sleep 10 p m 62 F 17 C 78 F 26 C Saturday Wake 8 a m 70 F 21 C 75 F 24 C Leave 10 a m 62 F 17 C 83 F 28 C Return 6 p m 70 F 21 C 75 F 24 C Sleep 11...
Page 23: ...s Time Setpoint Temperature Heat Setpoint Temperature Cool Weekday Wake Leave Return Sleep Saturday Wake Leave Return Sleep Sunday Wake Leave Return Sleep You can use the table below to plan your cust...
Page 24: ...time period 5 Press NEXT STEP 6 The setpoint temperature is flashing Use the or key to make your setpoint selection for the weekday wake period 7 Press NEXT STEP 8 Repeat steps 4 through 7 for weekda...
Page 25: ...ned Display accuracy 1 F Differential cycle rate or swing Heating is adjustable from 0 2 F to 2 0 F Cooling is adjustable from 0 2 F to 2 0 F Power source 18 to 30 VAC NEC Class II 50 60 Hz for hardwi...
Page 26: ......
Page 27: ......
Page 28: ...tomer Service 1 800 304 6563 Technical Service 1 800 445 8299 HVACCustomerService robertshaw com www robertshaw com 352 00301 001 6 Year Limited Warranty Use Phone to Scan for Warranty Info 352 00303...