
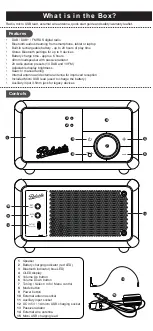

Radio, micro USB lead, external wire antenna, quick start guide and safety/warranty leaflet.
Features
Controls
continued overleaf...
STEP 1 - Charge & play DAB radio
What is in the Box?
• DAB / DAB+ / FM RDS digital radio
• Bluetooth audio streaming from smartphone, tablet or laptop
• Built-in rechargeable battery - up to 20 hours of play time
• Stores Bluetooth pairings for up to 8 devices
• Battery charge time - approx. 6 hours
• 40mm loudspeaker with passive radiator
• 20 radio station presets (10 DAB and 10 FM)
• Adjustable display brightness
• Search / manual tuning
• Internal antenna and external antenna for improved reception
• Included Micro USB lead (used to charge the battery)
• Auxiliary input 3.5mm jack for legacy devices
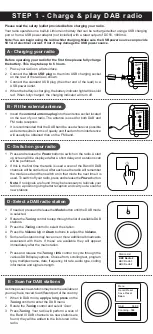
A - Charging your radio
C - Switch on your radio
Before operating your radio for the first time please fully charge
the battery. This may take up to 6 hours.
1 Place your radio on a flat surface.
2 Connect the
Micro USB plug
to the micro USB charging socket
on the rear of the radio as shown.
3 Connect the standard USB plug (the other end of the lead) to a
USB power outlet.
4 When the battery is charging, the battery indicator light will be solid
red. When fully charged, the charging indicator will turn off.
1
Speaker
2
Battery charging indicator (red LED)
3
Bluetooth indicator (blue LED)
4
OLED display
5
Volume Up button
6
Volume Down button
7
Tuning / Select / Info / Menu control
8
Mode button
9
Power button
10
External antenna socket
11
Auxiliary input socket
12
DC in 5V / 1A micro USB charging socket
13
Passive radiator
14
External wire antenna
15
Micro USB charging lead
2
3
5
6
7
8
9
4
1
1 Insert the
external antenna plug
into the antenna socket located
on the rear of your radio. The antenna is used for both DAB and
FM radio reception.
• It is recommended that the DAB band be used wherever possible
as better results in terms of quality and freedom from interference
will usually be obtained than on the FM band.
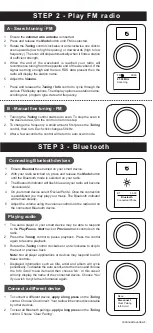
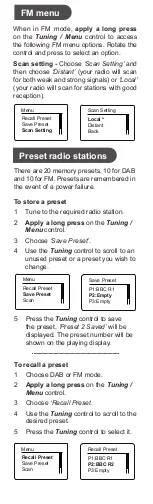
A - Search tuning - FM
B - Manual fine tuning - FM
Connecting Bluetooth devices
Playing audio
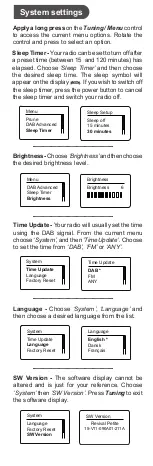
Connect a different device
1 Ensure the
external wire antenna
is inserted.
2 Press and release the
Mode
button until FM is selected.
3 Rotate the
Tuning
control clockwise or anti-clockwise one click to
scan upwards (low to high frequency) or downwards (high to low
frequency). The scan will stop automatically when it finds a station
of sufficient strength.
4 When the end of the waveband is reached your radio will
recommence tuning from the opposite end of the waveband. If the
signal is strong enough and there is RDS data present then the
radio will display the station name.
5 Adjust the
Volume
.
• Press and release the
Tuning / Info
control to cycle through the
various FM display options. The display options are station name,
scrolling text, program type, date and frequency.
1 Turning the
Tuning
control starts auto scan. To stop the scan in
the desired area, turn the control one more step.
2 To change the frequency a small amount, first press the
Tuning
control, then turn. Each click changes 50 kHz.
3 After a few seconds the control will return to auto scan mode.
STEP 2 - Play FM radio
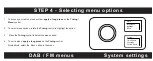
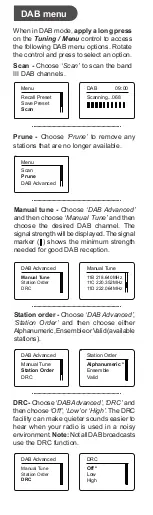
E - Scan for DAB stations
As time passes new stations may become available or
you may have moved to a different part of the country
.
1 When in DAB mode,
apply a long press
on the
Tuning
control to enter the DAB menu.
2 Rotate the
Tuning
control and select
‘Scan’.
3 Press
Tuning
. Your radio will perform a scan of
the Band III DAB channels. As new stations are
found, they will be added to the list stored in the
radio.
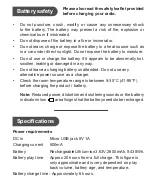
Please read the safety leaflet provided before charging your radio.
Your radio operates on a built-in Lithium-ion battery that can be recharged either using a USB charging
port or from a USB power adaptor (not included) with a rated output of DC5V, 1000mA.
Note: You can begin using the radio whilst charging. Make sure the USB power source can provide
5V 1A of electrical current. If not, it may damage the USB power source.
1 Ensure
Bluetooth
is enabled on your smart device.
2 With your radio switched on, press and release the
Mode
button
until the Bluetooth mode is selected on your radio.
3 The Bluetooth indicator will flash blue and your radio will become
‘discoverable’
.
4 On your smart device select
‘Revival Petite’
. Once the connection
is established you may play your music. The Bluetooth indicator
will remain steady.
5 Adjust the volume using the volume controls on the radio and on
the connected Bluetooth device.
STEP 3 - Bluetooth
1 The audio player in your smart device may be able to respond
to the
Play/Pause
,
Next
track
or
Previous
track controls on the
radio.
2 Press the
Tuning
control to pause playback. Press the control
again to resume playback.
3 Rotate the
Tuning
control clockwise or anti-clockwise to skip to
the next or previous track.
Note:
Not all player applications or devices may respond to all of
these controls.
• Displayed information such as title, artist and album will cycle
periodically. To disable the auto scroll, enter the menu and choose
the
‘Info Scroll’
menu item and then choose
‘No’
. In this case it
will only display the name of the connected device. Choose
‘Yes’
if you wish to cycle the information again.
1 To connect a different device,
apply a long press
on the
Tuning
control. Choose
‘Disconnect’
. Your radio will become discoverable
by other devices.
2 To clear all Bluetooth pairings,
apply a long press
on the
Tuning
control. Choose
‘Clear Pairing’
.
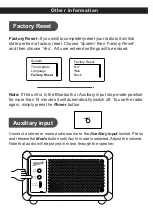
D - Select a DAB radio station
1 If needed, press and release the
Mode
button until the DAB mode
is selected.
2 Rotate the
Tuning
control to step through the list of available DAB
stations.
3 Press the
Tuning
control to select the station.
4 Press the
Volume Up
or
Down
buttons to adjust the
Volume
.
5 Some radio stations may have one or more additional broadcasts
associated with them. If these are available they will appear
immediately after the main station.
• Press and release the
Tuning / Info
control to cycle through the
various DAB display options. Choose from, scrolling text, program
type, multiplex name, date, frequency, bit rate, audio type, coding
information and signal strength.
Scanning...
FM
09:00
87.50 MHz
BBC Radio 2
BBC Radio 3
BBC Radio 4
Station List
Connected:iPhone
BT
09:00
Bluetooth
Disconnect
Clear Pairing
Info Scroll
Menu
Recall Preset
Save Preset
Scan
Menu
Scanning...068
DAB
09:00
10
11
12
13
14
15
B - Fit the external antenna
1 Press and release the
Power
button to switch on the radio. A start
up screen will be displayed after a short delay and a station scan
will be performed.
2 If this is the first time the radio is used a scan of the Band III DAB
channels will be carried out. After each use the radio will remember
the mode used and then switch on in that mode the next time it is
used. To switch off your radio, press and release the
Power
button.
•
Note:
If no signals are found it may be necessary to relocate your
radio to a position giving better reception and carry out a scan for
new stations.


