background image

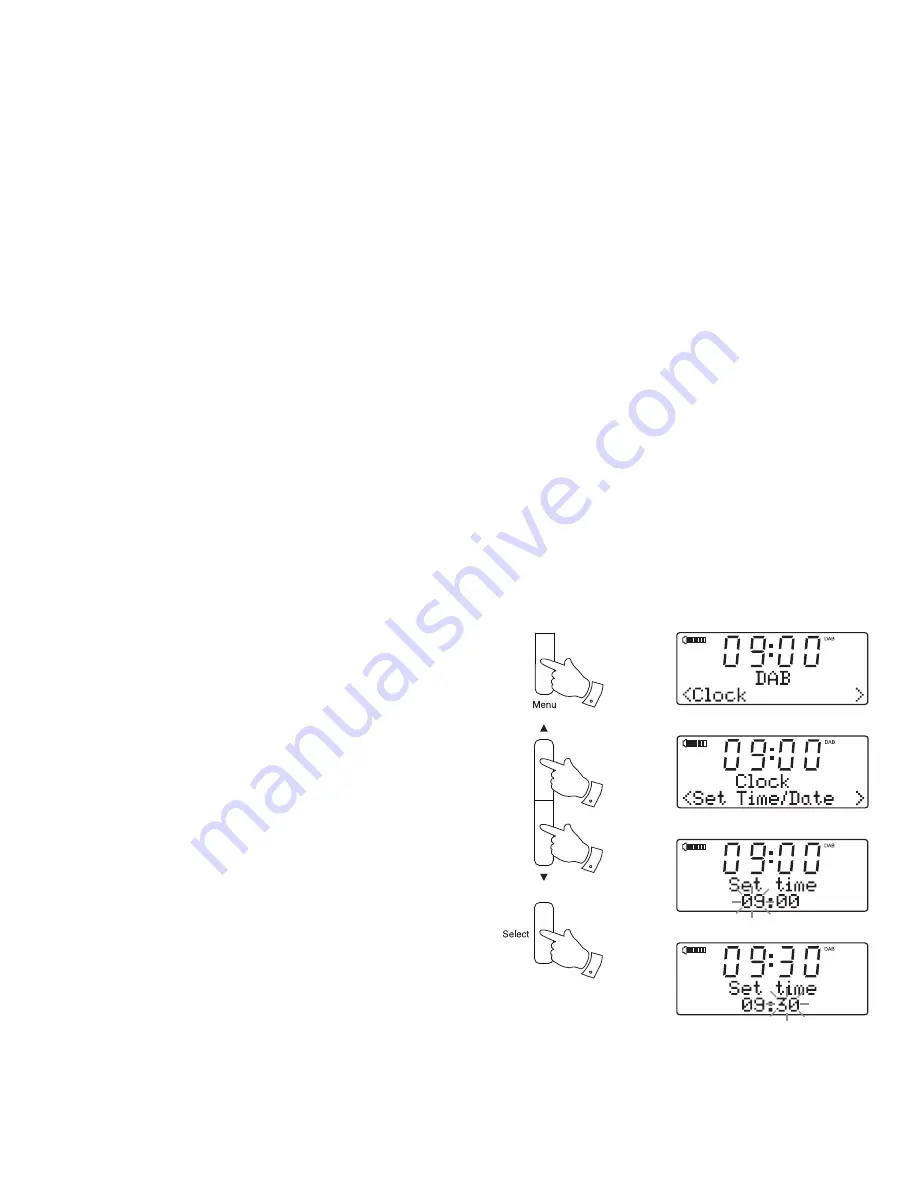
Setting the clock manually

Normally your radio will set its clock automatically using the DAB radio 
signal. If no DAB signal is available and you need to set the time manually, 
please follow the procedure shown below.

1. Press 

the 

On / Standby 

button to switch on the radio.

2.  To set the clock time, press the 

Menu 

button to enter the setup menu.

3. Press 

the 

Tuning Up

 or 

Down 

buttons until 

'Clock'

 appears on the 

display. Press and release the 

Select 

button.

4. Press 

the 

Tuning Up

 or 

Down 

buttons until 

'Set Time/Date'

 appears 

on the display. 

5.  Press and release the 

Select 

button

The hour digits will then 

fl

 ash 

on the display.

6. Press 

the 

Tuning Up

 or 

Down 

buttons to set the desired hour. 

7.  Press and release the 

Select 

button to enter the hour setting. The 

minute digits will then 

fl

 ash on the display. 

8. Press 

the 

Tuning Up

 or 

Down 

buttons to set the desired minute.

2

3-8

3-8

37

3-7

Summary of Contents for Fusion

Page 1: ...Please read this manual before use ROBERTS DAB FM RDS Stereo Digital Radio with dock for iPod and iPhone Enjoy Listening ...

Page 2: ... 21 Scan sensitivity setting FM 22 Presetting stations 23 24 iPod and iPhone docking 25 27 Navigating your iPod 27 Contents Playing a file on your iPod 27 28 Setting the alarm times 29 32 To view the alarm settings 33 Controlling alarm status in standby 33 Snooze function Sleep function 34 35 Setting the clock format 36 Setting the clock manually 37 38 Automatically updating the clock 39 Equalizer...

Page 3: ... Dimmer button 3 Volume Down button 4 On Standby button 5 Volume Up button 6 Preset button 7 Mode button DAB FM iPod or Aux in 8 Rewind button 9 Fast forward button 10 Tuning Up button 11 Select Snooze button 12 Tuning Down button 13 Menu button 14 Play Pause Mute button 15 iPod access button 4 1 2 3 5 6 7 8 9 10 11 12 13 14 15 ...

Page 4: ...3 16 iPod dock arm 17 iPod lock release button 18 Dock connector for iPod 19 LCD display 20 Speakers x 2 21 Infra red sensor Controls front 17 18 19 21 20 16 ...

Page 5: ...If you need any further advice please call our Technical Helpline on 1 5A 4 22 USB socket for software upgrades 23 Auxiliary input socket 24 DC in socket 25 Telescopic aerial Controls Rear 22 23 24 25 ...

Page 6: ...9 Play Pause button 10 Rewind button 11 Tuning Down button 12 Sleep button 13 Display dimmer button 14 Snooze button 15 Alarm button 16 Equalizer EQ button 17 Info button 18 Fast forward button 19 Preset button 20 Select button 21 Volume Up Down buttons 1 Controls remote control 2 3 4 5 6 7 8 9 10 11 15 14 13 12 16 17 18 19 20 21 ...

Page 7: ...ery CR2032 or equivalent ensuring that the positive side of the battery faces you with the holder positioned as shown 5 Replace the battery holder If the remote is not to be used for an extended period of time it is recommended that the battery is removed IMPORTANT The battery should not be exposed to excessive heat such as sunshine fire or the like After use disposable batteries should if possibl...

Page 8: ...nd hold the Menu button to access the menu system 3 Many operations require the user to make a selection from the menu This is done using the Tuning Up or Down buttons When the desired menu item shows on the display press the Select button to select that item 4 ToexitthemenusystempressandreleasetheMenubuttonasneeded Note For the sake of clarity the instructions for the use of the controls througho...

Page 9: ... display During this time the radio is scanning to find a DAB radio signal 4 If no signals are found Time is not set will be displayed It may be necessary to relocate your radio to a position giving better reception You should then carry out a scan to find stations as described on page 13 IMPORTANT The mains adaptor is used as the means of connecting the radio to the mains supply The mains socket ...

Page 10: ...t page 8 If the radio has been used before the last used station will be selected If new radio stations are found they will be added to the stored list of stations 4 When the scan is completed the first station in numeric alpha order 0 9 A Z will be selected The display will show the station name 5 If no signals are found then it may be necessary to relocate your radio to a position giving better ...

Page 11: ...elected 3 Press the Tuning Up or Down buttons to step through the list of available stations 4 When the desired station name appears on the display press and release the Select button to select the station The display will show Connecting while your radio finds the new station 5 Adjust the Volume to the required setting Note If after selecting a station the radio station will not connect it may be...

Page 12: ...s not available the radio will re tune to the associated primary service Display options DAB Your radio has a range of display options when in DAB mode 1 Press and release the Info button to cycle through the various options a Scrolling text Displays scrolling text messages such as artist track name phone in number etc b Signal strength Displaysagraphshowingthesignalstrength for the currently tune...

Page 13: ...B multiplex to which the current station belongs e Date Displays the current date f Frequency channel Displaysfrequencyandchannelnumber for the currently tuned DAB station g Bit rate Displays the digital audio bit rate for the currently tuned DAB station h Signal error Displays the bit error rate for the currently tuned DAB station d e f g h ...

Page 14: ... station counter on the right hand side of the display will increase and stations will be added to the list 1 3 2 2 Signal strength display DAB 1 Repeatedly press and release the Info button until the lower line of the display shows signal strength 2 Position your radio and try adjusting the aerial as to give maximum number of black rectangles on the signal strength display Normally the best recep...

Page 15: ...button 2 Press the Tuning Up or Down buttons until the display shows Manual tune Press and release the Select button to enter the manual tuning mode 3 Press the Tuning Up or Down buttons to select the desired DAB channel 4 Press and release the Select button to tune to the chosen frequency The open block is the signal strength needed for good DAB reception The signal blocks will go up and down sho...

Page 16: ...B band is selected 3 Press and release the Menu button 4 Press the Tuning Up or Down buttons until DRC appears on the display Then press and release the Select button The display will show the current DRC value and it will be marked with an asterisk 5 PresstheTuningUporDownbuttonstoselecttherequiredDRCsetting default is 0 6 Press and release the Select button to confirm the setting The display wil...

Page 17: ...s and release the Mode button until the DAB mode is selected 3 Press and release the Menu button 4 Press the Tuning Up or Down buttons until Station order shows on the display Press and release the Select button to enter the station order adjustment mode 5 Press the Tuning Up or Down buttons to choose between Alphanumeric and Ensemble Alphanumeric sorts the station list alpha numerically 0 9 A Z E...

Page 18: ...on until the DAB band is selected 3 Press and release the Menu button 4 Press the Tuning Up or Down buttons until Prune shows on the display Press and release the Select button 5 Tocausethestationslisttobepruned eliminatingunavailablestations press the Tuning Up or Down buttons until Yes is highlighted on the display 6 Press and release the Select button to cause the invalid station names to be re...

Page 19: ... will display the station name 6 To find other stations press and hold the Tuning Up button as before 7 Press and hold down the Tuning Down button for 2 3 seconds to cause your radio to search from high frequency to low frequency and to stop automatically when it finds a station of sufficient strength 8 When the end of the waveband is reached your radio will recommence tuning from the opposite end...

Page 20: ...ormation present then the display may change to show the station name 5 When the waveband end is reached the radio will recommence tuning from the opposite waveband end 6 Adjust the Volume to the required setting 7 To switch off your radio press the On Standby button Note If you find that FM reception is poor try repositioning the telescopic aerial Fully extend and position vertically for optimum ...

Page 21: ...efollowingareavailableonyourradio 1 Press and release the Info button to cycle through the various modes a Scrolling text Displays scrolling text messages such as artist track name phone in number etc b Programme type Displaystypeofstationbeinglistenedto e g Pop Classic News etc c Frequency Displays the frequency of the station being listened to d Date Displays the current date Note Your radio wil...

Page 22: ...e required FM radio station as previously described see pages 18 19 3 Press and release the Select button so that the display shows Mono The radio will play the current station in mono The Mono override is a temporary setting and is applied to the currently tuned station only It is cancelled automatically by tuning to another station 4 If you wish to cancel the Mono override while listening to the...

Page 23: ...ess and release the Menu button 4 Press the Tuning Up or Down buttons until Scan sensitivity shows on the display Press and release the Select button to enter the scan sensitivity adjustment mode 5 PresstheTuningUporDownbuttonstoswitchbetweenLocal Strong stations only and Distant All stations options on the lower line of the display The Distant option will allow the radio to find weaker signals wh...

Page 24: ...the Mode button to select the desired waveband DAB or FM 3 Tune to the required station as previously described 4 Press and hold the Preset button The display will show for example 1 Empty if no station has been stored to that preset 5 Use the Tuning Up or Down buttons to select the desired preset station number under which you wish to store the station 6 PressandreleasetheSelectbuttonuntilthedisp...

Page 25: ...easethePresetbutton Thedisplaywillshow forexample Empty 1 if no station has been stored to that preset If a preset has been stored then the display will show either the station name for DAB stations or the frequency for FM stations 4 Press the Tuning Up or Down buttons to select the desired preset station 5 Press and release the Select button Your radio will tune to the chosen preset station store...

Page 26: ...ct without the correct adapter fitted Throughout this section of this book iPod means iPod touch or iPhone Operating your iPod and iPhone dock 1 To raise the iPod dock arm push down the iPod access button on the front of the radio as illustrated The iPod dock arm will slowly raise and and click into place 2 To close the iPod dock arm press the iPod lock release button on the iPod dock as illustrat...

Page 27: ...no cushions 4th generation iPod touch Adaptor style 2 with cushions A 3rd generation iPod touch Adaptor style 2 with cushions B 2nd generation iPod touch Adaptor style 2 with cushions B 1st generation iPod touch Adaptor style 2 with cushions B To fit cushions to the adaptor style 2 if required 1 Slot the back of the rubber cushions marked with letter A or B as required into the holes at the back o...

Page 28: ...care that the plug goes into your iPod and not behind it 4 Press the On Standby button to switch on your radio 5 To select the iPod mode press the Mode button until iPod shows on the display If it was previously playing your iPod will switch on and continue playing from where it was previously stopped Note Your radio is able to recharge your iPod s internal battery When docked your iPod will use i...

Page 29: ...tton on the iPod is pressed This is a characteristic of the iPod software and does not indicate a fault with your radio Search function 1 While the iPod is playing press and hold the Fast forward or Rewind buttons to move through the current file or track Release the button when the desired point in the file or track is reached 2 Press and release either the Fast forward or Rewind buttons to start...

Page 30: ...e alarm 1 indicator will flash Press and release the Select button to enter alarm setup To set alarm 2 press and hold the Alarm button and then press and release the Alarm button Alarm 2 Setup will appear on the display and the alarm 2 indicator will flash Press and release the Select button to enter alarm 2 setup 2 Alarm Wizard shows on the display and the alarm status flashes on the display 3 Pr...

Page 31: ... minutes 10 Press and release the Select button to enter the alarm duration The alarm source option will flash on the display 11 Repeatedly press the Tuning Up or Down buttons to choose the desired alarm source DAB FM iPod Buzzer Press and release the Select button when the desired alarm source is highlighted on the display For which ever radio mode is selected the radio alarm may be set to any of...

Page 32: ...and release the Select button to enter the setting The alarm day will flash on the display 16 Press the Tuning Up or Down buttons to choose the alarm day 17 Press and release the Select button to enter the alarm day setting The alarm month will flash on the display 18 Press the Tuning Up or Down buttons to choose the alarm month 19 Press and release the Select button to enter the alarm month setti...

Page 33: ...od alarms are indicated in the display by the alarm symbol and the corresponding alarm number For DAB FM or iPod alarm you may adjust the volume while the alarm is active Without intervention the volume will gradually increase up to the level specified when setting the alarm When the alarm sounds The alarm will sound at the selected times for up to 90 minutes unless cancelled The volume and alarm ...

Page 34: ...to cycle through each of the settings for the chosen alarm You may use the Tuning Up and Down buttons to modify any particular setting if desired using the Select button to enter the modification Controlling the alarm On Off state in standby When your radio is in standby the alarm status can be controlled using the Alarm button This avoids risk of disturbance to someone who is asleep 1 To change t...

Page 35: ...unction press the On Standby button To set the snooze time 1 Press the On Standby button to switch on the radio 2 To set the snooze to the desired snooze time press the Menu button 3 Press the Tuning Up or Down buttons until Clock appears on the display Then press and release the Select button 4 Press the Tuning Up or Down buttons until Snooze time appears on the display Press and release the Sele...

Page 36: ...h will cancel the sleep function Alternatively you may use the Tuning Up or Down buttons to select the desired sleep time 3 Press and release the Select button The display will exit the sleep options The sleep symbol will show on the display 4 Your radio will switch off after the preset sleep time has elapsed 5 To cancel the sleep timer and switch off your radio before the chosen sleep time has el...

Page 37: ...he Tuning Up or Down buttons until Clock appears on the display Press and release the Select button 4 Press the Tuning Up or Down buttons until Set 12 24 hour appears on the display Press and release the Select button 5 Press the Tuning Up or Down buttons to display either Set 12 hour or Set 24 hour format 6 Press the Select button to confirm setting The display will return to the previous display...

Page 38: ...menu 3 Press the Tuning Up or Down buttons until Clock appears on the display Press and release the Select button 4 Press the Tuning Up or Down buttons until Set Time Date appears on the display 5 Press and release the Select button The hour digits will then flash on the display 6 Press the Tuning Up or Down buttons to set the desired hour 7 Press and release the Select button to enter the hour se...

Page 39: ... month will then flash on the display Press the Tuning Up or Down buttons to change the day as needed 11 Press the Select button to enter the day setting The month will then flash on the display 12 Press the Tuning Up or Down buttons to select the current month 13 Press the Select button to enter the month setting The year will then flash on the display 14 Press the Tuning Up or Down buttons to se...

Page 40: ...ect button 5 Press the Tuning Up or Down buttons to choose an update option from Update from Any Update from DAB Update from FM or No update as requested Press and release the Select button to confirm your choice 6 The radio will immediately set its time according to the information received The radio will return to the previous menu display If no signal is found Time is not set will be displayed ...

Page 41: ...ss levels to your own preferences which can be accessed from the My EQ menu item 1 Press the On Standby button to switch on the radio 2 Press the Equalizer button to enter the equalizer menu 3 Press the Tuning Up or Down buttons to cycle through and highlight the desired options Press and release the Select button to confirm your selection a My EQ b Normal no tone modification is applied c Classic...

Page 42: ...e desired level is displayed 5 Press and release the Select button to confirm your settings 6 To exit the Equalizer function at any time press the Menu button as needed Using your My EQ profile 7 To use the My EQ profile enter the equalizer menu and press the Tuning Up or Down buttons to select My EQ on the display and then press and release the Select button To quickly cancel the effect of the tr...

Page 43: ... EQ 3 Press and release the Select button to enter the equalizer adjustment option 4 Press the Tuning Up or Down buttons to cycle through and highlight the desired option Press and release the Select button to confirm your selection a My EQ b Normal no tone modification is applied c Classic d Jazz e Pop f Rock g News 5 To exit the Equalizer function at any time press the Menu button as needed 2 5 ...

Page 44: ...esired level is displayed 5 Press and release the Select button to confirm your settings 6 To exit the Equalizer function at any time press the Menu button as needed Using your My EQ profile 7 To use the My EQ profile enter the equalizer menu and press the Tuning Up or Down buttons to select My EQ on the display and then press and release the Select button To quickly cancel the effect of the trebl...

Page 45: ... buttons until Language appears on the display 3 Press and release the Select button to enter the language adjustment menu 4 Press the Tuning Up or Down buttons until your desired language appears on the display 5 Press and release the Select button to confirm your choice and return tothepreviousdisplay Thedisplaywillchangetothechosenlanguage The currently selected language will be marked with an ...

Page 46: ...tton on the remote control or on the radio will mute the output from the loudspeakers and in iPod mode will also pause playback 3 Press the Play Pause button to mute the sound output iPod will be paused if in iPod mode 4 Press the Play Pause button again to un mute the sound output iPod will resume playback if in iPod mode 1 2 45 Clock display 1 Whenyourradioisinstandbymodethetimeanddatewillbedisp...

Page 47: ...Press the Menu button to exit the menu Display backlight dimmer The brightness of the display can be adjusted for when the radio is in Standby and or whilst playing If you use the unit in the bedroom you may prefer a lower standby brightness level than the standard setting There are 3 brightness levels and an almost off night time setting 1 To change the dimmer brightness using the remote control ...

Page 48: ...y will revert to the previous display 5 Afullresetwillbeperformed Thestationlistandpresetswillbeerased Alarms will be cancelled and snooze and sleep timer settings will be set to their default values The display will show Welcome to Digital Radio After a short time the current date and time will appear on the display 6 See Operating your radio on page 9 for further details In case of malfunction d...

Page 49: ...n until Auxiliary input mode is selected on the display Note The Auxiliary input mode can only be selected when a plug is inserted into the socket 3 Adjust the Volume control on your iPod MP3 or CD player to ensure an adequate signal and then adjust the volume on the radio for comfortable listening 4 Remove the cable from theAuxiliary input socket or press and release the mode button to cancel the...

Page 50: ...oduct such that there is a minimum distance 10cm recommended to adjacent objects in order to ensure good ventilation The ventilation of the product should not be restricted by covering it or its ventilation openings with items such as newspapers tablecloths curtains etc No naked flame sources such as lighted candles should be placed on the product It is recommended to avoid using or storing the pr...

Page 51: ...e mean that an electronic accessory has been designed to connect specifically to iPod or iPhone respectively and has been certified by the developer to meet Apple performance standards Apple is not responsible for the operation of this device or its compliance with safety and regulatory standards Please note that the use of this accessory with iPod or iPhone may affect wireless performance ...

Page 52: ...this guarantee should be made through the dealer from whom the instrument was purchased It is likely that your Roberts dealer will be able to attend to any defect quickly and efficiently but should it be necessary the dealer will return the instrument to the Company s service department for attention In the event that it is not possible to return the instrument to the Roberts dealer from whom it w...

Reviews: