•
Short press / button of Group 2, send ON/OFF command to all associated devices of Association
Group 2.
•
Press and hold down / button of Group 2, send light intensity increase/decrease command to all
associated devices of Association Group 2.
•
Short press / button of Group 3, send ON/OFF command to all associated devices of Association
Group 3.
•
Press and hold down / button of Group 3, send light intensity increase/decrease command to all
associated devices of Association Group 3.
•
Short press/press and hold any button to send scene activation command to association group 1 using
Command Class “Central Scene Notification V3”.
How to communicate with the device
The remote control is under sleepy mode for most of the time to save battery power. It can not receive wireless
command under sleepy mode. Before the gateway interacts data with the remote, the remote control shall be
activated manually first. Short press any button to activate the remote control for 3s, and press and hold down
and buttons of Group 2 together over 1 second to activate the remote control for 7s.
Node Information Frame
The Node Information Frame is the business card of a Z-Wave device. It contains information about the device
type and the technical capabilities. The inclusion and exclusion of the device is confirmed by sending out a
Node Information Frame. Beside this it may be needed for certain network operations to send out a Node
Information Frame.
How to send out Node Information Frame:
Set the wall controller into inclusion/exclusion mode: Press and hold down both and buttons of Group 2
over 3 seconds, LED indicator turns on to indicate the wall controller has already sent out Node Information
Frame, the user can repeat the operation to set the wall controller to quit “inclusion/exclusion mode”.
Z-Wave Plus Info
Parameter
Z-Wave Plus Version
Role Type
Node Type
Installer Icon Type
User Icon Type
Value
1
Slave Portable
ZWAVEPLUS
0x0b00 (ICON_TYPE_GENERIC_REMOTE_CONTROL_SIMPLE)
0x0b00 (ICON_TYPE_GENERIC_REMOTE_CONTROL_SIMPLE)
Manufacturer Specific
Parameter
Manufacturer ID
Product Type ID
Product ID
Value (hex)
0x0330
0x0003
0xa306
Technical Data
Battery Type
Frequency
Wireless Range
SDK
Explorer Frame Support
Device Type
Generic Device Class
Specific Device Class
Routing
FLiRS
1*CR2450
868.42 MHz
up to 100 m outside, on average up to 20 m inside buildings
6.71.01
Yes
Wall Controller
Switch Remote
Switch Remote Multilevel
No
No
SUPPORTED COMMAND CLASS
•
COMMAND_CLASS_ZWAVEPLUS_INFO_V2
•
COMMAND_CLASS_ASSOCIATION_V2
•
COMMAND_CLASS_MULTI_CHANNEL_ASSOCIATION_V3
•
COMMAND_CLASS_CENTRAL_SCENE_V3
•
COMMAND_CLASS_ASSOCIATION_GRP_INFO_V1
•
COMMAND_CLASS_TRANSPORT_SERVICE_V2
•
COMMAND_CLASS_VERSION_V2
•
COMMAND_CLASS_MANUFACTURER_SPECIFIC_V2
•
COMMAND_CLASS_DEVICE_RESET_LOCALLY_V1
•
COMMAND_CLASS_FIRMWARE_UPDATE_MD_V4
•
COMMAND_CLASS_POWERLEVEL_V1
•
COMMAND_CLASS_BATTERY_V1
•
COMMAND_CLASS_SECURITY_V1
•
COMMAND_CLASS_SECURITY_2_V1
•
COMMAND_CLASS_WAKE_UP_V2
•
COMMAND_CLASS_SUPERVISION_V1
Controlled Command Classes
•
COMMAND_CLASS_CENTRAL_SCENE_V3
•
COMMAND_CLASS_BASIC_V2
•
COMMAND_CLASS_SWITCH_MULTILEVEL_V4
•
Multi Channel V3
•
Security_V1
•
Security_2_V1
①
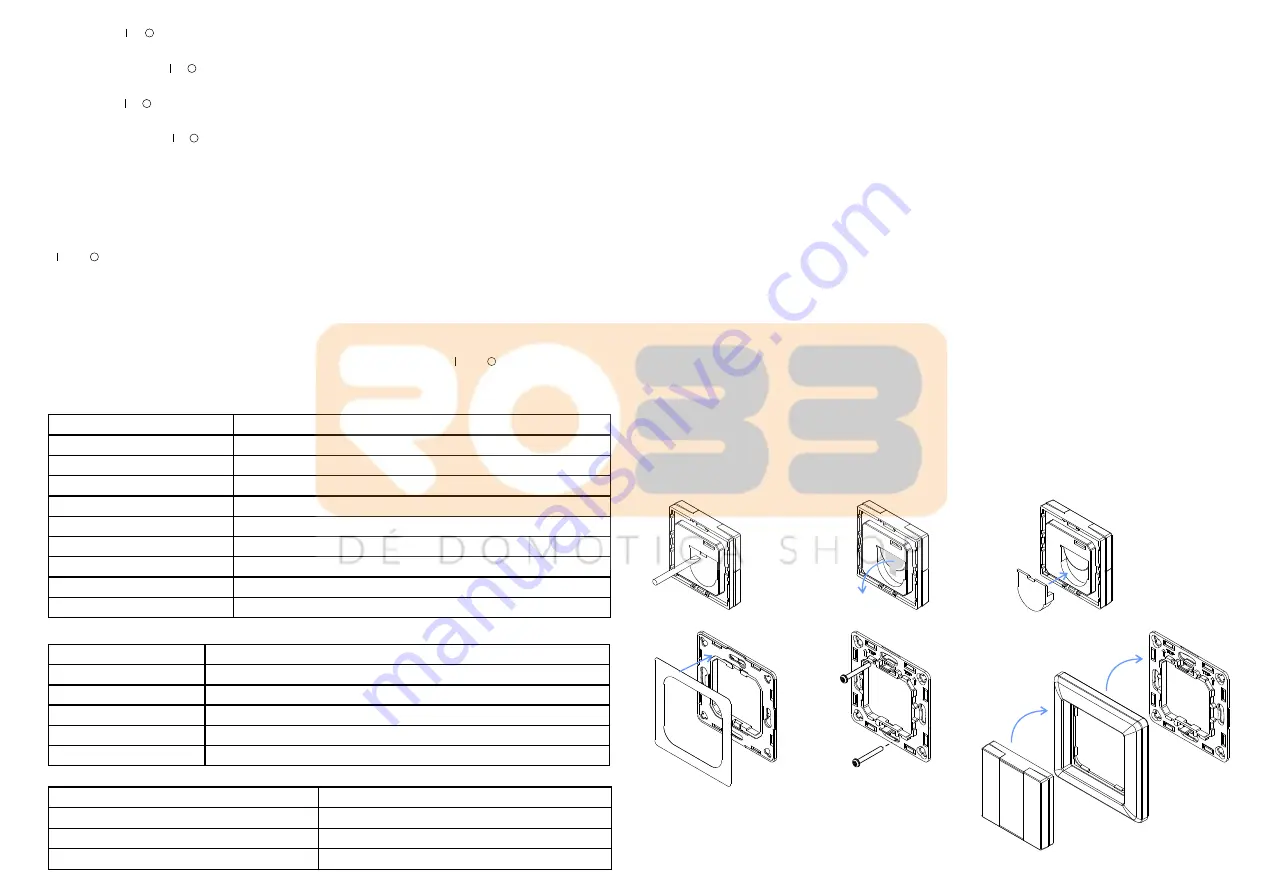
silicone gel battery cover
Use tool to open the
1.Remove battery insulator
2.Install the controller to wall(2 methods)
Method 1:
Stick 3M glue on the
back of the bracket and then stick
the bracket to the wall
Method 2:
Screw the bracket
to the wall
After the bracket is fixed,clip
the frame and control part to the
bracket
in sequence
②
Pull out the
battery insulator
③
Install the silicone
battery cover back
Installation


