M2A Transmitter Operator’s Manual
65
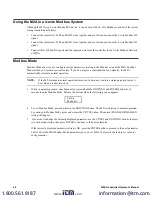
4. When you have scrolled through all the adjustable parameters,
SAVE IT? YES/NO
appears on the display.
5. If you do not wish to save the adjustments, press and release the DOWN/NO button. The
DO OVER? YES/
NO
message will display. Press and release the DOWN/NO button. The
ABORT? YES/NO
message will
display. Press the UP/YES button to return to normal operation.
If you wish to change some of the adjustments made, press and release the DOWN/NO button. The
DO
OVER? YES/NO
message will display. Press and release the UP/YES button. The
Re-do MB Setup
message will display and the M2A will return to the first adjustable parameter. Go back to step 3 and
continue.
If you want to save the adjustments made, press and release the UP/YES button.
Modbus Saved
is indicated
on the display for a few seconds and the M2A returns to normal operation.
NOTE:
All M2As on a Modbus network must be configured with the same baud rate and parity, and each
M2A must have a unique slave ID. For an M2A to participate on a network, the ENABLED/
DISABLED setting must be set to ENABLE.
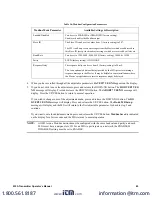
Table 16: Modbus Configuration Parameters
Modbus Mode Parameter
Available Settings & Description
Enabled/Disabled
Can be set to ENABLED or DISABLED (factory setting).
Enables or disables the Modbus output.
Slave ID
The Slave ID can be set to values from 1 (factory setting) to 247.
The M2A will only receive messages from the Master which are addressed to
this Slave ID (except for broadcast messages which are received by all slaves).
Baud Rate
Can be set to 1200, 2400, 4800, 9600 (factory setting), 14440, & 19200.
Parity
EVEN (factory setting), ODD, NONE
Response Delay
The response delay can be set from 0 (factory setting) to 20 mS.
This is an optional additional delay inserted by the M2A prior to returning a
response message to the Master. It may be helpful in some installations where
the Master’s preparedness to receive responses might be delayed.
www.
.com
1.800.561.8187

