background image

SPRacingF3EVO 


Page 9

Firmware Upgrade

IMPORTANT: 

It is 

REQUIRED

 that you immediately upgrade the firmware of the flight controller so that you have the latest fea-

tures and bug fixes.  

DO NOT ATTEMPT TO FLY

 until you have installed the 

latest CLEANFLIGHT firmware

.

On Windows USB DFU drivers must be installed.  See the Cleanflight manual for latest installation instructions.
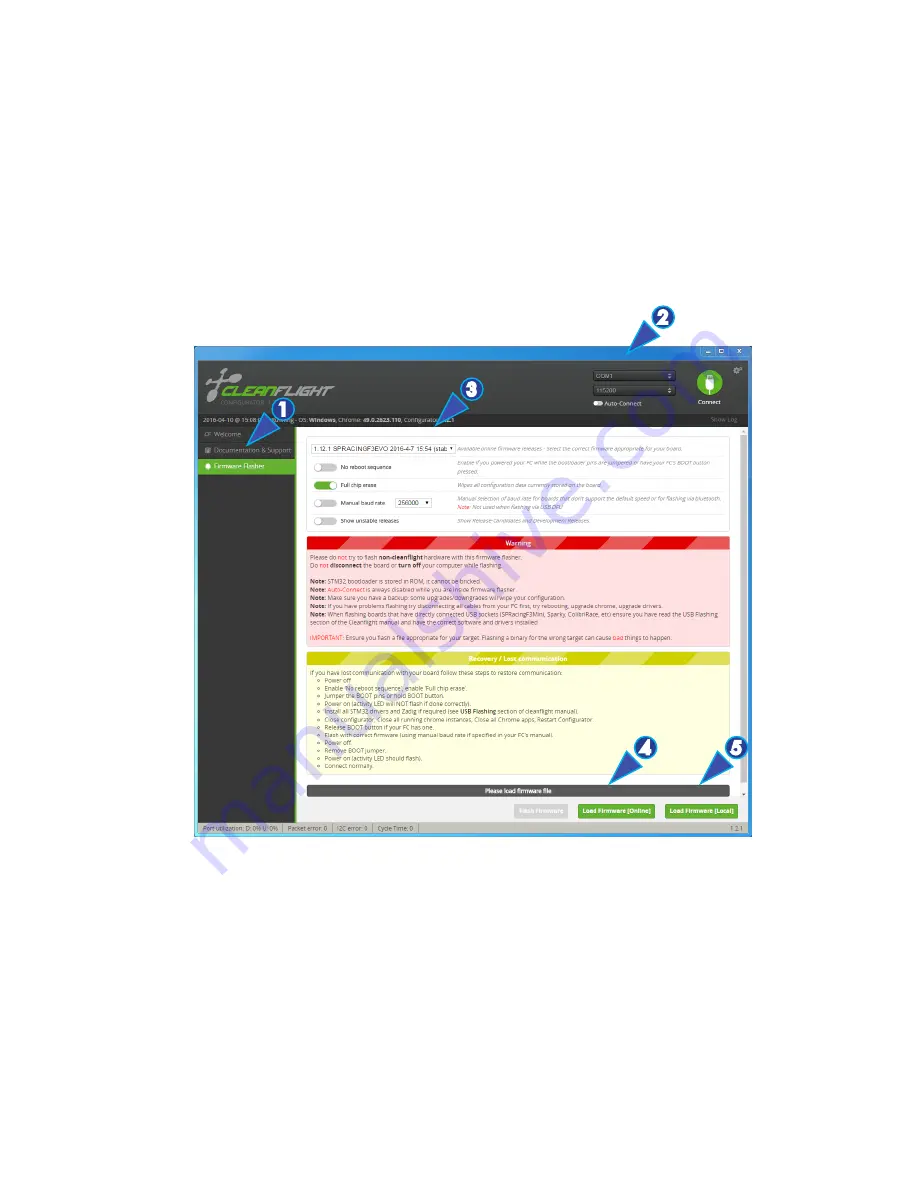
1.  Click the Firmware Flasher tab.
2.  Select the correct COM port and speed, use the default speed unless you have changed it on the FC.
3.  Select the latest “SPRACINGF3EVO” stable release. (Do not use “SPRACINGF3” or other targets). If no firm-

ware is currently available do NOT attempt to flash.  

NOTE: Flashing the wrong firmware can cause the FC 

to be permanently damaged.

4.  Click ‘Load firmware [Online]’ and wait for firmware to download and read release notes before flashing.
5.  Click ‘Flash Firmware’.  At this point the FC will reboot into DFU mode.  DFU will appear in the list of ports 

and flashing via DFU will proceed.  After flashing the virtual COM port will re-appear.

IMPORTANT: Verify operation using latest CLEANFLIGHT firmware before attempting to use al-

ternative firmware.  Not all features may be supported by alternative firmware.

Troubleshooting

Q: Unable to flash firmware via DFU.

A: Likely the correct DFU drivers are not installed.  Put the board in BOOTLOADER mode (jump boot pins, connect 

USB cable).  Then update DFU drivers.  See USB Flashing section of Cleanflight manual for details. 

Q: The COM port does not show up.

A: Ensure latest USB STM VCP (Virtual Com Port) drivers are installed.

Q: It beeps continually.

A: Verify your RX is receiving data and your battery voltage monitoring is configured correctly, verify that the 

board is aligned correctly and is not at an angle.

1

4

5

2

3

Summary of Contents for seriously pro

Page 1: ...3 EVO Flight Controller Seriously Pro Seriously Pro Racing F3 EVO Flight Controller Manual Version 1 Copyright 2016 Dominic Clifton Thank you for directly supporting the Cleanflight project with your...

Page 2: ...mable LEDs great for orientation racing and night flying Currently mutually exclusive with the Transponder Dedicated I2C port for connection of OLED display without needing flight battery Battery moni...

Page 3: ...r outputs unless specifically stated Do not connect any input or output to any other input or output unless specifically stated Do not allow dirt dust glue etc into the pressure sensor barometer Keep...

Page 4: ...side mount through hole JST ZH 3 pin socket for connecting to a Spektrum Satellite receiver UART3 PIN 1 faces towards the bottom of the board BATTERY 9 1 l V 2 n V BATTERY IMPORTANT DOUBLE CHECK and...

Page 5: ...the on board voltage regulators even when powering via USB I2C1 socket 2 1 l GND 2 5v 3 SCL 4 SDA I2C1 connector Used for external sensors and OLED displays The SCL and SDA are 3 3v signals 5 0v is al...

Page 6: ...ight some are right angled Choose very carefully which ones you want to use You can solder headers to top or the bottom of the board Once you have soldered pin headers in place DO NOT attempt to remov...

Page 7: ...com web en catalog tools PF257938 Install and launch the Cleanflight Configurator tool https chrome google com webstore detail cleanflight configurator enacoimjcgeinfnnnpajinjgmkahmfgb Connect flight...

Page 8: ...0 2000 and trim channels on transmitter Configure voltage monitoring Configure outputs servos ESCs Ensure ESC calibration matches ESC configuration recalibrate ESCs if needed Learn about flight modes...

Page 9: ...for firmware to download and read release notes before flashing 5 Click Flash Firmware At this point the FC will reboot into DFU mode DFU will appear in the list of ports and flashing via DFU will pr...

Page 10: ...are using is old or incorrect Transponder The SPRacingF3EVO features a IR LED transponder system For optimum performance ensure you read the follow ing section Mounting Ensure that the IR LED can shi...

Page 11: ...r supplied 1x 4pin top mounted JST SH socket for I2C 1x 4pin top mounted JST SH socket for UART2 PPM 1x 4pin bottom mounted JST SH socket for SWD debugging 1x 2pin though holes for BOOT jumper Credits...

Reviews: