Check for parts online at www.HuntRiversEdge.com or call 800-345-6007
9
Operator’s Manual
Landmark
™
600 Blind
21
56
19
49
20
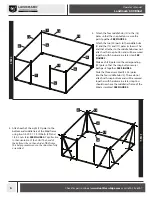
STEP 8
STEP 9
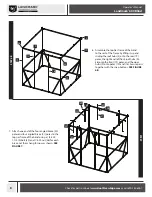
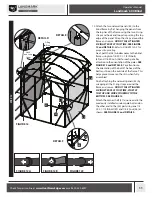
8. Attach each set of angled braces (20, 21) to
the four (19) poles using a 1/4-20 X 1-1/2 IN
bolt (49) and 1/4-20 nut (56) for each set. SEE
FIGURE 8.
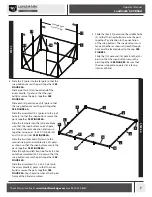
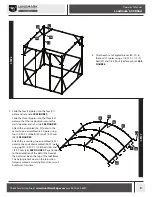
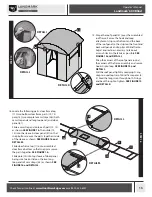
9. Slide the four (26) poles into the four (27)
poles and set aside. SEE FIGURE 9.
Slide the three (8) poles into the three (25)
poles so that the snap buttons secure the
parts together and set aside. SEE FIGURE 9.
Attach the assembled (26, 27) poles in the
center to one assembled (8, 25) pole using
four 1/4-20 X 2 IN bolts (50) and 1/4-20 nuts
(56). SEE FIGURE 9.
Attach the remaining two assembled (8, 25)
poles to the ends of assembled (26, 27) poles
using eight 1/4-20 X 1-1/4 IN bolts (48) and
1/4-20 nuts (56). SEE FIGURE 9. Pay attention
to the orientation of the bolts! The head of
the bolt must be on the top of the roof frame.
This helps prevent wear on the skin when
fully assembled.
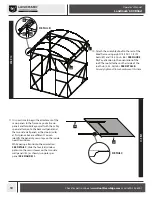
Securely tighten all loose roof
hardware at this time.
26
50
27
25
8 56
48
56
19
56
21
49
20
26
50
56
27
48
56
8
25


