Check for parts online at www.HuntRiversEdge.com or call 800-345-6007
14
Operator's Manual
Landmark
™
600 Blind
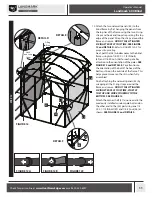
FIGURE 18
DETAIL O
DETAIL P
44
53
13
51
33
53
54
40 55
55 55
57
56
Hook
and Loop
Strap
Hook
and Loop
Strap
47
DETAIL N
14
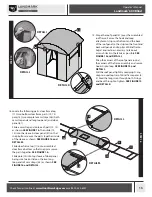
STEP 17
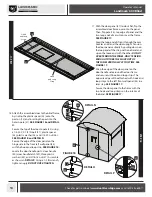
STEP 18
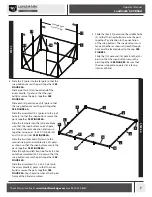
17. With the door panel (47) laid out flat, flip the
assembled door frame over onto the panel.
Then, flip pole (14), top edge of panel and the
two long ends of cam straps over the frame.
SEE FIGURE 17.
Feed the loop end of straps through the cam
buckles and stand the door upright. Tension
the door panel vertically by pulling down on
the loop end of the strap with one hand and
up on the loose end with the other. DO NOT
OVER TENSION THE PANEL. ONLY TENSION
ENOUGH TO TAKE THE SLACK OUT OF
THE PANEL VERTICALLY AT THIS TIME. SEE
FIGURE 17.
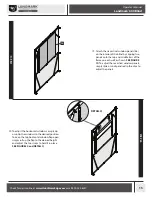
Wrap the edge of the door panel on the
door handle side around the door frame
and secure with hook and loop strips. The
opposite edge will be attached with hook and
loop strips to the left front wall panel (44) in a
later step. SEE FIGURE 17.
Secure the door panel to the frame with the
two hook and loop straps on the interior of
the blind. SEE FIGURE 17.
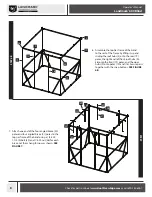
18. Attach the assembled door to the blind frame
by sliding the plastic spacer (53) onto the
post on (13) and inserting the post into the
hole in pole (31). SEE FIGURE 18 and DETAIL
O.
Secure the top of the door to pole (33) using
a 1/4-20 X 2-1/4 IN bolt (51), plastic spacer
(53), plastic washer (54), and 1/4-20 nut (56).
SEE FIGURE 18 and DETAIL N.
Secure the edge of the door panel on the
hinge side to the front left wall panel (44)
with the hook and loop strip. SEE FIGURE 18.
Locate the door handle parts: door handle
(40), door handle latch (39), three plastic
washers (55), and 5/16-18 nut (57). Assemble
as shown in DETAIL P. Using a 1/2 IN wrench,
tighten snugly. DO NOT OVER TIGHTEN.
14
47
44
13
53
51
33
53
54
56
55
40
55 55
39
57


