background image

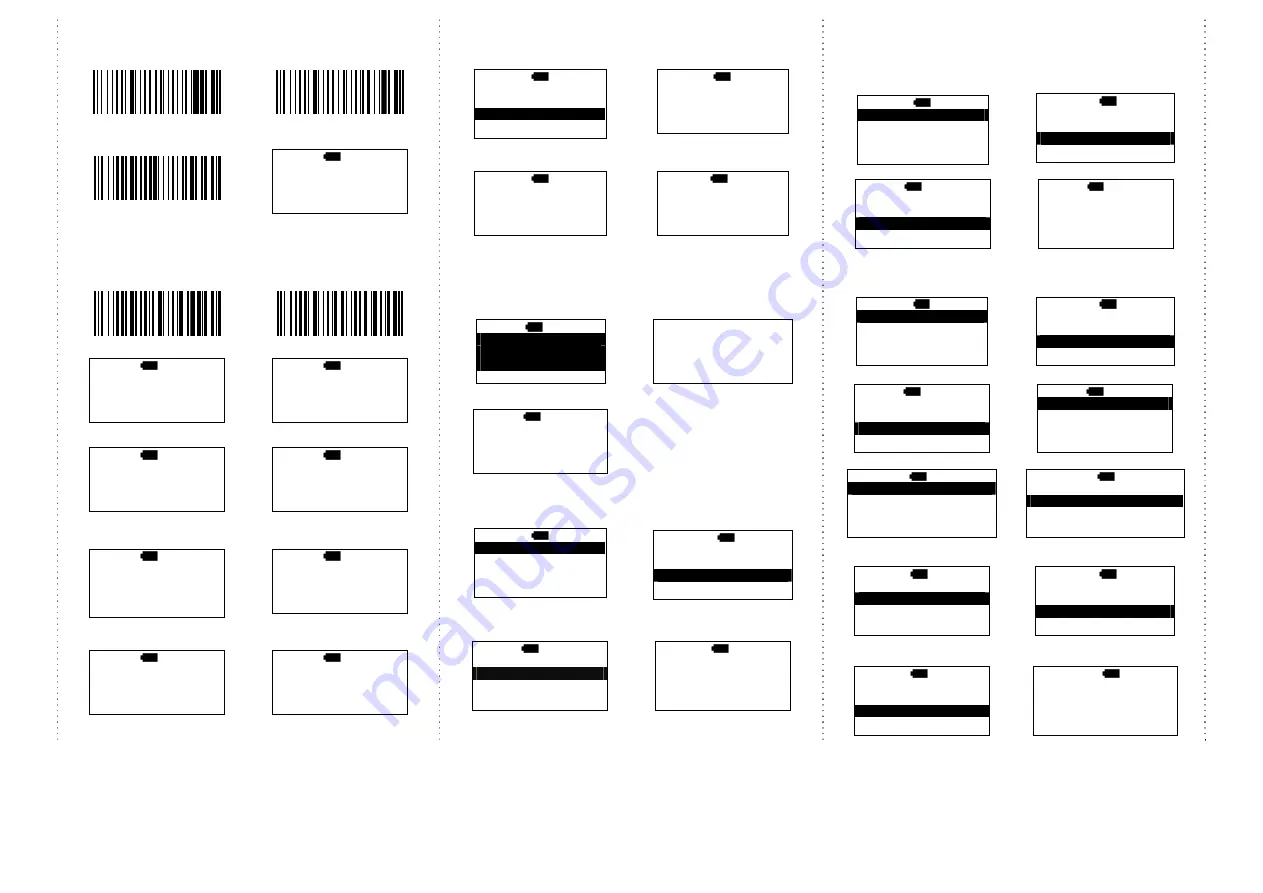
Enable “Quantity Entry” function, 

decide the order of the output data to your device first


1. Q’ty first, then, barcode

2. Barcode first, then, Q’ty


3. Enable “Quantity Entry” 

Setting code 

4. 

begin the scan the barcodes 


M> 

  H  12:52

Scan code: 


Q’ty:   

ESC 

SCAN 


When “Quantity Entry” is enabled, decide how to type-in 

the number.   


By button (default)

By scanning the number code

C1. enable

D1. enable


C2. 

scan the barcode

D2. 

scan the barcodes


M> 

  H  12:52

1234567 


Q’ty:    1 

ESC 

SCAN 

ENTER


M> 

  H  12:52

7654321 


Q’ty:    1 

ESC 

SCAN 

ENTER

C3. 

Press the


ENTER to type the q’ty

D3. 

Press the


ENTER to type the q’ty

M> 

  H  12:52

1234567 


Q’ty: 1 

ESC 

SCAN 

ENTER

M> 

  H  12:52

7654321 


Q’ty:    1 

ESC 

SCAN 

ENTER

C4. 

press


  to choose number, 

then, press


ENTER to confirm

D4.

 scan numeric code (page #5) 

M> 

  H  12:52

1234567 


Q’ty:    5--- 
ESC 

ENTER 


M> 

  H  12:52

7654321 


Q’ty:    5--- 

ESC 

SCAN 

5. 

Then,


scan the next barcode


5. 

end by

 X 

code, then, 

be ready to scan the next


M> 

  H  12:52

SCAN: 


Q’ty:     

ESC 

SCAN 


M> 

  H  12:52

SCAN: 


Q’ty:     

ESC 

SCAN 


Upload data (Memory-scan)


1. 

press

 ESC, 

select 

Upload 

2. 

BT connected, press 


START

 to send data


MAIN>

H 12:52

Direct-scan

Memory-scan

Upload


ENTER


U>

  H 12:52

Push START key

to send data… 

ESC

START 

3. 

After data upload, press

ERASE

 to delete memory data


4.

be sure that you want to delete 

memory data.


U>

H 12:52

ESC

SPEED ERASE


U/E>

  H 12:52

Data    in    memory

  Will    be    erased!

Are    you    sure?

NO


YES


5.

 After you delete the memory data, it will be back to 

MAIN MENU


Switch from Memory-scan to Direct-scan mode 


1.

switch 

Memory-scan

to 

Direct-scan

 mode


2. 

must

delete

 all data in the 

memory


D>

H 12:52

Data in memory

will be erased!

Are you sure? 

NO

YES


Completed!!!


3. 

begin to scan the barcode

D>

H

12:52

ESC

SCAN


Power-saving Mode 


1. Main MENU

2. 

select

 Setup 


MAIN>

H 12:52

Direct-scan

Memory-scan

Upload


ENTER


MAIN> 

  H 12:52

Memory-scan 

Upload 

Setup

ENTER 


3. 

select

 Sleep time 

4. 

press


decide the time to   

    enter sleeping mode


S>

H 12:52

BT setup

Sleep time

Output Speed
ESC

ENTER 


S/P/S> 

  H 12:52

Sleep    time 

                    00 

ESC

ENTER


When charging, the scanner will not enter power-saving mode automatically 


Transmission Speed


Transmission speed is dependent on your device. In order not to lose data, 

please choose the correct speed.   

1. Main MENU

2. 

select

Setup 

MAIN>

H 12:52

Direct-scan

Memory-scan

Upload


ENTER


MAIN>

  H  12:52 

Memory-scan 

Upload

Setup

ENTER 


3.

select

Output Speed

4. 

select

the speed type,   

S>

H 12:52

BT Status

Sleep time

Output Speed

ESC

ENTER 


S/O>

H  12:52 

Unlimited

Extra high

High
ESC

ENTER 


RTC (Real-time clock) 

1. Main MENU

2.

select

Setup 


MAIN>

H 12:52

Direct-scan

Memory-scan

Upload


ENTER


MAIN>

  H  12:52 

Memory-scan 

Upload

Setup

ENTER 


3. 

select

Time setup

4. 

select 

Stamp 

S>

H 12:52

Sleep time

Output Speed

Time setup

ESC

ENTER 


S/T>

H  12:52 

Stamp

Format

Date adj.
ESC

ENTER 


5. 

select

Date Stamp

6. 

Date Stamp is on or off.


S/T/S>

H 12:52

Date Stamp

Time Stamp

Interval char.

ESC

ENTER 


S/T/S/D>

  H  12:52 

Date Stamp

On 

Off 

ESC 

ENTER 


7. 

press

ESC, 

select

Time 

Stamp 

8. 

Time Stamp is on or off


S/T/S>

H 12:52

Date    Stamp

Time    Stamp

Interval char.

ESC

ENTER


S/T/S/T>

  H  12:52 

Time    Stamp 

On 

Off 

ESC 

ENTER 


      9. 

press

ESC,

select

Interval char. 

8. 

select

 Interval char. 

S/T/S>

H 12:52

Date    Stamp

Time    Stamp

Interval char.

ESC

ENTER


S/T/S/P>

  H  12:52 

Interval char. 

,

ESC 

ENTER 


Summary of Contents for iDC9607AW

Page 1: ...ou do not follow the safety instructions and information on proper handling in this manual we assume no liability for any resulting personal injury or damage to property Don t put scanner in places excessively high temperatures such as expose under direct sunlight Don t use scanner in extremely humid area or drastic temperature change The rechargeable battery is permanently built into the product ...

Page 2: ... B1 to B3 A1 select SPP device B1 select HID device S B S 12 52 HID device SPP device dongle ESC ENTER S B S 12 52 HID device SPP device dongle ESC ENTER A2 select Simple pairing or Pairing B2 select Simple pairing or Pairing S B S S 12 52 Simple pairing Pairing ESC ENTER S B H S 12 52 Simple pairing Pairing ESC ENTER A3 Setting Completed B3 Setting Completed Setting Completed Setting Completed Af...

Page 3: ...e keyboard refer to drawing 5 on page 1 LED is RED Bluetooth is offline press it again to lower keyboard LED is off Bluetooth is online It will take 5 10 seconds to make BT online offline Please be noted that when BT is offline scanning function is stopped Under iOS system If you want to raise lower soft keyboard please read the above setting code first Then press Left button for 2 seconds to rais...

Page 4: ...2 must delete all data in the memory D H 12 52 Data in memory will be erased Are you sure NO YES Completed 3 begin to scan the barcode D H 12 52 ESC SCAN Power saving Mode 1 Main MENU 2 select Setup MAIN H 12 52 Direct scan Memory scan Upload ENTER MAIN H 12 52 Memory scan Upload Setup ENTER 3 select Sleep time 4 press decide the time to enter sleeping mode S H 12 52 BT setup Sleep time Output Spe...

Page 5: ...Format Date adj Clock adj ESC ENTER 5 set the time Press to select the number then press the ENTER to go the next 6 save the time setting S T T H 12 52 Hour 00 23 00 Min 00 59 00 Sec 00 59 00 ESC ENTER Save it NO YES Trigger Mode Trigger always Trigger available at any time Trigger standard Default Trigger available after data sent to the device Multi language UI setting can be changed to differen...

Page 6: ...2 3A 52 R 6A j 04 CTRL D EOT 1C CTRL FS 23 3B 53 S 6B k 05 CTRL E ENQ 1D CTRL GS 24 3C 54 T 6C l 06 CTRL F ACK 1E CTRL RS 25 3D 55 U 6D m 07 CTRL G BEL 1F CTRL _ US 26 3E 56 V 6E n 08 Backspace BS 27 3F 57 W 6F o 09 Tab HT HEX HID Only 28 40 58 X 70 p 0A CTRL J LF 80 F1 29 41 A 59 Y 71 q 0B CTRL K VT 81 F2 2A 42 B 5A Z 72 r 0C CTRL L FF 82 F3 2B 43 C 5B 73 s 0D Enter CR 83 F4 2C 44 D 5C 74 t 0E CT...

Page 7: ... set 1D Symbologies 3 ENABLE GS1 Databar RSS DISABLE ENABLE GS1 Databar RSS Limited DISABLE ENABLE GS1 Databar RSS Expand DISABLE ENABLE CODE 128 DISABLE ENABLE GS1 128 UCC EAN 128 DISABLE ENABLE ISSN DISABLE ENABLE ISBN DISABLE ENABLE UPC E DISABLE ENABLE UPC A DISABLE 1 Pull out the USB cover its slot 2 Press inward firmly on the USB cover to reattach it Top Bottom Insert a thin object e g a ben...

Page 8: ...y attention to assembling direction 5 Connect trigger cable with pocket scanner and wear ring trigger unit you can use plastic hook to adjust the trigger cable 6 Glove set can be used for the right hand also 7 If you want to remove pocket scanner from Glove set you can disassembled it as per above photo Quick guide is subject to change without notice R_191108_01 ...

Reviews: