


Rinnai Corporation EX17C / EX22C Manual
27
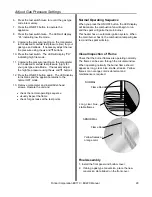
Pipe stopper
Elbow
Manifold
Hook
Pipe stopper
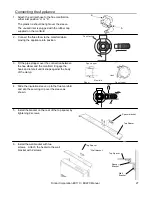
Connecting the Appliance
2. Connect the flue elbow to the manifold while
moving the appliance into position.
3. Fit the pipe stopper over the connection between
the flue elbow and the manifold. Engage the
hook and rotate it until it snaps against the body
of the clamp.
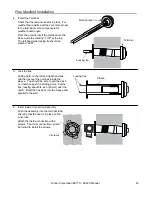
4. Slide the insulation sleeve up to the flue manifold
and slip the securing clip over the sleeve as
shown.
5. Install the bracket on the rear of the top spacer by
tightening 2 screws.
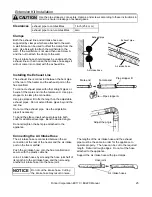
6. Install the wall bracket with two
screws. Attach the heater to the wall
bracket with 2 screws.
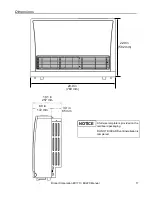
Flue Manifold
a
b
Fit Clip
Slide
Sock
Top Spacer
Spacer bracket
Top Spacer
Wall bracket
Wall
Bracket
Top Spacer
Spacer
Bracket
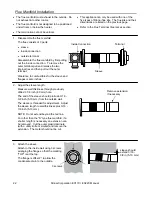
1. Attach the air inlet hose to the flue manifold on
either inlet position “a” or “b”.
The plastic tie should be tight over the sleeve.
The unused inlet is plugged with the rubber cap
supplied on the manifold.
Summary of Contents for Energysaver EX17C
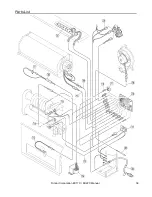
Page 31: ...Rinnai Corporation EX17C EX22C Manual 31 Cut Away Diagram ...
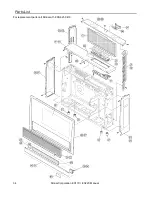
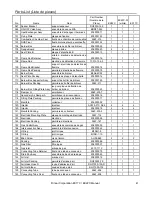
Page 35: ...Rinnai Corporation EX17C EX22C Manual 35 Parts List ...
Page 36: ...36 Rinnai Corporation EX17C EX22C Manual Parts List ...
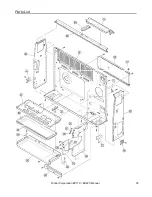
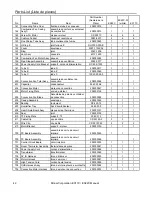
Page 37: ...Rinnai Corporation EX17C EX22C Manual 37 Parts List ...
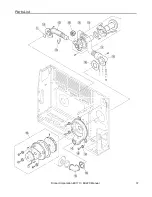
Page 38: ...38 Rinnai Corporation EX17C EX22C Manual Parts List ...
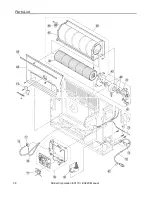
Page 39: ...Rinnai Corporation EX17C EX22C Manual 39 Parts List ...
Page 81: ...Rinnai Corporation EX17C EX22C Manual 81 Notes ...
Page 82: ...82 Rinnai Corporation EX17C EX22C Manual Notes ...
Page 83: ...Rinnai Corporation EX17C EX22C Manual 83 Notes ...


