background image

MAINTENANCE

16


Turn the power switch “OFF” and disconnect the plug from the outlet prior to adjusting 

or maintaining the machine. DO NOT attempt to repair or maintain the electrical components of the motor. 

Contact a qualified service technician for this type of maintenance.

1.  Before each use:
   -  Check the power cord and plug for any wear or      

   damage.
   -  Check for any loose screws, hardware or parts.
   -  Check the area to make sure it is clear of any    

misplaced tools, lumber, cleaning supplies, etc. that 

could hamper the safe operation of the machine.

2.  To avoid a build-up of wood dust, regularly clean 

all parts of the machine using a soft cloth, brush or 

compressed air. A general cleaning should be done 

after every use to avoid future problems and ensure 

the machine is in ready condition for its next use.

WARNING: 

If blowing sawdust, wear proper eye pro-

tection to prevent debris from blowing into eyes.

3.  Keep the machined surfaces of the drill press table 

and base free of resin and rust. Clean them regularly 

with a non-flammable solvent, then coat with a light 

film of dry lubricant spray or wax.

4.  Lubricate the table bracket and locking lever bolts


to keep them operating smoothly. 

5.  Clean the column on a regular basis to prevent


the build-up of dust, drilling residue and rust. Treat 

the posts with a dry lubricant spray or a light coating 

of wax. Do not use ordinary oil which will collect dust 

and hamper the movement of parts along the column.

6.  Periodically, lower the quill assembly and apply 

a light coating of machine oil to the quill and spindle 

surfaces. Raise and lower the quill a few times to 

distribute the oil on all of the internal surfaces.

7.  Apply #2 tube grease to the worm gears in the 

table elevation mechanism and rack to keep them 

operating smoothly.

8.  The ball bearings in the spindle and pulley assem-

blies are lifetime lubricated, sealed, and do not need 

any further care.

9.  Keep the drive belt and pulley surfaces free of oil 

and grease. Periodically, check the drive belt for wear 

and replace if necessary.

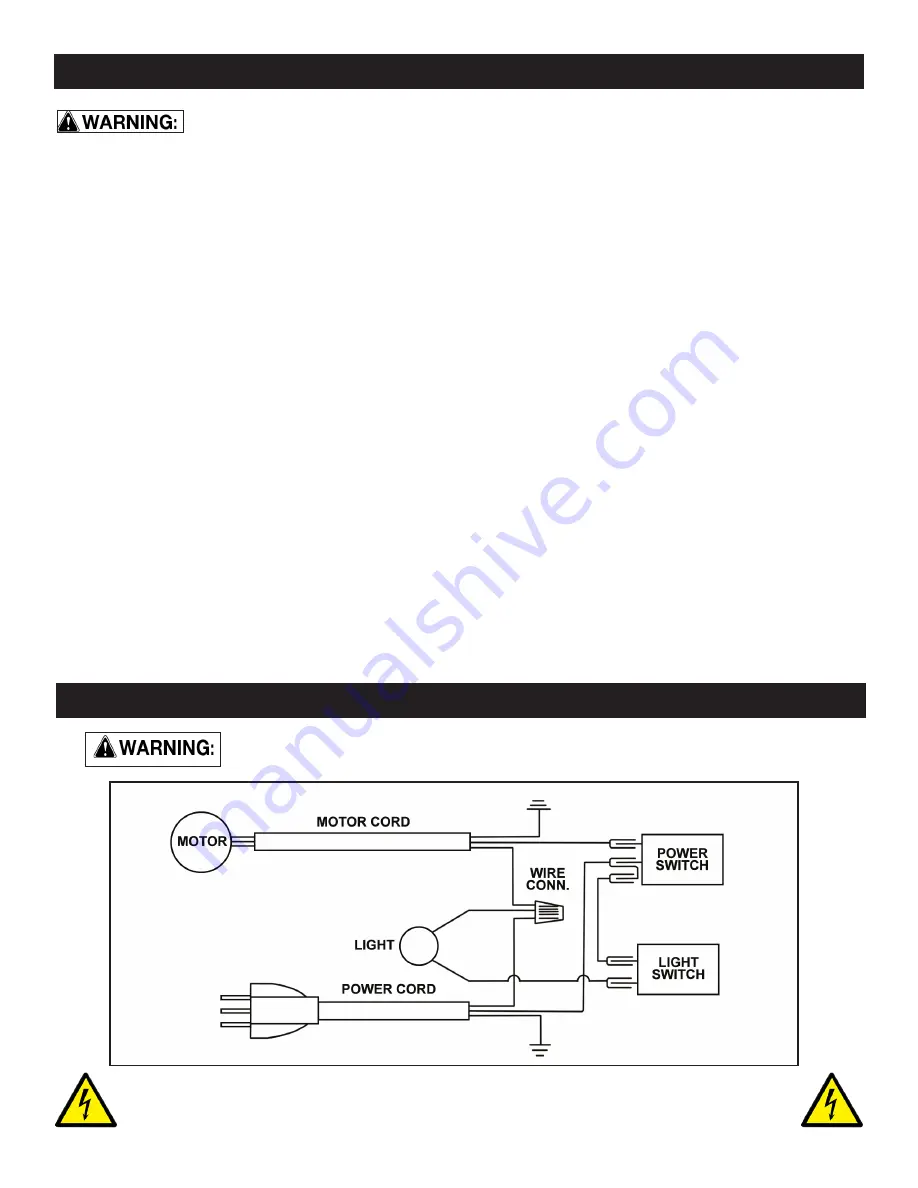
WIRING DIAGRAM

DO NOT attempt to repair or maintain the electrical components of the motor. 

Contact a qualified service technician for this type of maintenance.


This machine must be grounded. Replacement of the power supply cable should only                    


                           be done by a qualified electrician. See page 5 for additional electrical information.

Summary of Contents for 30-240

Page 1: ...l Record the serial number and date of purchase in your manual for future reference Serial Number _________________________ Date of purchase _________________________ For technical support or parts questions email techsupport rikontools com or call toll free at 877 884 5167 ...

Page 2: ... 720 RPM Volts 120 V Amps Hertz 13 5 A 60 Hz Swing 20 Chuck Size 5 20mm 7 32 3 4 Chuck Taper JT3 Drilling Capacity 1 Spindle Travel 4 3 4 Spindle Taper MT3 Head Rotates 360 Speed Range RPM 180 3865 Speeds 12 Quill Diameter 3 75mm Table Size 16 3 4 x 18 3 4 Table Tilts 90 Left Right Table Rotates 360 Maximum Chuck to Table 24 1 4 Maximum Chuck to Base 43 3 4 Column Diameter 3 5 8 92mm Height 67 Bas...

Page 3: ...ctrical receptacle The 3rd prong is used to ground the tool and provide protection against accidental electric shock DO NOT remove the 3rd prong See Grounding Instructions on the following pages 4 AVOID A DANGEROUS WORKING ENVIRONMENT DO NOT use electrical tools in a damp environment or expose them to rain 5 DO NOT use electrical tools in the presence of flammable liquids or gases 6 ALWAYS keep th...

Page 4: ...ker cord An undersized cord will cause a drop in line voltage resulting in a loss of power and overheating USE ONLY A 3 WIRE EXTENSION CORD THAT HAS A 3 PRONG GROUNDING PLUG AND A 3 POLE RECEPTACLE THAT ACCEPTS THE TOOL S PLUG 27 ADDITIONAL INFORMATION regarding the safe and proper operation of this product is available from Power Tool Institute 1300 Summer Avenue Cleveland OH 44115 2851 www power...

Page 5: ...tand the grounding instructions or if you are not sure the tool is properly grounded when installing or replacing a plug USE ONLY A 3 WIRE EXTENSION CORD THAT HAS THE PROPER TYPE OF A 3 PRONG GROUNDING PLUG THAT MATCHES THE MACHINE S 3 PRONG PLUG AND ALSO THE 3 POLE RECEPTACLE THAT ACCEPTS THE TOOL S PLUG REPLACE A DAMAGED OR WORN CORD IMMEDIATELY This tool is intended for use on a circuit that ha...

Page 6: ... operating a floor Drill Press it must be securely fastened to the floor 5 Always clear the table and work area before turning on the Drill Press 6 Always use drill bits cutting tools and accessories with a 1 2 shank or less 7 Never place hands near the drill bit cutting tool or accessory while operating the Drill Press 8 Always wear approved safety eye wear and hearing protection while operating ...

Page 7: ...discarding any packing material Place parts on a protected surface for easy identification and assembly If any parts are missing or broken please call RIKON Customer Service 877 884 5167 as soon as possible for replacements DO NOT turn your machine ON if any of these items are missing You may cause injury to yourself or damage to the machine 2 Report any shipping damage to your local distributor 3...

Page 8: ...that is located in an area that has ample space in front and to both sides of the drill press for the moving of lumber and projects to be drilled 2 Align the machine so that during use any kickback will not face aisles doorways or other work areas that bystanders may be in Do not locate or use the machine in damp or wet conditions 3 If possible secure the machine to the floor with lag screws or ot...

Page 9: ... the table assembly with the rack together onto the column and slide them down the column until the rack fits back into the column support base 6 Replace the column collar on top of the rack and secure it in place with a hex wrench Fig 3 7 Install the raising lowering crank handle onto the table bracket s worm gear shaft with a hex wrench Figure 4 The handle s set screw must line up and be secured...

Page 10: ...the lid from the inside Thread the knob on the outside of the belt cover and tighten it in place on the screw with a screwdriver Figure 9 Assistance is needed for this next step NOTE Figure 7 A Figure 8 Figure 5 8 Install the locking lever handle onto the table support bracket Tightening the locking lever handle secures the table support to the column so that it does not move during the remaining ...

Page 11: ... into the spindle This will properly seat the chuck assembly on the spindle Fig 13 NEVER HIT THE CHUCK ASSEMBLY WITH A METAL HAMMER This could damage the chuck assembly or spindle 5 Close the chuck jaws with the chuck key provided Figure 12 IMPORTANT Figure 13 MAKE SURE THE JAWS ARE INSIDE OF CHUCK BODY TO PROTECT THEM FROM BEING HIT DURING ASSEMBLY OPEN CHUCK JAWS It is important that the tapered...

Page 12: ...5 THE MACHINE MUST NOT BE PLUGGED IN AND THE POWER SWITCH MUST BE IN THE OFF POSITION UNTIL ASSEMBLY IS COMPLETE B A Figure 16 RAISING AND LOWERING THE TABLE 1 Loosen the column lock handle A Fig 16 on the table support bracket B Fig 16 2 Turn the crank handle C Fig 16 to raise or lower the table to the desired height 3 Tighten the column lock handle A Fig 16 NOTE The table assembly can rotate 360...

Page 13: ... 1 Loosen the large nut below the table support arm A Fig 17 This requires a 30mm 1 1 4 socket or adjustable wrench not included 2 The small threaded pin with nut below the 30mm nut B Fig 17 positions the table at 90 Tighten the nut to withdraw the pin from its index hole in the support frame so that the table can be tilted from the pre set 90 position 3 Tilt the table to the desired angle using t...

Page 14: ...depth stop collar lock ADJUSTMENTS A B Figure 23 6 Swing back the tension lever until there is ap proximately 1 2 deflection in the belt Fig 21 7 Tighten the locking knob on the both sides of drill press head 8 Close the belt guard and reconnect the drill press to the power Continued from page 13 BELT DEFLECTION FIGURE 21 THE MACHINE MUST NOT BE PLUGGED IN AND THE POWER SWITCH MUST BE IN THE OFF P...

Page 15: ...k depends on a variety of factors a the workpiece material hardness wood composites plastics or metal b the size of hole diameter c the depth of the hole d the type of drill bit or other cutter needed to make the desired hole diameter and depth e the quality of the bore We recommend consulting various books magazine articles drill bit and material manufacturers informa tion for information on the ...

Page 16: ...nt spray or wax 4 Lubricate the table bracket and locking lever bolts to keep them operating smoothly 5 Clean the column on a regular basis to prevent the build up of dust drilling residue and rust Treat the posts with a dry lubricant spray or a light coating of wax Do not use ordinary oil which will collect dust and hamper the movement of parts along the column 6 Periodically lower the quill asse...

Page 17: ...al 1 Use back up material on underside under workpiece Wood piece turn 1 Not supported or 1 Support workpiece or clamp it loose from hand clamped properly Drill bit binds 1 Workpiece pinching drill bit 1 Support workpiece or clamp it in workpiece or excessive feed pressure 2 Adjust tension 2 Improper belt tension Excessive drill bit 1 Bent drill bit 1 Use a straight drill bit runout or wobble 2 Wo...

Page 18: ...PARTS DIAGRAM 18 See Page 21 for the Parts List 30 240 Drill Press Parts Keyed as A B ...

Page 19: ...ease reference the Model Number and Key Number when calling for Replacement Parts For Parts under Warranty the Serial Number of your machine is required 19 See Page 21 for the Parts List 30 240 Drill Press Parts Keyed as C ...

Page 20: ...PARTS DIAGRAM Parts Explosion 18 20 30 240 Drill Press Parts Keyed as D 49D 50D 51D ...

Page 21: ...7C 18C 19C 20C 21C KEY NO 1D 2D 3D 4D 5D 6D 7D 8D 9D 11D 12D 13D 14D 15D 16D 17D 21D 22D 24D 25D 26D 27D 28D 29D 30D 31D 32D 33D 34D 36D 37D 38D 39D 40D 41D 42D 43D 44D 45D 46D 47D 48D 49D 50D 51D DESCRIPTION Screw Hex Head M8x1 25 16 Lever Adjusting Support Motor Bracket Mount Motor Lock washer 12mm Nut Hex M12 Motor Nut Hex M8x1 25 Washer 8 Screw Hex Head M8x1 25 20 Support Motor Bracket Knob Mo...

Page 22: ...ets sash pattern shops and other woodworking plants The Mortising Attachment Kit can be installed on most any drill press with a collar size of 40mm 48mm 50 8mm 55mm 60mm 66mm or 75mm Kit includes yoke collar adapters fence hold downs 4 chisels bits 1 4 5 16 3 8 1 2 and plastic storage case All metal construction with slots for mounting on drill press tables Large toggle handles for fast adjusting...

Page 23: ...23 WARRANTY ...

Page 24: ...www rikontools com 30 240M4 30 240 For more information 16 Progress Road Billerica MA 01821 877 884 5167 978 528 5380 techsupport rikontools com ...

Reviews: