20154169
30
GB
Maintenance
Fan
Check to make sure that no dust has accumulated inside the fan or
on its blades, as this condition will cause a reduction in the air flow
rate and provoke polluting combustion.
Burner
Check that the graduated sector that controls the air damper is se-
cured by the nut 2)(Fig. 31, page 27).
The tightness of the screws that fasten the cables to the burner ter-
minal strip must also be checked.
Clean the outside of the burner.
Clean and grease the cam variable profile.
Boiler
Clean the boiler as indicated in its accompanying instructions in or-
der to maintain all the original combustion characteristics intact, es-
pecially the flue gas temperature and combustion chamber
pressure.
Gas leaks
Make sure that there are no gas leaks on the pipework between the
gas meter and the burner.
Gas filter
Change the gas filter when it is dirty.
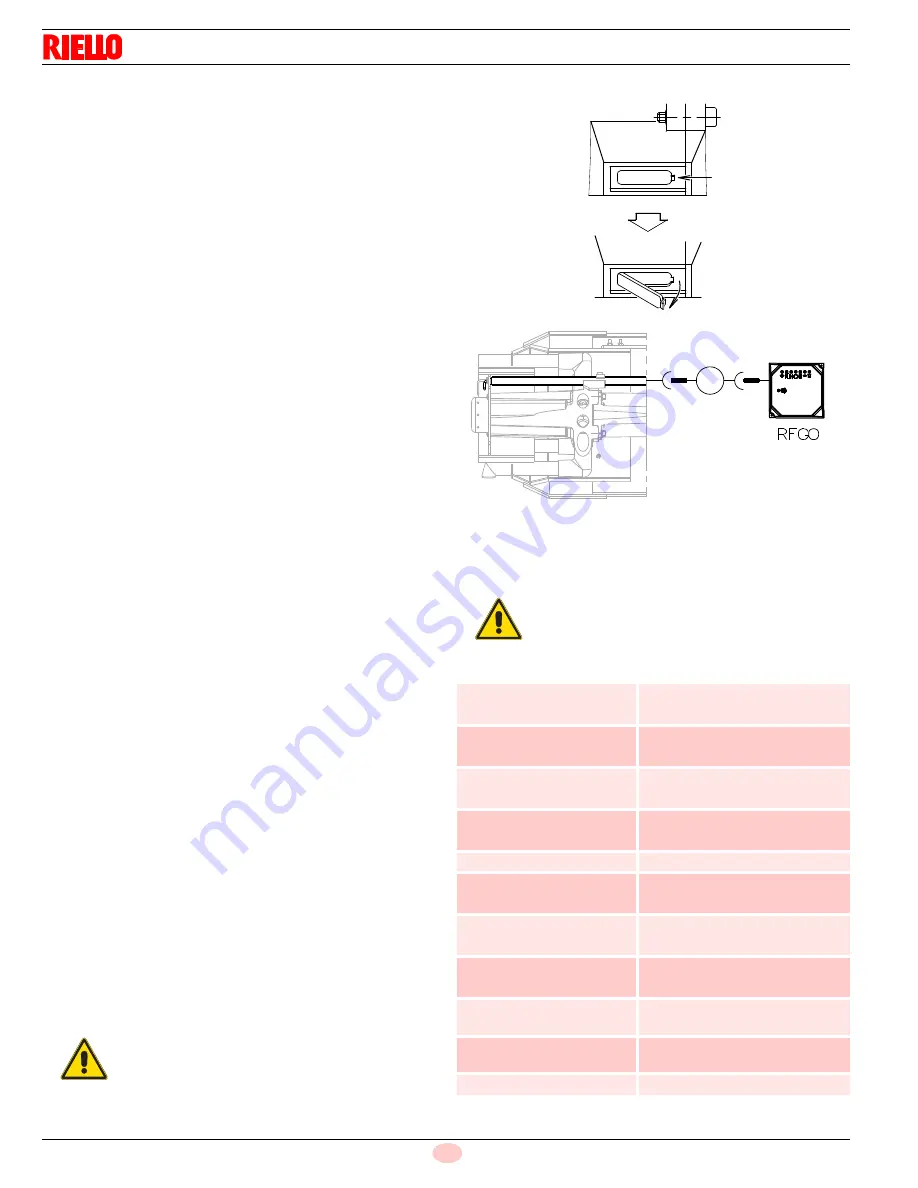
Flame inspection window
Clean the flame inspection window (Fig. 34).
6.2.4
Flame presence check
The burner is fitted with an ionisation system which ensures that a
flame is present. The minimum current for plant operation is 3
μ
A.
The burner provides a much higher current, so that controls are not
normally required.
However, if it is necessary to measure the ionisation current, there
are two methods:
Flame presence check with RFGO function
–
Check the level of the flame detection signal with the “Check
mode” function from the flame control: the LEDs from 2 to 6 in-
dicate the flame signal level, respectively. See “LED indicator
and special function” on page 32.
Check Mode
With burner flame on:
–
hold the reset button on the flame control pressed for at least
3 sec.;
–
the button colour will change from green to yellow;
–
each operating status signalling LED will be compared to 20%
of the maximum brightness;
–
press the reset button again (<0.5 sec) to reset the standard
operation of the signalling LEDs.Safety components.
Flame presence check with microamperometer instru-
ment
–
disconnect the plug-socket 7)(Fig. 4, page 10) on the ionisation
probe cable and insert a direct current microamperometer with
a base scale of 100
μ
A.
6.2.5
Safety components
The safety components should be replaced at the end of their life
cycle indicated in the following table.
Tab. M
WARNING
Carefully check polarities!
WARNING
The specified life cycles do not refer to the warranty
terms indicated in the delivery or payment condi-
tions.
Safety component
Life cycle
Flame control
10 years or 250,000
operation cycles
Flame sensor
10 years or 250,000
operation cycles
Gas valves (solenoid)
10 years or 250,000
operation cycles
Pressure switches
10 years or 250,000
operation cycles
Pressure adjuster
15 years
Servomotor
(electronic cam) (if present)
10 years or 250,000
operation cycles
Oil valve (solenoid)
(if present)
10 years or 250,000
operation cycles
Oil regulator (if present)
10 years or 250,000
operation cycles
Oil pipes/ couplings
(metallic) (if present)
10 years
Flexible hoses (if present)
5 years or 30,000
pressurised cycles
Fan impeller
10 years or 500,000 start-ups
Fig. 34
D484
-
μ A
+
20156526
Fig. 35
Summary of Contents for RS 28/M
Page 2: ...Original instructions...
Page 47: ......


