background image

11

Riello 7200/2 HV PLUS

1

3

2

9

6

4

7

8

5

14   Recycling/disposal  

13   Cleaning the storage cylinder and dismantling the internal components

OUTSIDE

Cleaning the cover of the storage cylinder should be car-

ried out with damp cloths and water and soap. In the 

case of stubborn stains dampen the cloth with a mix-

ture of 50% water and methylated spirit or with specific 

products for the marks. Once the cleaning is finished, dry 

the storage cylinder.

   Do not use abrasive products, gasoline or trichloro-

ethylene.

INSIDE

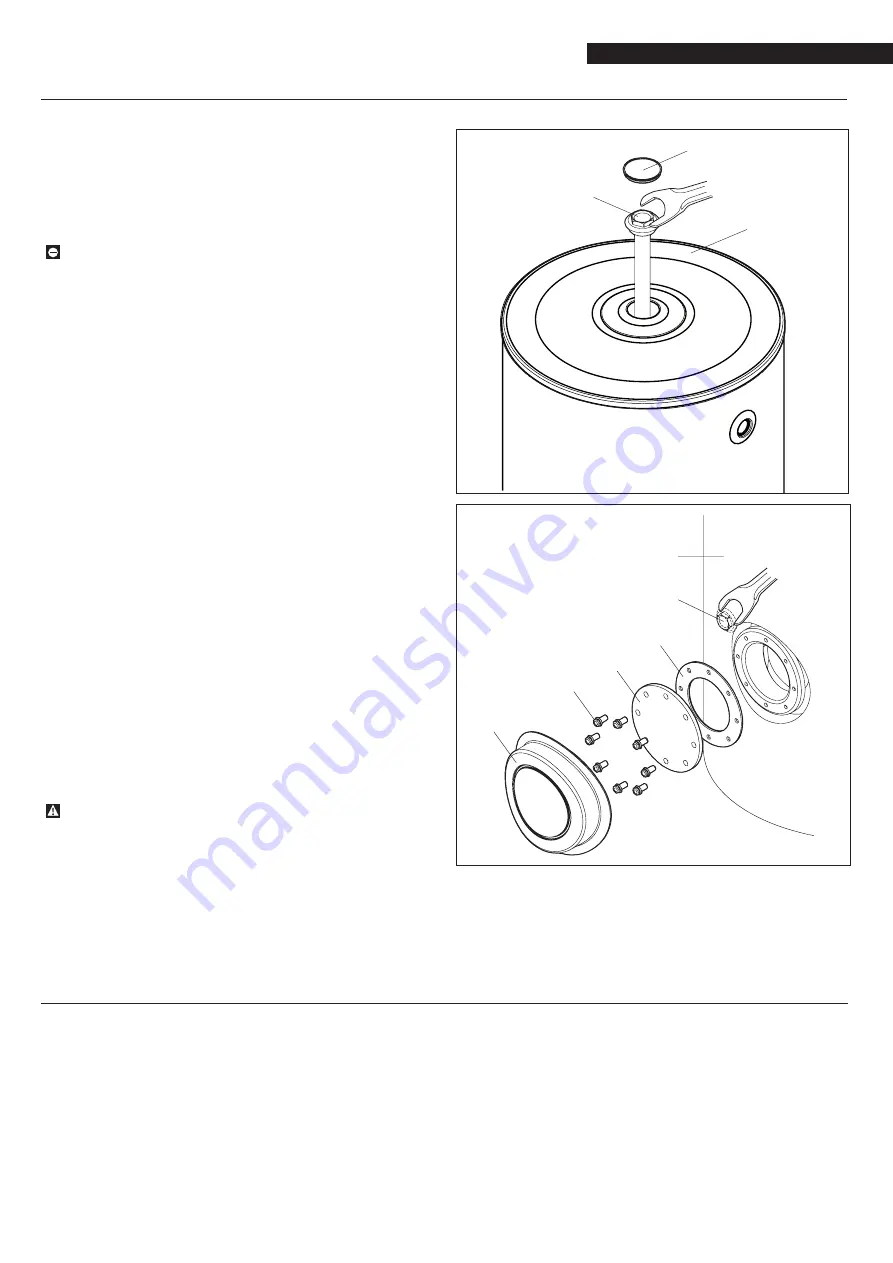
Removing and checking the magnesium anodes

First magnesium anode:

- Remove the plug (1), the cover (2) and, with a wrench, 

unscrew the anode-carrying plug (3)

Second magnesium anode:

- Partially remove the cover (4) and, with a wrench, un-

screw the anode-carrying plug (5)

Check the state of wear of the magnesium anode and 

replace it if necessary.

Once the cleaning operations are finished, reassemble all 

the components, following the above instructions in the 

reverse order.

NOTE:  the tightening torque of the anode-carrying plug 

should be 25-30 Nxm.

Cleaning the parts inside the storage cylinder

- Remove the flange cover (6)

- Unscrew the bolts (7), remove the cover (8) and the 

gasket (9).

- Clean the inside surfaces and remove the residues 

through the opening.

Once the cleaning operations are finished, reassemble all 

the components, following the above instructions in the 

reverse order.

    Tighten the bolts (7) with a “cross-head” system to 

uniformly distribute pressure on the gasket.

- Load the storage cylinder's secondary circuit and check 

the seal of the gaskets.

- Carry out a performance test.

When they are no longer needed, the components of the solar storage cylinder (boiler body, insulation and outer cover) 

can be separated from one another and disposed of using the most environmentally compatible recycling procedure.

Summary of Contents for 20052784

Page 1: ...cod 20055743_EN rev 2 05 2016 Solar storage cylinders 7200 2 1500 2000 HV PLUS EN INSTALLATION INSTRUCTIONS...

Page 2: ...ternal components 11 14 Recycling disposal 11 Index Dear Installer thank you for choosing a Riello 7200 2 HV PLUS solar stor age cylinder a modern high quality product providing you with the utmost we...

Page 3: ...operations be carried out Drain the solar heating circuit Close the shut off devices of the water system Switch off the boiler as described in the appli ance s instruction booklet Turn off the system...

Page 4: ...ersion 250 305 W 6 7 32 kWh 24h Insulation type Soft PU shells Useful non solar volume Vbu 525 800 l According to DIN 4708 to get domestic hot water with T 20 C 80 60 C on the heat exchanger please ob...

Page 5: ...4500 5000 5500 6000 Mod 1500 Mod 2000 Pressure drop TOP COIL Pressure drop BOTTOM COIL PRESSURE DROP mbar FLOW RATE l h PERDITA DI CARICO mbar PORTATA l h 600 650 700 550 500 450 400 350 300 250 200...

Page 6: ...ric resistor socket not supplied AD1 AD2 Magnesium anode 1500 HV PLUS 2000 HV PLUS The solar storage cylinder Riello 7200 2 HV PLUS is not equipped with load circulators which should be appropriately...

Page 7: ...rain 1 1 2 F 1 1 2 F Psc Diameter length boiler probe socket 1 2 F 1 2 F mm Psr Diameter length solar regulator probe socket 1 2 F 1 2 F mm RE Electric resistor socket not supplied 1 1 2 F 1 1 2 F AD1...

Page 8: ...is an integral part of the storage cylinder and it is recommended that it be read and kept safe INSTALLING THE MAGNESIUM ANODES Proceed as follows to install the magnesium anodes Remove the protectiv...

Page 9: ...e solar heating circuit is completely vented The cold pressure of the equipment is about 3 bar The safety valves intervenes at 6 bar The piping of the hydraulic supply are insulated in full respect of...

Page 10: ...he proce dure reported above is difficult to do Periodic maintenance which is essential for safety purposes the efficiency and the life of the solar storage cylinder provides reduced consumption and k...

Page 11: ...nesium anode and replace it if necessary Once the cleaning operations are finished reassemble all the components following the above instructions in the reverse order NOTE the tightening torque of the...

Page 12: ...0442630111 Fax 044222378 www riello it The manufacturer strives to continuously improve all products Appearance dimensions technical specifications standard equipment and accessories are therefore lia...

Reviews: