background image


‐ 27 ‐ 


M

ONITORING 

U

NIT 

(MU)


[MPX


100


CBC;


MPW


170


BTC] 

Within the Modular UPS Power Cabinet [MPX 100 CBC], the Monitoring Unit (MU) monitors the status of the internal and external 
disconnection switches, the status of the Power Supply Unit and the internal and external temperatures. 
 
Within  the  Battery  Cabinet  [MPW  170  BTC],  the  MU  monitors  the  Power  Supply  Unit,  the  internal  temperature  values  and 
supervises the status of each Battery Unit. 
 
During the first installation of a single Cabinet, via a specific set up made within the MU, the address and the type of cabinet must 
be configured (ref. to “MPW-MPX Advanced Configuration Manual”) 


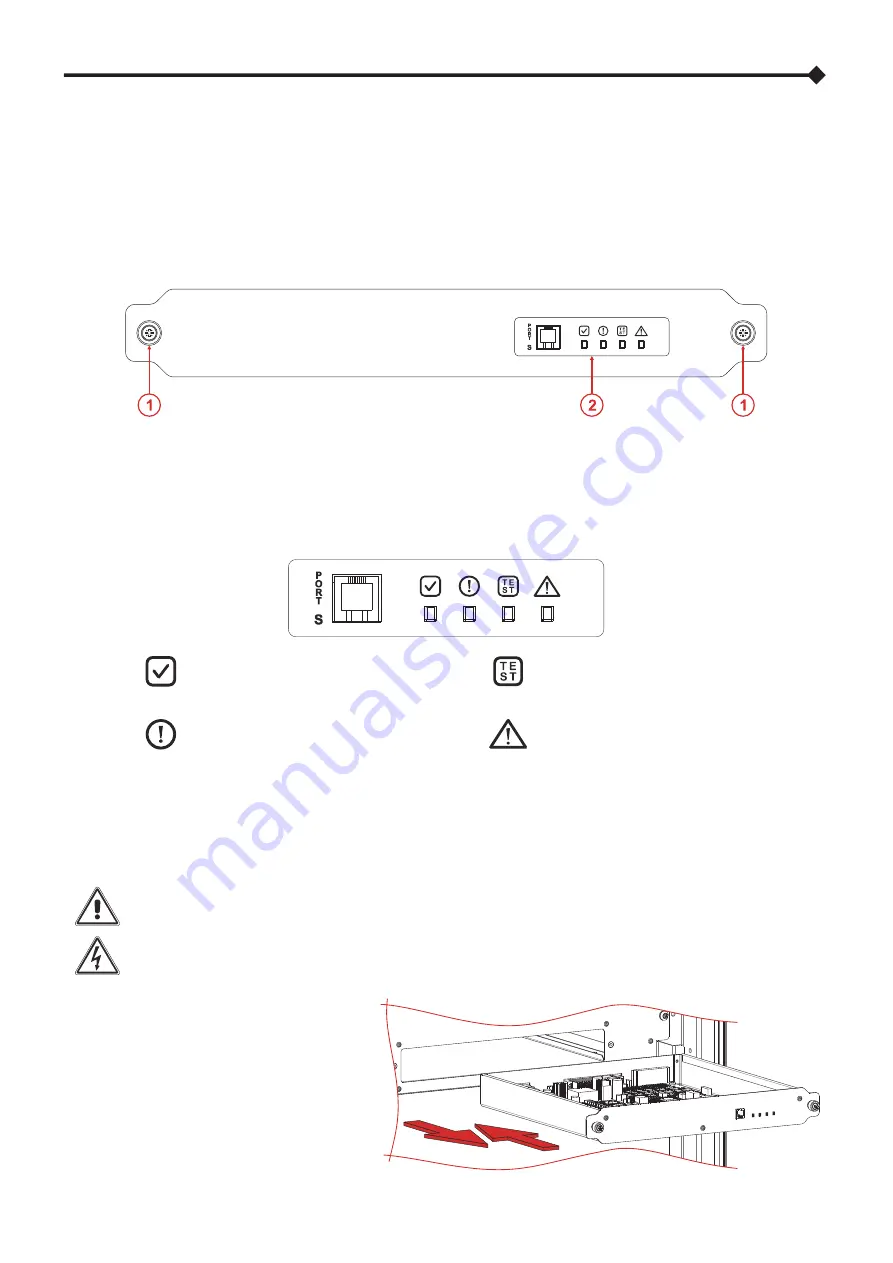
  Fastening knobs   

  Interface panel 


I

NTERFACE PANEL


Green 

On steady:

 MU ready


Green 

Slow blinking:

 Test in progress


Yellow 

On steady:

 Anomaly 


Red 

On steady:

 Alarm 


PORT S


Communication port reserved for service personnel only


I

NSERTION

/

EXTRACTION PROCEDURE


The following operations must only be performed by skilled and specifically trained personnel. 
When the MU is not inserted, uncovered parts with dangerous voltage are present on the corresponding 
backplane. 
The MU is pre-installed by the manufacturer. Remove the MU only in case of maintenance or replacement. 
Strictly comply with the instructions as listed below. 


EXTRACTION 

Unscrew the two side fastening knobs. 
Using the knobs, carefully pull and remove the 
MU. 


INSERTION 

Carefully insert the MU into the dedicated slot. 
Fasten the MU by tightening the side knobs. 


Summary of Contents for MPX 100 CBC

Page 1: ......

Page 2: ......

Page 3: ...ing to the current legislation No harmful material such as CFC HCFC or asbestos can be found in this product The packaging is made of recyclable material Please dispose of the individual elements according to the current legislation in force in the country where the product is to be employed Please refer to the following table for identifying the materials DESCRIPTION MATERIAL Pallet Wood FOR Pack...

Page 4: ...TALLATION 21 POWER MODULE PM 21 INTERFACE PANEL 22 INSERTION EXTRACTION PROCEDURE 23 BYPASS MODULE BM 24 INTERFACE PANEL 25 INSERTION EXTRACTION PROCEDURE 26 MONITORING UNIT MU MPX 100 CBC MPW 170 BTC 27 INTERFACE PANEL 27 INSERTION EXTRACTION PROCEDURE 27 POWER SUPPLY UNIT PSU 28 INTERFACE PANEL 28 INSERTION EXTRACTION PROCEDURE 28 MAIN COMMUNICATION UNIT MCU MPX 100 CBC 29 INSERTION EXTRACTION P...

Page 5: ...TINGS 61 PLANNED OPERATIONS CONFIGURATION 62 BATTERY TEST SCHEDULING 62 E MAIL CONFIGURATION 63 SMTP CLIENT CONFIGURATION 63 E MAIL ADDRESS CONFIGURATION 63 CONFIGURATION OF THE DETAILS OF THE E MAIL MESSAGE 64 NETWORK SETTINGS 64 GENERAL SYSTEM SETTINGS 65 SYSTEM LABEL 65 PASSWORD SETTING AND CHANGE 65 DISPLAY SETTINGS 66 BUZZER 66 ANOMALOUS SITUATION SCREENS 67 OPTIONS 69 REMOTE COMMUNICATION 70...

Page 6: ... system efficiency whilst operating in on line double conversion mode ULTIMATE SCALABILITY with 15 25kVA unity power factor PF power modules ensures the highest power density with ultimate scalability UTMOST AVAILABILITY designed to have a redundant power module in each power rack to provide reliability in terms of resilience and the availability of the UPS system EASY CONTROL using the latest col...

Page 7: ... 5 MODULAR UPS POWER CABINET MPX 130 PWC Front view Rear view Display Relay Slot Door ASB Panel Lock CIB Panel Back Panel ...

Page 8: ... 6 Top view Bottom view Display Wheels Bottom cable entry Fastening stands ...

Page 9: ...r open Power Modules extracted and respective blanking plates removed Power Module 15 25kW MPX 15 PM MPX 25 PM Connectivity Panel CP Bypass Module BM Backplane Power and communications interface connections between the PM and the cabinet Manual Bypass switch SWMB ...

Page 10: ... 8 Rear view Without the signal board panels Rear view without the connections cover Auxiliary Signal Board ASB Connections cover Relay Slot Power connections area Cabinet interface Board CIB Option ...

Page 11: ... 9 MODULAR COMBO CABINET MPX 100 CBC Front view Rear view Display Handle with lock Door Back Panel ...

Page 12: ... 10 Top view Bottom view Top cable entry Swivel castors for positioning Bottom cable entry Fastening stands ...

Page 13: ...w open door Power Modules extracted and respective blanking plates removed Power Module PM Battery Unit Bypass Module BM Connectivity Panel CP Manual Bypass switch SWMB Backplane power and communications interface connections for the PM Battery Switch SWBATT ...

Page 14: ... 12 Rear view without rear panel Rear view without connections cover Auxiliary Signal Board ASB Connections cover Relay Slot Power connections area ...

Page 15: ...nal The Connectivity Panel is provided with a network connection to enable the remote operation of the system The right side of the display is equipped with connection ports SA ports that are reserved for trained service personnel only Do not connect to the SA ports without specific instructions NOTE For further information refer to the chapter Remote Communication and accessories ...

Page 16: ...lots for housing the expansion cards Cold Start optional A network connection port is located on one side of the display to enable the remote operation of the system The right side of the display is equipped with connection ports SA ports that are reserved for trained service personnel only Do not connect to the SA ports without specific instructions NOTE For further information refer to the chapt...

Page 17: ...power from the incoming supply in order to avoid stressing due to the inrush current a generator which is installed upstream if fitted The duration of the transition mode can be set between 1 to 125 seconds The default value is 10 seconds when the function is enabled During the transition mode the required power is partially collected from the batteries and partially from the network whilst mainta...

Page 18: ...alies or malfunctions are present and if the system is operational 1 Ensure that the Bypass Module see the Modules and Units chapter is present and switched on 2 Open the SWMB disconnection switch by rotating the handle anti clockwise 3 The Bypass Module will activate and then the entire Modular UPS Cabinet will be switched on MODULAR UPS POWER CABINET MPX 130 PWC The Modular UPS Power Cabinet MPX...

Page 19: ... 17 A wring diagram of the Modular UPS Power Cabinet is provided below ...

Page 20: ... SWBATT disconnection switch which enables the BUs to be disconnected from the Modular UPS Cabinet The cabinet also features an opto isolated input which enables the SWBATT switch to be opened remotely CAUTION each shelf of the Modular Battery Cabinet can be filled with the 4 BUs based on the autonomy requirements of the system up to a maximum of 9 shelves The minimum number of fully populated bat...

Page 21: ... the central AUTOMATIC BYPASS for the whole Modular UPS Cabinet ref to chapter Modules and Units In order to further increase the power of the system multiple Modular UPS Combo Cabinets can be connected in parallel up to 4 CAUTION the Modular UPS Combo Cabinet can use both internal batteries and external batteries It s mandatory to use only modular MPW Battery Cabinets as the external battery sour...

Page 22: ... 20 The wiring diagram of the Modular UPS Combo Cabinet is provided below ...

Page 23: ... system The hot swap parts are Power Module PM Bypass Module BM Monitoring Unit MU MPX 100 CBC MPW 170 BTC Power Supply Unit PSU Main Communication Unit MCU MPX 100 CBC Connectivity Panel CP MPX 130 PWC Battery Unit BU MPX 100 CBC MPW 170 BTC POWER MODULE PM The Power Module PM is a three phase double conversion UPS module available in two sizes 15kW MPX 15 PM and 25kW MPX 25 PM The wiring diagram...

Page 24: ...sabled bypass line and or non synchronised inverter 130 ms ON 2 5 s OFF module in EFFICIENCY CONTROL mode Yellow Battery operation LED On steady battery operating mode Slow blinking battery operation with early low battery or imminent shutdown warning Green Load on bypass LED On steady load powered from bypass line Slow flashing load fed by inverter while waiting to return to bypass Eco mode Red S...

Page 25: ...ten it using the supplied screws as shown in the picture 4 Turn the Switch Lock 90 Degrees clockwise to the closed position see the picture on the right 5 Switch on the PM using the display ref to Operative procedures chapter EXTRACTION Note before extracting any PM please ensure that the remaining PMs are capable of supporting the full load To extract the PM from the cabinet reverse the procedure...

Page 26: ...tion depends on the BM model installed within the system MPX 130 BM BM126X If a BACKFEED is detected the system transfers the output onto the automatic bypass and disconnects the inverter line via relays The load is powered from the bypass line If the protective action is triggered whilst on battery operating mode the load will be disconnected for safety reasons MPW 130 BM If the BACKFEED is detec...

Page 27: ... Switch Lock rotating switch and mechanical lock for the BM into the cabinet INTERFACE PANEL Green On steady Bypass ready Green On steady Bypass operating Slow flashing active call with bypass unavailable Yellow On steady Anomaly Red On steady Alarm Slow blinking Initialisation PORT S Communication port reserved for service personnel only ...

Page 28: ...ove the two side fastening screws and store them 4 Carefully extract the BM from its housing This operation requires two persons 5 Caution when the BM is not inserted uncovered parts with dangerous voltage are present on the corresponding backplane Therefore in the case where a new BM is not immediately inserted install the supplied protection cover using the dedicated screws INSERTION 1 If presen...

Page 29: ...Manual Fastening knobs Interface panel INTERFACE PANEL Green On steady MU ready Green Slow blinking Test in progress Yellow On steady Anomaly Red On steady Alarm PORT S Communication port reserved for service personnel only INSERTION EXTRACTION PROCEDURE The following operations must only be performed by skilled and specifically trained personnel When the MU is not inserted uncovered parts with da...

Page 30: ...RACTION PROCEDURE The following operations must only be performed by skilled and specifically trained personnel When the PSU is not inserted uncovered parts with dangerous voltage are present on the corresponding backplane The PSU is pre installed by the manufacturer Remove the PSU only in case of maintenance or replacement Strictly comply with the instructions as listed below EXTRACTION Undo the ...

Page 31: ...the dedicated handles on the sides of the display carefully pull and remove the MCU INSERTION Carefully insert the MCU in the dedicated slot Fasten the MCU by fastening the two side screws removed previously CONNECTIVITY PANEL CP MPX 130 PWC The Connectivity Panel CP integrates the logic functions of the MCUs and MUs that are contained within other types of Cabinets Therefore it carries out the mo...

Page 32: ... INSERTION Carefully insert the CP in the dedicated slot Fasten the CP by fastening the two side screws removed previously BATTERY UNIT BU The Battery Unit BU contains 10 off 12V batteries 120Vdc which can be replaced during maintenance if required INSERTION EXTRACTION PROCEDURE The following operations must only be performed by skilled and specifically trained personnel When the BU is not inserte...

Page 33: ...st free dedicated slot within the Battery Cabinet starting from the bottom slot 1 If present remove the protection cover and store it together with the fastening screws 2 If present remove the locking bracket and store it together with the fastening screws 3 Insert the BU into the cabinet Remove the screw located in the front part of the BU in the low front part Fasten the BU to the cabinet using ...

Page 34: ...t on the corresponding backplane Therefore in the case where a new BU is not immediately inserted install the supplied protection cover using the dedicated screws BATTERY MAINTENANCE WARNING DANGEROUS VOLTAGE INSIDE Never open the BU for any reason if any anomaly is noted contact your local service agent Batteries in order to maintain a high efficiency and durability must be regularly charged usin...

Page 35: ...the system access levels and the network services e mail sending anomaly reporting etc The Home page shows a diagram of the general operation status of the system It is possible to interact with the system and see the details through the icons STATUS BAR The status bar at the top shows the title of the current page and the rated power of the system The system date and time are displayed on the rig...

Page 36: ... Load gauge phase 3 System status Redundancy bar see paragraph Load level and redundancy system status In general the colour and the shape of the icons provide instant information to the status of the system Grey colour communication lost Com Lost Light blue colour normal status Blue colour bypass operation Orange colour anomaly Red colour alarm ...

Page 37: ...R FROM BATTERY LOAD ON BYPASS EFFICIENCY CONTROL LOCKED COMM LOST MU STATUS NORMAL OPERATION ANOMALY WARNING FAULT COMM LOST PRESENT COMM LOST BM STATUS NORMAL OPERATION ANOMALY WARNING FAULT LOCK COMM LOST READY LOAD ON BYPASS LOCKED COMM LOST CABINET ALARMS NORMAL OPERATION ANY ANOMALY WARNING ANY FAULT ANY LOCK ANY COMM LOST PRESENT COMM LOST ...

Page 38: ... the load The diagrams below show the possible Load level bar status according to the system conditions with respect to the load level redundancy and PM availability The example shows a system with 5 PMs in operation 2 of which are configured as redundant Case 1 Normal operation light blue colour Configured PM number Redundant PM number Number of operating PMs necessary to supply the current load ...

Page 39: ...isplay reserved for displaying the main electrical values related to the battery Bypass input Area of the display reserved for displaying the main electrical values related to the bypass line Output Area of the display reserved for displaying the main electrical values related to the output of the system NAVIGATION HOME Key for closing the currently selected page and returning to Home PREVIOUS Key...

Page 40: ...BLE ON LOCK STATUS TEMPORARILY UNAVAILABLE SYSTEM STATUS DISPLAY LEGEND OF THE USED SYMBOLS TOUCH If present it highlights the main elements which can be selected from the screen SWIPE LEFT RIGHT Movement for the sliding graphical elements for the status switch from O to I SWIPE RIGHT LEFT Movement for the sliding graphical elements for the status switch from I to O ...

Page 41: ...on of the system It is possible to interact with the system and see the details through the icons Depending on the current state of the system this page may assume different appearances as shown in the examples below Load on INVERTER normal operation BATTERY operating mode LOAD ON STATIC BYPASS ...

Page 42: ... 40 Load on the STATIC BYPASS with the MANUAL BYPASS SWITCH CLOSED Load supplied solely via the MANUAL BYPASS SWITCH System with an alarm signal ...

Page 43: ...tion of the inverter is restored Icon indicating the existence and number of alarms that are active at that time If you click on the icon a window will open up that shows the individual alarms in detail Icon that may appear on the status bar Indicates that a data processing task on the mass storage is in progress in this condition the system may work at a slower pace Icon that may appear on the st...

Page 44: ...MEASUREMENTS The pages that display the main electrical values of the system can be accessed through the icons on the Home page 1 This displays the status and the electrical parameters relating to the system input ...

Page 45: ...ed batteries due to a BUA removal or the opening of the battery disconnectors a bar will be displayed that shows the amount of residual Ah compared to the total configured Ah 3 This displays the status and the parameters relating to the system bypass line 4 This displays the status and the electrical parameters relating to the system output ...

Page 46: ... element in the individual cabinets is represented By pressing each of the related icons A B C D all details in relation to each of the cabinets can be monitored Cabinet page The following TABs represent the total number of connected Battery Cabinets these are shown in groups of 3 or 4 By pressing each of the related icons 1 2 3 0 all details in relation to each of the cabinets can be monitored Ba...

Page 47: ... 45 If for any reason an anomaly occurs within any of the cabinets the related TAB will highlight the failure For example if a PM fails the icon representing it will change as shown below ...

Page 48: ...displays general information about the system Expand the drop down menu on the Home page and touch the following icon System name firmware version and the network configuration of the cabinet Sys Overall system parameters set by the user Set ...

Page 49: ...ividual MU and MCU modules or CP SN NOTE 1 the CP integrates in one unit the logic functions of the MCUs and MUs therefore it features two types of FWs and two serial numbers NOTE 2 The serial numbers and firmware versions of non communicating elements are shown with an asterisk and in italics ...

Page 50: ... status bar Power Cabinet MPX 130 PWC Combo Cabinet MPX 100 CBC Battery Cabinet MPW 170 BTC By pressing the left Tab menu it is possible to display the electrical values of the cabinet related to the input the batteries the bypass line and the output Touching the relevant module PM BM or MU brings up the associated detailed information page ...

Page 51: ...icated on the status bar By pressing the left Tab menu it is possible to display the input battery bypass line and output electric values measured in the module The alarm list on the right of the page shows details of any anomalous conditions alarms currently present on the selected PM ...

Page 52: ...ge During inverter mode operation bypass currents are always zero while the voltages on the bypass output will be visible Alternatively during normal bypass operation and in presence of a load the bypass current values will reflect the load levels applied The alarm list on the right of the page shows details of any anomalous conditions alarms currently present on the selected BM ...

Page 53: ...d in this page The alarm list on the right of the page shows details of any anomalous conditions alarms currently detected by the selected MU SWBYP Bypass Switch external SWIN Input Switch external SWBATT_EXT Battery Switch external SWOUT Output Switch external SWMB Manual Bypass Switch external and internal SWBATT Battery Switch internal Power Cabinet MPX 130 PWC ...

Page 54: ... 52 Combo Cabinet MPX 100 CBC ...

Page 55: ... 53 Battery Cabinet MPW 170 BTC ...

Page 56: ...d on the selected level Expand the drop down menu in the Home page and touch the access level selection icon The User level allows only basic display actions The Power User level allows commands on off bypass switch or battery test and part of the settings The preset access password power The Expert level is reserved for the authorised service personnel only NOTES 1 Access as Expert user to config...

Page 57: ... or for the individual module It is also possible to perform a battery test or force system operation from a static bypass Operate the sliding switch to execute a command The progress bar shows the progress of the start up shut down sequence SYSTEM OFF ON COMMAND Operate the sliding switch from O to I to switch the system on A confirmation of the action is requested for some of the commands ...

Page 58: ...m off COLD START COMMAND To switch on the system from the battery press the COLD START button of the Cabinet for around 5 seconds see the User Interface paragraph The UPS modules will activate with their LEDs on Repeat this operation for all the Cabinets within the system Finally switch on the system from the display using the ON OFF COMMAND described in the previous paragraph ...

Page 59: ...O to I to execute the battery test The progress bar shows the progress of the battery test MODULE OFF ON COMMAND Select the Power Module on which you want to operate Operate the sliding switch from O to I or from I to O to switch the single Power Module on off ...

Page 60: ...vent log icon By setting the start and end dates you can view the events stored during a certain period To view the communication status tap the View communication status icon ErrCnt represents the number of errors accumulated by the MCU of CP you are operating from as of the date given at the top of the page Using the eraser icon you can reset the counters and start the count again from the prese...

Page 61: ...nload is complete before removing the USB key NOTE the service files export icon will only become active once the USB key has been correctly recognised EMERGENCY OFF COMMAND When there is an EPO condition if you enter the Command Panel a window will appear that displays the EPO condition WARNING to restore the operation of the UPS make sure that the conditions which led to the emergency shut down ...

Page 62: ...quired for accessing the Main Setup Language configuration E mail service configuration Date time Country settings system clock synchronisation with an NTP benchmark Network settings Planned operations configuration General system settings system name etc ...

Page 63: ...he system menus SYSTEM CLOCK SETTING These pages enable the user to configure the date the time and the time zone of the system CLOCK SYNCHRONIZATION SETTINGS It is possible to make the system regularly synchronise its system clock with the clock of a local NTP server ...

Page 64: ...ATTERY TEST SCHEDULING This page enables the configuration of the scheduling for the automatic battery tests You can also program for logs to be sent via email It will always be sent at 00 00 every day or every week depending on your choice ...

Page 65: ...ort name and e mail address of the sender encryption type and authentication data E MAIL ADDRESS CONFIGURATION This page allows you to set a list of addresses to be sent a message in the event of a system event Using the alarm category messages can be filtered by importance Alarm type Informative Minor Major Critical NOTES The selected alarm category includes all the other more serious categories ...

Page 66: ...ooter of the message NETWORK SETTINGS These pages enable the configuration of the network connection Hostname This is the name identifying the MCU or CP on the network Tcp Ip protocol Allows you to modify the network interface settings UDP HTTP Allows you to set the associated services with the key the port and the password see chapter on Monitoring via Ethernet port ...

Page 67: ...nd the contact person The commissioning date can only be viewed by a Power User PASSWORD SETTING AND CHANGE Touch the user icon matching the access level for which it is intended to set or change the password and type change the password The password will be required to be entered twice to ensure it is correct ...

Page 68: ...lies are reported by a buzzer which emits a modulated sound according to the various UPS operating conditions The different types of sounds are described below Sound A This sound is made when the UPS switches to bypass Sound B The sound is made when the UPS switches to battery mode before the battery final discharge signal is given sound C Sound C The sound is made in battery mode when the battery...

Page 69: ... configuration of its own cabinet Under some circumstances this operation may not be successful at the first attempt In this case the display will show a screen that allows the test outcome to be forced by the operator The test is in any case repeated autonomously every 60 seconds Usually the test is completed successfully at the second attempt and the MCU or CP can then start autonomously Only fo...

Page 70: ...tings In this case refer to the MPW MPX Advanced Configuration Manual In the event that the EPO condition is detected by a sub system of UPS Cabinets the system will switch to a state of partial switching on with the BMs of the affected Cabinets locked To exit this situation remove the EPO contact problem and switch the system on again ...

Page 71: ...for the monitoring of the batteries contained in the Modular Battery Cabinets For further information please refer to the parallel kit manual provided and to the installation manual Note this card is provided as standard in the Cabinet MPX 100 CBC REDUNDANT POWER SUPPLY UNIT PSU2 The Cabinet MPX 130 PWC features a kit for the installation of an additional power supply unit PSU2 in the slot provide...

Page 72: ...separate communications bus can be created The figure shows the Ethernet network port and the slots with the Multicom 302 and Netman 204 options MPX MONITORING WITH ETHERNET PORT STANDARD The network port supports standard UDP HTTP and SMTP protocols to control and monitor the system In detail UDP protocol to operate with PowerShield3 propriety software available from www riello ups com For furthe...

Page 73: ... 71 MONITORING VIA WEB BROWSER ...

Page 74: ...loped a special page for Simplified Monitoring The page can be accessed at http addrMCU monitor html where addrMCU is the hostname of the MCU or CP or simply the selected IP address You can view a preview by clicking in the AUTONOMY panel on the Home page ...

Page 75: ...ntire system It also provides a detailed description of the cabinet it is inserted into Note A Netman 204 installed within an MPX system does not make available the services already supplied by the standard Ethernet port UDP HTTP and SMTP MONITORING VIA OPTIONAL MULTICOM 302 CARD MODBUS 485 The optional network card supports the standard Modbus 485 protocol to integrate the system into a Modbus ne...

Page 76: ...all the configured BM are ready the green led BYPASS READY is lit fixed From the Command Panel page slide System Off On from O to I to start the System Confirm System ON command This command will automatically Start Up the System with the following sequence 1 PMs Pre charge 2 PMs Inverters Synchronise 3 Transfer the load onto the Static Bypass Line 4 Transfer the load onto the Inverter Output The ...

Page 77: ... the System Status page From the Command Panel page slide System Off On from O to I to start the PMs Confirm Inverter On Command The inverters will synchronise within all of the PMs ready to start but the system will remain on bypass The Awaiting Start Up process will take approximately one minute Verify that no anomalies are present on the system status page except the alarm Batteries not present...

Page 78: ... supplies the load directly NOTE In the case of an installation with an external SWMB switch verify first the proper connection of the relative Auxiliary Contact SWITCHING THE SYSTEM TO INVERTER AFTER MANUAL BYPASS Operation to be performed in order to switch the MPX from Manual Bypass to normal operation From the Command Panel page slide OnBypass from O to I to close static bypass Confirm Load On...

Page 79: ...ced module is operating correctly Verify that all the measurements and the operational status are correct B Operation to be performed in order to replace a PM when redundancy is not available When the number of available PMs cannot adequately support the connected load it is necessary to put the system into static bypass Using OnBypass command from Command Panel System page force the system into s...

Page 80: ...ion procedure This operation can be performed without interrupting power to the load The replacement of these units will not affect the load Simply extract the unit and insert the new one Verify the status of the replaced unit NOTE If the MCU or CP is removed the system will continue to operate correctly During this time the user will only lose the system monitoring functions WARNING The MU MCU an...

Page 81: ...AL BYPASS ACTIVE Major SWOUT OPEN Major LOW REDUNDANCY Minor SWBATT OPEN Major SWEXTBATT OPEN Major BATTERY NOT PRESENT Major BATTERY UNIT ANOMALY REPLACE BATTERY Major SYSTEM ANOMALY Minor LOAD THRESHOLD EXCEEDED BATTERY LOW Major IMMINENT SHUTDOWN Major SCHEDULED SHUTDOWN Minor TEST IN PROGRESS EPO COMMAND ACTIVE Critical SWIN OPEN Major SWBYP OPEN Major PM NOT COMPATIBLE Warning SYSTEM WARNING ...

Page 82: ...Warning BYPASS DISABLED BYPASS COMMAND ACTIVE REMOTE BATT CHARGER OFF POWER MODULE PM STATUS MESSAGES PM NOT PRESENT Minor PRECHARGE STAND BY STARTING LOAD ON BYPASS Minor LOAD ON INVERTER FROM BATTERY Major WAIT BATTERY RECHARGE ECONOMY MODE ENERGY SAV Warning READY LOCK LOAD OFF Critical LOCK LOAD ON BYPASS Critical LOCK STAND BY Critical FREQUENCY CONVERTER CALIBRATION POWER OFF ACTIVE WAIT CAB...

Page 83: ...ERVOLTAGE L2 A07 MAINS OVERVOLTAGE L3 A08 MAINS UNDERVOLTAGE L1 A09 MAINS UNDERVOLTAGE L2 A10 MAINS UNDERVOLTAGE L3 A11 MAINS FREQUENCY ABNORMAL A13 BYPASS VOLT ABNORMAL L1 A14 BYPASS VOLT ABNORMAL L2 A15 BYPASS VOLT ABNORMAL L3 A16 BYPASS FREQ ABNORMAL A18 BYPASS VOLTAGE FAIL A19 OUT PEAK OVERCURRENT L1 A20 OUT PEAK OVERCURRENT L2 A21 OUT PEAK OVERCURRENT L3 A22 LOAD L1 USER THRESHOLD A23 LOAD L2...

Page 84: ...Y OVERVOLTAGE F20 BATTERY OVERVOLTAGE F21 BATTERY UNDERVOLTAGE F22 BATTERY UNDERVOLTAGE F23 OUTPUT OVERLOAD F24 BYPASS MODULE FAULT F25 POWER RETURN FROM OUTPUT F26 OUTPUT CONTACT LOCKED L1 F27 OUTPUT CONTACT LOCKED L2 F28 OUTPUT CONTACT LOCKED L3 F29 OUT FUSE CONTACT FAIL L1 F30 OUT FUSE CONTACT FAIL L2 F31 OUT FUSE CONTACT FAIL L3 F32 BATTERY CHARGER FAULT F33 BATTERY MEASURE ERROR F34 POWER OVE...

Page 85: ...AVE ABNORMAL L1 L21 INV SINE WAVE ABNORMAL L2 L22 INV SINE WAVE ABNORMAL L3 L23 OUTPUT OVERLOAD L1 L24 OUTPUT OVERLOAD L2 L25 OUTPUT OVERLOAD L3 L26 OUTPUT SHORT CIRCUIT L1 L27 OUTPUT SHORT CIRCUIT L2 L28 OUTPUT SHORT CIRCUIT L3 L29 OUT FUSE CONTACT FAIL L1 L30 OUT FUSE CONTACT FAIL L2 L31 OUT FUSE CONTACT FAIL L3 L32 PARAL SYNCHRON ERROR L33 PARAL SYNC LINE FAULT L34 BOOST L1 OVERTEMP SENSOR L35 ...

Page 86: ...OMMAND ACTIVE C08 BYPASS COMMAND ACTIVE WARNING W89 BM WARNING W90 BACKFEED NOT COMPATIBLE ANOMALY A86 BYPASS UNDERVOLTAGE A89 BM ANOMALY FAULT F81 FAN 1 FAILURE F82 FAN 2 FAILURE F83 FAN 3 FAILURE F84 HIGH TEMPERATURE F85 BYPASS PHASE REVERSED F87 OUTPUT UNDERVOLTAGE F89 BM FAULT F91 OUTPUT OVERLOAD LOCK L89 BM LOCKED L91 OUTPUT OVERLOAD L92 BOARDS LINK FAIL L93 BYPASS BACKFEED ...

Page 87: ...A69 CABINET OVERTEMP Major FAULT F61 TEMP SENSOR FAULT S1 F62 TEMP SENSOR FAULT S2 F63 TEMP SENSOR FAULT S3 F64 TEMP SENSOR FAULT S4 F65 HUMIDITY SENSOR FAULT F66 HARDWARE FAULT F67 POWER SUPPLY PSU1 FAIL Minor F68 POWER SUPPLY PSU2 FAIL Minor b n INTERNAL CODE b n INTERNAL CODE BU ALARM CODES WARNING W62 DISCHARGE CURRENT W63 BATTERY CONFIG ERR ANOMALY A62 BATTERY NOT PRESENT Major A71 CHARGE OVE...

Page 88: ...s to a significant attention to batteries our UPS preserves the health of the batteries both during charging and discharging For example an algorithm has been implemented to avoid deep discharges Nevertheless environmental conditions and usage affect the duration of the batteries The environmental temperature the number of blackouts or power supply interruptions the number of deep discharges and t...

Page 89: ... and current battery status monitoring via the MPX LCD display Traditional VRLA type batteries Dimensions WxDxH mm 600x1050x2000 860x800x2000 Weight kg without PM3 BU4 280 250 OUTPUT Nominal voltage V 3802 400 415V AC 3 phase plus neutral Nominal frequency Hz 50 or 60 Voltage stability 1 Dynamic stability EN62040 3 Performance Class 1 with non linear load GENERAL SPECIFICATIONS Cabinet type MPX 13...

Page 90: ...ly line Short circuit current ICC 10kA at 415V maximum Cable entry Rear from the bottom MPX 130 PWC Rear from the bottom or top MPX 100 CBC Colour RAL 9005 Standards Safety IEC EN62040 1 EMC IEC EN 62040 2 Category C2 Mobile Cabinet Castors all cabinet types are sent without PM3 and BU4 1 Including redundancy 2 Applied conditions 3 PM Power Module referring to the 15 kW MPX 15 PM or 25 kW MPX 25 P...

Page 91: ......

Page 92: ...0MNMPXK15RUENUB ...

Reviews: