background image

18

19

WARRANTY

Proof of purchase must be presented when requesting 
warranty service. 

This product is manufactured by One World Technologies, 
Inc. The trademark is licensed from RIDGID, Inc.  All warranty 
communications should be directed to One World Technolo-
gies, Inc., attn: RIDGID Pneumatic Tool Technical Service at 
(toll free) 1-866-539-1710. 

90-DAY SATISFACTION GUARANTEE POLICY 

During the first 90 days after the date of purchase, if you are 
dissatisfied with the performance of this RIDGID

®

 Pneumatic 

Tool for any reason you may return the tool to the dealer 
from which it was purchased for a full refund or exchange. 
To  receive  a  replacement  tool  you  must  present  proof  of 
purchase and return all original equipment packaged with 
the original product. The replacement tool will be covered by 
the limited warranty for the balance of the 3-YEAR service 
warranty period. 

WHAT IS COVERED UNDER THE 3 YEAR 
LIMITED SERVICE WARRANTY 

This warranty on RIDGID

®

 Pneumatic Tools covers all defects 

in workmanship or materials and normal wear items for three 
years following the purchase date of the tool. Warranties for 
other RIDGID

®

 products may vary. 

HOW TO OBTAIN SERVICE

To obtain service for this RIDGID

®

 tool you must return it; 

freight prepaid, or take it in to an authorized service center 
for RIDGID

®

 branded pneumatic tools. You may obtain the 

location  of  the  authorized  service  center  nearest  you  by 
calling  (toll  free)  1-866-539-1710  or  by  logging  on  to  the 
RIDGID

®

  website  at  www.ridgid.com.  When  requesting 

warranty service, you must present the original dated sales 
receipt. The authorized service center will repair any faulty 
workmanship, and either repair or replace any part covered 
under the warranty, at our option, at no charge to you.

One World Technologies, Inc.

P.O. Box 35, Hwy. 8

Pickens, SC 29671

WHAT IS NOT COVERED

This warranty applies only to the original purchaser at retail 
and may not be transferred. This warranty only covers de-
fects arising under normal usage and does not cover any 
malfunction, failure or defect resulting from misuse, abuse, 
neglect, alteration, modification or repair by other than an 
authorized service center for RIDGID

®

 branded pneumatic 

tools. Consumable accessories provided with the tool such 
as, but not limited to, fasteners, oil, and safety glasses are 
not covered. 
RIDGID,  INC.  AND  ONE  WORLD  TECHNOLOGIES,  INC. 
MAKE NO WARRANTIES, REPRESENTATIONS OR PROM-
ISES  AS  TO  THE  QUALITY  OR  PERFORMANCE  OF  ITS 
PNEUMATIC TOOLS OTHER THAN THOSE SPECIFICALLY 
STATED IN THIS WARRANTY. 

ADDITIONAL LIMITATIONS

To the extent permitted by applicable law, all implied war-
ranties, including warranties of MERCHANTABILITY or FIT-
NESS FOR A PARTICULAR PURPOSE, are disclaimed.  Any 
implied warranties, including warranties of merchantability 
or fitness for a particular purpose, that cannot be disclaimed 
under state law are limited to three years from the date of 
purchase. One World Technologies, Inc. and RIDGID, Inc. 
are not responsible for direct, indirect, incidental or conse-
quential damages. Some states do not allow limitations on 
how long an implied warranty lasts and/or do not allow the 
exclusion or limitation of incidental or consequential dam-
ages, so the above limitations may not apply to you. This 
warranty gives you specific legal rights, and you may also 
have other rights which vary from state to state. 

RIDGID

®

 PNEUMATIC TOOL 3 YEAR LIMITED SERVICE WARRANTY 

Summary of Contents for R250SFA

Page 1: ...tor safety When properly cared for it will give you years of rugged trouble free performance WARNING To reduce the risk of injury the user must read and understand the operator s manual before using this product Thank you for buying a RIDGID product SAVE THIS MANUAL FOR FUTURE REFERENCE OPERATOR S MANUAL STRAIGHT FINISH NAILER R250SFA ...

Page 2: ...10 16 n Maintenance 17 n Accessories 17 n Troubleshooting 18 n Warranty 19 n Customer Service Information 20 TABLE OF CONTENTS INTRODUCTION This tool has many features for making its use more pleasant and enjoyable Safety performance and dependability have been given top priority in the design of this product making it easy to maintain and operate ...

Page 3: ...t in moving parts n Keep fingers away from trigger when not driving fasten ers to avoid accidental firing n Do not overreach Keep proper footing and balance at all times Proper footing and balance enables better control of the tool in unexpected situations n Use safety equipment Always wear eye protection Dust mask nonskid safety shoes hard hat or hearing protection must be used for appropriate co...

Page 4: ... other than the workpiece n Do not use the tool as a hammer n Always carry the tool by the handle Never carry the tool by the air hose n Do not alter or modify this tool from the original design or function without approval from the manufacturer SPECIFIC SAFETY RULES n Always be aware that misuse and improper handling of this tool can cause injury to yourself and others n Never clamp or tape the t...

Page 5: ...ected possibly causing injury n Always disconnect air supply Before making adjustments When servicing the tool When clearing a jam When tool is not in use When moving to a different work area as accidental actuation may occur possibly causing injury LOADING TOOL n Do not load the tool with fasteners when any one of the operating controls is activated When loading tool n Never place a hand or any p...

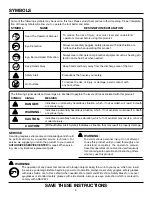
Page 6: ...n their meaning Proper interpreta tion of these symbols will allow you to operate the tool better and safer Read The Operator s Manual Safety Alert SYMBOL NAME DESIGNATION EXPLANATION To reduce the risk of injury user must read and understand operator s manual before using this product Eye Protection Precautions that involve your safety Hot Surface To reduce the risk of injury or damage avoid cont...

Page 7: ...rol is released and re activated Selective actuation An actuation system that allows discrete selection of two or more of the following actuation systems single sequential actuation full sequential actuation or contact actuation One or more of the selections shall be single sequential actuation or full sequential actuation Air inlet port In an air tool the opening to which the compressed air suppl...

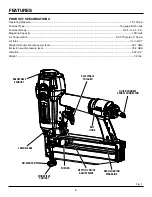
Page 8: ...to 2 1 2 in Magazine Capacity 100 nails Air Consumption 0 05 ft3 cycle at 100 psi Air Inlet 1 4 in NPT Weighted sound impulse power level 90 7 dBA Emission sound pressure level 78 4 dBA Vibration 2 52 m s2 Weight 3 5 lbs QUICK CONNECT SWIVEL CONNECTOR DEPTH OF DRIVE ADJUSTMENT ADJUSTABLE EXHAUST SELECTABLE TRIGGER WORKPIECE CONTACT BELT HOOK JAM RELEASE PUSHER ...

Page 9: ...ER The self cleaning in handle air filter helps keep debris out to extend the life of the tool JAM RELEASE A tool free jam release is provided for ease in clearing infre quent jams NO MAR PAD The no mar pad prevents marring and denting when using the tool on softer woods OVERMOLD GRIP AND TRIGGER The overmold grip and trigger offer increased comfort and control of the tool QUICK CONNECT SWIVEL CON...

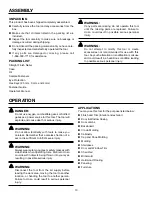
Page 10: ...ly to make sure no breakage or damage occurred during shipping n Do not discard the packing material until you have care fully inspected and satisfactorily operated the tool n If any parts are damaged or missing please call 1 866 539 1710 for assistance PACKING LIST Straight Finish Nailer Case Oil Sample Fasteners Eye Protection Hex Keys 2 5 mm 3 mm and 4 mm Fastener Guide Operator s Manual ASSEMB...

Page 11: ...within the proper range of 70 120 psi NO MAR PAD See Figure 3 The no mar pad attached to the nose of the tool helps prevent marring and denting when working with softer woods WARNING Disconnect the tool from the air supply before removing or replacing the no mar pad Failure to do so could result in serious personal injury The pad can be removed by pulling it down and away from the nose To replace ...

Page 12: ...The tool and air hose must have a hose coupling that allows all pressure to be removed from the tool when the coupling is disconnected WARNING Always use a coupling that discharges all the compressed air in the tool at the time the fitting or hose coupling is disconnected Using a coupling that does not discharge the compressed air could cause unintended operation and serious personal injury WARNIN...

Page 13: ...sult in possible serious personal injury n With the nose of the tool pointed away from you feed a strip of nails into the magazine Be sure the nails are pointed downward and at the angle shown n Depress the button located on the left side of the pusher to allow the pusher to move the nails up to the driving mechanism The pusher will stop when it rests against the end of the nail strip NOTE Do not ...

Page 14: ...ition A n Release the trigger lever pivot pin WARNING The nailer will not function properly if the selector is not securely seated in either position A or B Always assure the selector is seated properly to avoid an unexpected fastener discharge and possible serious personal injury n Reconnect the tool to the air supply n Grip the tool firmly to maintain control Position the nose of the tool onto t...

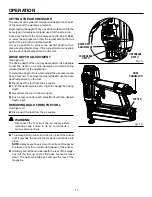
Page 15: ...d drive a test nail To achieve the desired depth use the drive depth adjustment on the tool n Disconnect the tool from the air supply n Turn the depth selector left or right to change the driving depth n Reconnect the tool to the air supply n Drive a test nail after each adjustment until the desired depth is set REMOVING NAILS FROM THE TOOL See Figure 10 n Disconnect the tool from the air supply W...

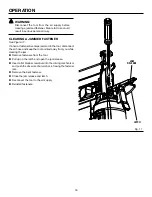
Page 16: ...ool disconnect the air hose and keep the tool pointed away from you while clearing the jam n Remove fasteners from the tool n Pull up on the latch and open the jam release n Insert a flat blade screwdriver into the driving mechanism and push the driver mechanism back freeing the fastener jam n Remove the bent fastener n Close the jam release and latch n Reconnect the tool to the air supply n Reins...

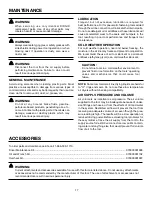
Page 17: ...er Before evaluating tool problems for these symptoms trace the air supply from the tool to the supply source for restrictive connectors low points contain ing water and anything else that would prevent full volume flow of air to the tool WARNING When servicing use only identical RIDGID replacement parts Use of any other parts may create a hazard or cause product damage WARNING Always wear safety ...

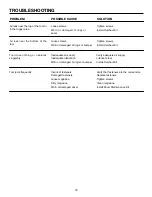
Page 18: ... air supply Inadequate lubrication Worn or damaged O rings or bumper Tighten screws Install Overhaul Kit Verify adequate air supply Lubricate tool Install Overhaul Kit Air leak near the bottom of the tool Loose screws Worn or damaged O rings or bumper Incorrect fasteners Damaged fasteners Loose magazine Dirty magazine Worn or damaged driver Verify that fasteners are the correct size Replace fasten...

Page 19: ...rvice center will repair any faulty workmanship and either repair or replace any part covered under the warranty at our option at no charge to you One World Technologies Inc P O Box 35 Hwy 8 Pickens SC 29671 WHAT IS NOT COVERED This warranty applies only to the original purchaser at retail and may not be transferred This warranty only covers de fects arising under normal usage and does not cover a...

Page 20: ...r the location of the authorized service center nearest you please call 1 866 539 1710 or visit us online at www ridgid com The model number of this tool is found on a plate attached to the the magazine Please record the serial number in the space provided below When ordering repair parts always give the following information Model No Serial No R250SFA OPERATOR S MANUAL STRAIGHT FINISH NAILER R250...

Reviews: