background image

StreamPunch

TM


Pro, Pro EX & MP

6. PUNCHING OPERATIONS

After installing the correct die set in your StreamPunch, you are ready to
start punching. The following sections indicate how to activate the machine.
Carefully read these sections completely to become familiar with the various
components of the machine and the Die Set.

The 

POWER 

LED should be illuminated. If not, turn on power with the

Power On/Off (I/O) switch located at the front of the StreamPunch module.

PUNCH ENABLED:

 Punch mode is selected using the Printer

Operation screen. The LED will be illuminated while a punch
job is running

CLOSE DOOR and PAPER JAM:

 If either of these LEDs is

illuminated, no bypass and no punch function can occur until
these areas have been checked and corrected.

CHIP TRAY FULL/OUT and CHECK DIE SET: 

If either of

these LEDs is on, you can run in bypass mode, but not punch
mode.

CHIP TRAY FULL/OUT: 

If this LED is flashing the Chip Tray is

FULL. If this LED is on and not flashing, the Chip Tray is OUT.

POWER:

 If this LED is not on, paper can not run through the

StreamPunch in either bypass or punch mode. The paper will
jam when entering the StreamPunch.

Your StreamPunch offers the convenience of interchangeable die sets,
allowing you to economically punch documents for a wide variety of binding
styles. Changing the machine's die sets is both quick and easy, as the
following instructions illustrate:

Removing Die Sets from the Machine: 

The inter-changeable die set

slot of the StreamPunch is located on the right front side of the machine.
If a die set is already installed in your StreamPunch, you can easily
remove the die set by following these instructions:

Step 1: 

 Stop the printer/copier.

Step 2:

  Open the StreamPunch access door  panel.

Step 3: 

Securely grasp the handle and pull firmly. This firm pull

disengages the Automatic Latching Mechanism and allows the die set
to slide out.

Step 4:  

Continue to pull the handle until the Die Set is fully removed,

supporting it with both hands.

Step 5:  

Properly store the removed Die Set in the Die Set storage area at

the top of the StreamPunch (keep away from dust, dirt, accidental falls
from the edge of counters, etc.).

Step 6:  

Select the desired Die Set for your new job and slide it into the

Die Set slot. Push Die Set in firmly until it latches.

WARNING: POSSIBLE PINCH POINT HAZARD. WHEN
INSTALLING DIE SETS IN YOUR STREAMPUNCH,
ALWAYS KEEP FINGERS AND OTHER BODY PARTS OUT
OF THE MACHINE’S DIE SET SLOT AND AWAY FROM
ALL AREAS OF THE DIE SET, EXCEPT FOR THE FINGER
HOLE IN THE DIE SET. FAILURE TO FOLLOW THESE
PRECAUTIONS MAY RESULT IN INJURY.

Step 7:  

Close the Access Door Panel.

Step 8:

  Enable punch and proceed with your printing and punching job.

5. CHANGING THE INTERCHANGEABLE DIE SETS

Area

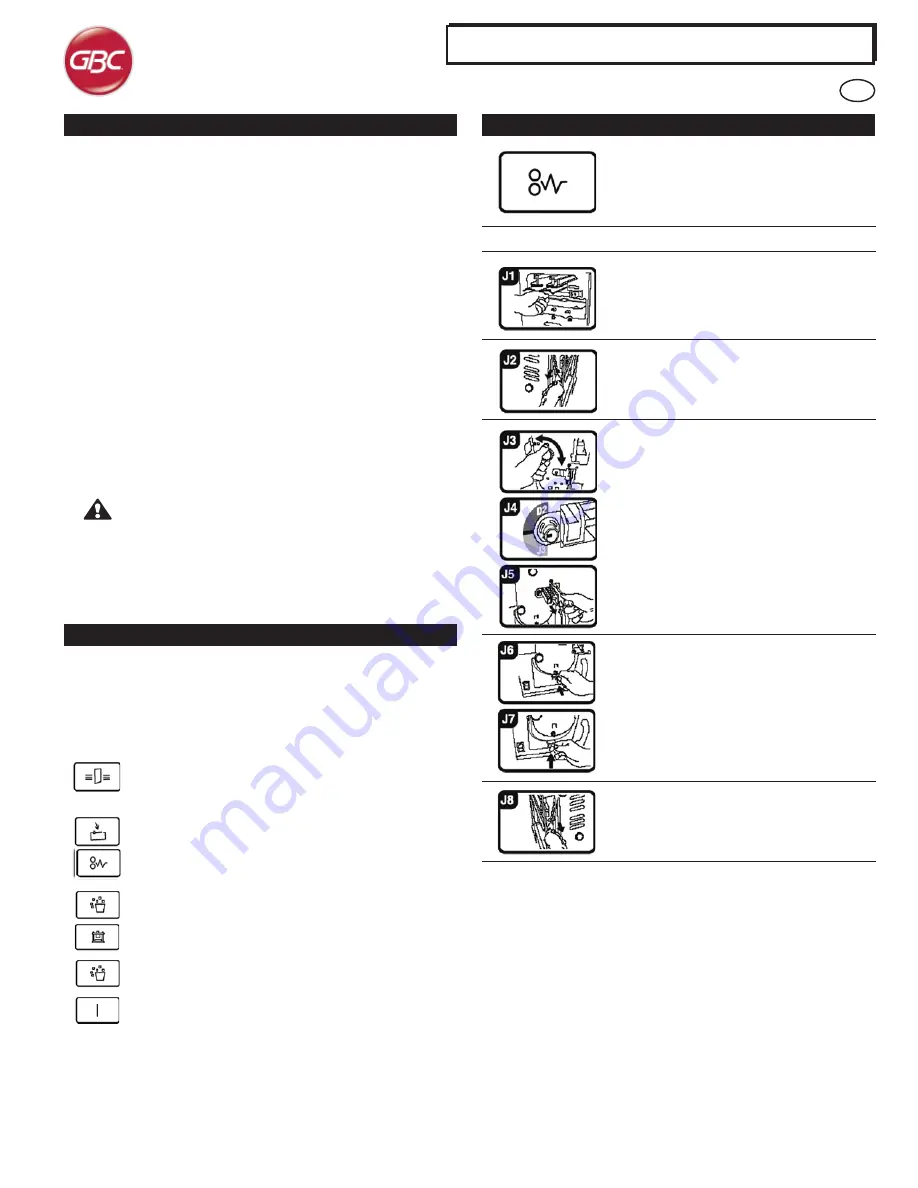
If paper is jammed in the Punch Bypass, lift the
paper guide plate located just inside, reach in and
remove the jammed paper.

If paper is jammed in the downward paper path
chute, move the door to the right, reach in and
remove the jammed paper.

If paper is jammed or the Die Set is jammed, turn
Knob J3 to the HOME position, (arrows line up)
slide the Die Set out and remove paper.

If paper is jammed in the bottom chute of the Punch
Paper path, press the bottom chute latch, reach in
and remove any jammed paper.

If paper is jammed in the upward paper path chute,
move the door to the left, reach in and remove the
jammed paper.

7. PAPER JAMS

This symbol indicates a paper jam. To assist in
clearing paper jams in any of the following areas,
turn one or more of the small knobs to advance the
paper.

Description

GB

6

Summary of Contents for StreamPunch Pro

Page 1: ...r F Manual de instrucciones E Manuale d istruzioni I Bedienungsanleitung D Gebruiksaanwijzing NL Visit GBC at www gbcconnect com ACCO Brands Four Corporate Drive Lake Zurich IL 60047 www acco com Rico...

Page 2: ...rvelo para futuras consultas Bitte lesen Sie diese Bedienungsanleitung sorgf ltig durch und bewahren Sie sie zum sp teren Nachschlagen gut auf Si prega di leggere attentamente le presenti istruzioni...

Page 3: ...n extended period of time Do not operate the StreamPunch if the machine has a damaged power supply cord or plug Do not operate the machine after any malfunction Do not operate the machine in case of l...

Page 4: ...major maintenance for your StreamPunch DO NOT REMOVE THE MACHINE S COVER There are NO user serviceable parts inside the machine in order to avoid potential personal injury and or damage to property o...

Page 5: ...oop Binding choose from W3 Wire Round 3 Holes per inch Hole Size 4mm x 4mm 0 156 x 0 156 Lx W Center to Center Hole Spacing 8 5mm 0 333 W2 Wire Round 2 Holes per inch Hole Size 6 4mm x 5 4mm 0 250 x 0...

Page 6: ...printer copier Step 2 Open the StreamPunch access door panel Step 3 Securely grasp the handle and pull firmly This firm pull disengages the Automatic Latching Mechanism and allows the die set to slid...

Page 7: ...In this case please keep test copying until clean copies can be made 9 SERVICE Probable Cause No power won t punch Die Set will not come out using a moderate pull Probable Cause Power cord not attache...

Page 8: ...i vous d sirez d placer la machine ou si vous n allez pas l utiliser durant une longue p riode N utilisez pas le StreamPunch si le cordon ou si la fiche d alimentation de la machine sont endommag s N...

Page 9: ...ts 50 60 Hz Classe 1 3 conducteurs homologu e par l Union Europ enne CORDON Type H05VV F3G0 75 Harmonis HAR Les symboles indiquent que le cordon est homologu conform ment la norme europ enne appropri...

Page 10: ...epr sent s sur les illustrations ne sont pas l chelle Remarquez que chacun des styles repris dans le tableau ci dessus exige l utilisation d une matrice diff rente sur le StreamPunch Le StreamPunch pe...

Page 11: ...illez lire compl tement ces sections pour vous familiariser avec la machine et avec ses diff rents composants Le voyant marche arr t doit tre allum Si ce n est pas le cas appuyez sur la touche marche...

Page 12: ...es copies sans taches 9 REPARATION 10 EN CAS DE PROBLEME 11 SP CIFICATIONS Le fonctionnement de cette machine est garanti pendant un an compter de la date d achat sous r serve de conditions normales d...

Page 13: ...izar su seguridad Desconecte el StreamPunch si desea desplazar la m quina o si no la va a usar durante un largo periodo No use el StreamPunch si el cable o la toma de alimentaci n de la m quina est n...

Page 14: ...ieza interna puede ser reemplazada por el usuario Evitamos as que se lesione que se lesione que se produzcan da os en la propiedad o que se da e la m quina Pilotos que indican Atasco del papel Bandeja...

Page 15: ...ados Rev 10 02 R2 3 03 Los modelos de perforaci n representados en los gr ficos no respetan las dimensiones reales Note que cada estilo indicado en la tabla de arriba implica el uso de una matriz dife...

Page 16: ...iloto de puesta en marcha debe estar encendido Si no es el caso presione la tecla de puesta en marcha I O situada en la parte delantera del StreamPunch Zona Si el atasco del papel se produce en el en...

Page 17: ...n cuando se use la m quina por primera vez as como justo cuando se aplique aceite en la m quina En este caso siga sacando copias de prueba hasta que vea que las copias salen limpias 9 REPARACI N Causa...

Page 18: ...en Stecker heraus bevor Sie den StreamPunch verschieben oder wenn das Ger t ber eine l ngere Zeitdauer nicht in Betrieb ist Nehmen Sie den StreamPunch nicht in Betrieb wenn die Anschlussleitung oder d...

Page 19: ...europ ische Sicherheitsnormen KABEL Typ H05VV F3G0 75 harmonisiert HAR Die Zeichen bedeuten dass ein Kabel der entsprechenden europ ischen Norm entspricht HINWEIS HAR kann durch das Pr fzeichen der e...

Page 20: ...f r den StreamPunch ben tigt wird Im StreamPunch k nnen bis zu vier Lochstempel aufbewahrt werden einer in Betriebsposition und drei im Stauraum Zus tzliche Lochstempel oder Ersatzlochstempel k nnen S...

Page 21: ...chritt Zugangst r des StreamPunch ffnen 3 Schritt Griff fassen und fest ziehen Durch das feste Ziehen wird der automatische Einrastmechanismus gel st und der Lochstempel gleitet heraus 4 Schritt Halte...

Page 22: ...opien erstellt werden k nnen 9 SERVICE Problem Kein Strom Lochvorgang wird nicht ausgef hrt Lochstempel kann durch angemessenes festes Ziehen nicht entfernt werden M gliche Ursache Stromkabel auf der...

Page 23: ...qualificato per l installazione di una presa idonea Non modificare la spina del cavo di alimentazione se presente di StreamPunch fornita per garantire la sicurezza dell operatore Scollegare dall alime...

Page 24: ...i manutenzione di StreamPunch NON RIMUOVERE IL PANNELLO DI COPERTURA DELLA MACCHINA NESSUNO dei componenti interni alla macchina pu essere riparato dall utente In tal modo si evitano potenziali rischi...

Page 25: ...ati nei grafici non riflettono le dimensioni reali di foratura e di spaziatura tra i fori Notare che a ciascun tipo di perforazione elencato sopra associata una matrice di perforazione specifica per S...

Page 26: ...CI PRESENTE NELLA MACCHINA E LONTANO DA TUTTE LE PARTI DELLE MATRICI DI PERFORAZIONE FATTA ECCEZIONE PER L APPOSITO FORO DI PRESA PRESENTE SULLA MATRICE LA MANCATA OSSERVANZA DI QUESTE MISURE PRECAUZI...

Page 27: ...blema Alimentazione interrotta non viene eseguita la perforazione Impossibile estrarre la matrice di perforazione esercitando una trazione moderata Probabile causa Cavo di alimentazione non collegato...

Page 28: ...op uw veiligheid Verwijder de stekker van de StreamPunch uit de contactdoos voordat u de machine verplaatst of wanneer u de machine gedurende langere tijd niet gebruikt Gebruik de StreamPunch niet al...

Page 29: ...onderhoudsbedrijf VERWIJDER DE BESCHERMKAP VAN DE MACHINE NIET U mag de machineonderdelen NIET zelf vervangen Dit om persoonlijk letsel en of beschadiging van de machine of het bedrijfspand te voorko...

Page 30: ...2 3 03 De perforeerpatronen zijn niet op ware grootte afgebeeld Houd er rekening mee dat u voor elke bovengenoemde inbindstijl een apart mesblok op de StreamPunch nodig hebt De StreamPunch heeft plaat...

Page 31: ...nt verwijderen Als er papier vastzit in de naar boven lopende papiergoot beweegt u de deur naar links waarna u het vastzittende papier kunt verwijderen 7 PAPIERSTORINGEN Dit symbool duidt op een papie...

Page 32: ...HOUD Storing Geen voeding perforeert niet Mesblok kan niet uitgenomen worden door eraan te trekken Mogelijke oorzaak Het netsnoer is niet aangesloten op de achterkant van het apparaat of zit niet goed...

Reviews: