Ricoh SP 201n Operating Instructions Manual Download Page 51

5. Maintaining the Machine

Replacing the Print Cartridge

• Store print cartridges in a cool dark place.
• Actual printable numbers vary depending on image volume and density, number of pages printed

at a time, paper type and size, and environmental conditions such as temperature and humidity.
Toner quality degrades over time.

• For good print quality, the manufacturer recommends that you use genuine toner from the

manufacturer.

• The manufacturer shall not be responsible for any damage or expense that might result from the use

of parts other than genuine parts from the manufacturer with your office products.

1.

Open the front cover, and then carefully lower it.
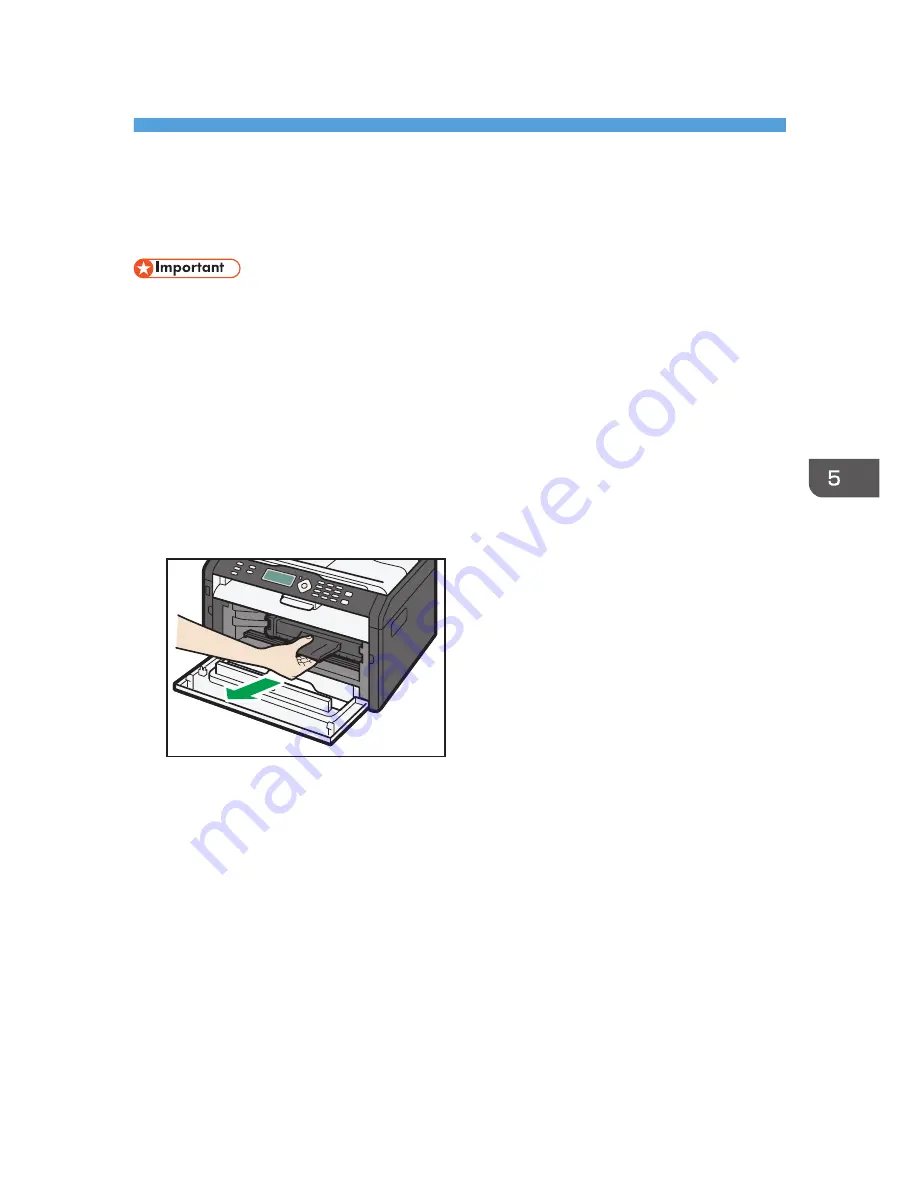
2.

Carefully pull out the print cartridge horizontally, holding its center.

CTT045

3.

Take the new print cartridge out of the box, and then take it out of the plastic bag.

4.

Hold the print cartridge and shake it from side to side five or six times.

Shake the print cartridge horizontally in the direction. The first few printed pages may appear
blurred or smeared if the cartridge has not been shaken properly.

49

Summary of Contents for SP 201n

Page 1: ...Operating Instructions User Guide For safe and correct use be sure to read Safety Information before using the machine...

Page 2: ......

Page 3: ...es to Users in the State of California 9 ENERGY STAR Program 10 1 Guide to the Machine Guide to Components 13 Exterior 13 Interior 14 What is Smart Organizing Monitor 15 Configuring Network Settings 1...

Page 4: ...s 46 Printing the Configuration Page 47 Updating the Firmware 47 5 Maintaining the Machine Replacing the Print Cartridge 49 Cautions When Cleaning 51 Cleaning the Inside of the Machine 52 6 Troublesho...

Page 5: ...Consumables 69 Print Cartridge 69 Specifications of the Machine 70 General Function Specifications 70 Printer Function Specifications 71 Trademarks 73 INDEX 75 3...

Page 6: ...o the maximum extent permitted by applicable laws in no event will the manufacturer be liable for any damages whatsoever arising out of failures of this machine losses of the registered data or the us...

Page 7: ...About IP Address In this manual IP address covers both IPv4 and IPv6 environments Read the instructions that are relevant to the environment you are using 5...

Page 8: ...n specific Read the information under the symbol that corresponds to the region of your machine mainly Europe and Asia If the label contains the following your machine is a region A model CODE XXXX 27...

Page 9: ...ealth which could otherwise result from inappropriate handling Recycling of products helps to conserve natural resources and protect the environment For more detailed information on collection and rec...

Page 10: ...t can immediately print again from this mode If no additional prints are required and a specified period of time passes the device switches to an energy saving mode In these modes the machine consumes...

Page 11: ...portant Safety Instructions Notes on Lamp s Inside This Machine Notes to Users in the State of California Perchlorate Material special handling may apply See www dtsc ca gov hazardouswaste perchlorate...

Page 12: ...nction devices Energy Star standards and logos are internationally uniform This machine is equipped with the following Energy Saver modes Energy Saver mode 1 and Energy Saver mode 2 The machine recove...

Page 13: ...very Time 1 17 seconds or less 1 Recovery time and power consumption may differ depending on the conditions and environment of the machine Recycled Paper We recommend you to use environmentally friend...

Page 14: ...12...

Page 15: ...lding down the key for two seconds the network setting list can be printed You can also use this key to print on the back of paper in duplex printing and to execute forced printing 3 Power Indicator T...

Page 16: ...a nearby wall outlet 11 Rear Cover Open this cover to deliver sheets face up or remove jammed paper 12 USB Port Use this port to connect the machine to a computer using a USB cable 13 Ethernet Port Us...

Page 17: ...ne Print test and configuration pages Prints List Report to check the list of settings for this machine and other information Modify the IPv4 Address Use to specify the IPv4 address Modify the system...

Page 18: ...k that IPv6 and DHCPv6 are set to Enable in IPv6 in Web Image Monitor If DHCPv6 is set to Enable the machine can automatically obtain the IP address Assigning the machine s IPv6 address manually The I...

Page 19: ...For details about configuring the IPv4 address see the Software Installation Guide Configuring Network Settings 17...

Page 20: ...1 Guide to the Machine 18...

Page 21: ...llowing paper sizes are supported as custom paper sizes Width Tray1 Approximately 100 216 mm 3 9 8 5 inches Bypass Tray Approximately 90 216 mm 3 6 8 5 inches Length Approximately 148 356 mm 5 8 14 in...

Page 22: ...Bypass Tray 1 sheets 70 g m2 19 lb 2 Loading Paper 20...

Page 23: ...using paper printed on by other than a laser printer e g monochrome and color copiers ink jet printers etc Special paper such as thermal paper and carbon paper Paper weighing heavier or lighter than t...

Page 24: ...3 1 4 4 1 Print area 2 Feed direction 3 Approx 4 2 mm 0 2 inches 4 Approx 4 2 mm 0 2 inches The print area may vary depending on the paper size and printer driver settings To adjust the print positio...

Page 25: ...n paper is loaded can be used for printing If you print test pages when the bypass tray is loaded the paper in the bypass tray is fed first Do not load paper in the bypass tray when the machine is war...

Page 26: ...tray 5 Load the new paper stack print side down Make sure paper is not stacked higher than the upper limit marked inside the tray CTT075 6 Carefully push Tray 1 straight into the machine CTT029 To avo...

Page 27: ...ull out the extender CTT077 Make sure the extender s inner surface and the scale are aligned You can adjust the length of the extender in three steps When using A4 or Letter size paper adjust the leng...

Page 28: ...nger than A4 must be loaded without attaching the tray cover Loading Paper into Bypass Tray 1 Open the bypass tray CTT063 2 Slide the side guides outward load paper with the print side up and then pus...

Page 29: ...vary depending on the operating system you are using Specifying the paper type and paper size 1 On the Start menu click All Programs 2 Click Smart Organizing Monitor for SP xxx Series 3 Click Smart O...

Page 30: ...cted click Select Device and then select the machine s model 5 Click OK 6 On the User Tool tab click Printer Configuration 7 On the System tab select mm or inch in the Measurement Unit list 8 In the H...

Page 31: ...n a sheet Splitting a single page across multiple sheets Printing on both sides of sheets Not having blank pages printed Having prints sorted Saving printer driver settings as a file Recalling and del...

Page 32: ...with the bypass tray 1 After creating a document open the Printing Preferences dialog box in the document s native application 2 On the Setup tab in the Duplex list box select how you want to open th...

Page 33: ...on the status of the job Canceling a print job before printing has started 1 Double click the printer icon on the task tray of your computer 2 Select the print job you want to cancel click the Documen...

Page 34: ...to ignore the error and print using mismatched paper Reset the print job Cancel printing Continuing Printing Using Mismatched Paper If the paper is too small for the print job the printed image will...

Page 35: ...ted Web browsers Internet Explorer 6 or later Firefox 3 0 or later Displaying Top Page When you access the machine using Web Image Monitor the top page appears in your browser s window 1 Launch the We...

Page 36: ...ersion of a supported Web browser or the Web browser has JavaScript and cookies disabled display and operation problems may occur If you are using a proxy server configure the Web browser settings as...

Page 37: ...ion appears 3 IPv6 The IPv6 configuration appears 4 Machine Information The machine information appears Administrator Mode In the administrator mode you can configure various machine settings 1 Interf...

Page 38: ...n the address bar enter http machine s IP address 3 Click Log in 4 Enter the administrator password and then click Log in If you are logging in for the first time enter admin133 as the password 5 In t...

Page 39: ...nfiguring the Interface Settings Click Interface Settings to display the page for configuring the interface settings Item Description Network Displays Ethernet operation status MAC Address Displays th...

Page 40: ...settings IPv4 Item Description IPv4 Indicates that IPv4 is enabled Ethernet Item Description Host Name Enter the host name you want to set for the network interface board using up to 63 characters Th...

Page 41: ...et mask obtained from the DHCP server is used DDNS Select whether DDNS Dynamic DNS name resolution for the network interface board is active or inactive When active the DNS database is immediately upd...

Page 42: ...ric characters Link local Address Displays the link local address of the network interface board The link local address applies only within the local network local segment and begins with fe80 followe...

Page 43: ...using DHCP the default gateway address obtained from the DHCP server is used If the address cannot be obtained from the DHCP server the default gateway address set for the device is used DNS Server Se...

Page 44: ...tion SNMPv1 Trap Communication Select whether to send SNMPv1 trap SNMPv2 Trap Communication Select whether to send SNMPv2 trap Community Item Description Community Name Enter the name of the community...

Page 45: ...e Inactive Configure settings for each protocol used by the community Manager Address Enter the host computer s address according to the protocol in use Configuring the Administrator Password Click Ad...

Page 46: ...splay machine information Machine Information Item Description Firmware Version Displays the version of firmware installed on the machine Engine FW Version Displays the version of the firmware for the...

Page 47: ...ine with an icon 2 Status area Paper Size Displays the paper size configured on the machine Paper Type Displays the paper type configured on the machine Toner The remaining toner level is displayed in...

Page 48: ...settings if necessary 8 Click OK 9 Click Close Tab Settings This section provides a tab by tab overview of the machine settings that can be modified using Smart Organizing Monitor For more information...

Page 49: ...customer and third parties resulting from any use or loss of use of this software To make sure that a firmware update has successfully completed print the configuration page before and after the upda...

Page 50: ...ware Update 8 Click OK 9 Specify the location of the DWN file and then click Open 10 After a message is displayed on the Smart Organizing Monitor to indicate that the firmware update has completed tur...

Page 51: ...cturer shall not be responsible for any damage or expense that might result from the use of parts other than genuine parts from the manufacturer with your office products 1 Open the front cover and th...

Page 52: ...nt cartridge in horizontally and then slowly push it in all the way Finally push the cartridge down until it clicks into place CTT048 6 Carefully push up the front cover until it closes 5 Maintaining...

Page 53: ...dry wipe the area and allow it to dry To avoid deformation discoloration or cracking do not use volatile chemicals such as benzine and thinner or spray insecticide on the machine If there is dust or g...

Page 54: ...loth to wipe the inside of the machine toward and away from yourself CTT176 Wipe carefully so as not to touch any protrusions inside the machine 4 Slide the print cartridge in horizontally and then sl...

Page 55: ...inserted into the wall outlet Make sure that the wall outlet is not defective by connecting another working device Pages are not printed The USB cable or Ethernet cable is not connected correctly Reco...

Page 56: ...st the paper guides to remove the gaps Avoid printing on both sides of paper when printing images that contain large areas of solid color which consume a lot of toner Use supported types of paper See...

Page 57: ...oving Printing Jams Jammed paper may be covered in toner Be careful not to get toner on your hands or clothes Toner on prints made immediately after clearing a paper jam may be insufficiently fused an...

Page 58: ...ay 1 back in until it stops 3 Open the front cover and then carefully lower it CTT054 4 Carefully pull out the print cartridge horizontally holding its center CTT045 Do not shake the removed print car...

Page 59: ...and then slowly push it in all the way Finally push the cartridge down until it clicks into place CTT048 7 Carefully push up the front cover until it closes CTT055 If the error display continues to a...

Page 60: ...carefully CTT034 2 Close the bypass tray 3 Follow Steps 3 to 7 in Removing Jammed Paper from Tray 1 If the error display continues to appear perform the procedure described in Opening the Rear Cover t...

Page 61: ...g cover CTT079 3 Push the levers on the sides down with your thumbs CTT080 4 Remove the jammed paper carefully CTT066 5 Push the levers on the sides up with your thumbs 6 Close the fusing cover Paper...

Page 62: ...7 Close the rear cover CTT044 6 Troubleshooting 60...

Page 63: ...machine See page 19 Supported Paper The paper type setting is incorrect Make sure that the paper type setting of the printer driver matches the type of paper loaded See page 19 Supported Paper A non g...

Page 64: ...data volume High volume data such as graphics heavy documents take longer to process Wait for a while To speed up printing reduce the printing resolution using the printer driver The whole printout is...

Page 65: ...cause may be one of the following Possible Cause Solution Page layout settings are not configured properly Check that the page layout settings are properly configured in the application The paper size...

Page 66: ...ified on the machine and the size specified in the printer driver do not match For details about specifying the paper size setting on the machine see page 23 Loading Paper For details about changing t...

Page 67: ...utions Print Cartridge Not Detected The print cartridge has not been installed Reinstall the print cartridge See page 49 Replacing the Print Cartridge Error and Status Messages Appear on the Smart Org...

Page 68: ...6 Troubleshooting 66...

Page 69: ...ut the Toner Proper operation cannot be guaranteed if any third party toner is used Depending on printing conditions there are cases where the printer cannot print the number of sheets indicated in th...

Page 70: ...heck the following points The power switch is turned off The power cord is unplugged from the wall outlet All other cables are unplugged from the machine 2 Lift the machine using the inset grips on bo...

Page 71: ...artridge replacement we recommend you purchase and store extra print cartridges The actual number of printable pages varies depending on the image volume and density number of pages printed at a time...

Page 72: ...71 4 101 2 Executive A5 A6 B6 16K 197 273 mm 16K 195 270 mm 16K 184 260 mm Custom Paper Size The following paper sizes are supported as custom paper sizes Width Tray1 Approximately 100 216 mm 3 9 8 5...

Page 73: ...Hz Power consumption Maximum power consumption 900 W Energy Saver mode 1 36 6 W or less Energy Saver mode 2 3 1 W or less Machine dimensions Width Depth Height 402 360 165 mm 15 8 14 2 6 5 inches Weig...

Page 74: ...600 dpi maximum 1200 600 dpi First print speed 10 seconds From the completion of data processing to the completion of paper delivery Interface Ethernet 10BASE T 100BASE TX USB 2 0 Printer language DDS...

Page 75: ...ional Microsoft Windows XP Home Edition Microsoft Windows XP Professional x64 Edition The product names of Windows Vista are as follows Microsoft Windows Vista Ultimate Microsoft Windows Vista Busines...

Page 76: ...ft Windows Web Server 2008 Microsoft Windows HPC Server 2008 The product names of Windows Server 2008 R2 are as follows Microsoft Windows Server 2008 R2 Foundation Microsoft Windows Server 2008 R2 Sta...

Page 77: ...al prohibition 4 Loading paper 23 M Machine settings 46 Models 6 Moving 68 N Network settings 16 Non recommended paper 21 P Paper feed problems 54 Paper jam 55 58 Paper mismatch 32 Print area 22 Print...

Page 78: ...MEMO 76 EN GB EN US EN AU M133 8629...

Page 79: ......

Page 80: ...EN GB EN US EN AU M133 8629 2013...

Reviews: