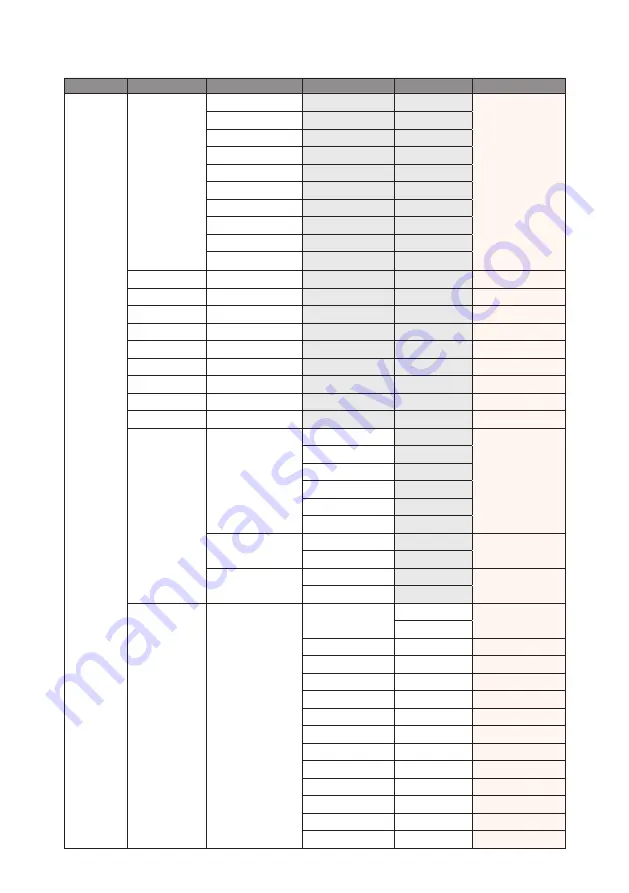
Ricoh PJ LU8000 Series User Manual Download Page 44

44

OSD Tree

Level 1

Level 2

Level 3

Level 4

Level 5

Default

PICTURE

Display Mode

Presentation

By source set

Video
Bright

REC709

DICOM SIM
2D High Speed

3D

Blending

User

Save to User

Brightness

0 ~ 100

50

Contrast

0 ~ 100

50

Sharpness

0 ~ 4

2

Color

0 ~ 100

50

Tint

0 ~ 100

50

Phase

0 ~ 100

50

Frequency

0 ~ 100

50

Horz Position

0 ~ 100

50

Vert Position

0 ~ 100

50

3D Display

3D Enable

Auto

Auto

Frame Packing

Side by Side
Top and Bottom
Frame Sequential

Off

3D Invert

Off

Off

On

DLP Link

Off

Off

On

HSG Adjustment

CE1 Parameters

Auto Test Pattern

Off

On

On

Red H.

0 – 254

127

Red S.

0 – 254

133

Red G.

0 – 254

127

Green H.

0 – 254

127

Green S.

0 – 254

127

Green G.

0 – 254

127

Blue H.

0 – 254

127

Blue S.

0 – 254

127

Blue G.

0 – 254

127

Cyan H.

0 – 254

102

Cyan S.

0 – 254

124

Cyan G.

0 – 254

127

Summary of Contents for PJ LU8000 Series

Page 1: ...chine and keep it handy for future reference For safe and correct use be sure to read the Precautions in this manual before using the machine Appendices User Controls Installation Introduction 4 3 2 1...

Page 2: ...r quick reference Important Contents of this manual are subject to change without prior notice In no event will the company be liable for direct indirect special incidental or consequential damages as...

Page 3: ...ety Precautions to Be Followed This section explains safety precautions that should always be followed when using this machine Environments where the machine can be used This section explains safety p...

Page 4: ...ock CAUTION Do not put your face or hand near the exhaust vents Doing so could result in burns or an accident due to hot air coming from the exhaust vents CAUTION Do not use the product on soft materi...

Page 5: ...internal parts Doing so could result in fire CAUTION Do not place low heat resistant material near the exhaust vents Hot air may come from the exhaust vents resulting in damage to the product or an a...

Page 6: ...not place heavy objects on the power cord or pull the cord or bend it severely Doing so could result in fire or electric shock WARNING Touching the prongs of the power cable s plug with anything meta...

Page 7: ...any of the above conditions exist do not use the power cord and consult your dealer or service representative Use of the power cord could result in fire or electric shock WARNING Do not use the connec...

Page 8: ...r at a time disconnect its power cord from the wall outlet CAUTION When disconnecting the power cord from the wall outlet always pull the plug not the cord Pulling the cord can damage the power cord U...

Page 9: ...tative and report the problem Do not use the machine Doing so could result in fire or electric shock WARNING Do not touch this machine if a lightning strike occurs in the immediate vicinity Doing so c...

Page 10: ...ector weighs about 23kg 50 7lb Projector weight without lens The projector must be installed in a location that is sturdy enough to support the full weight of the projector and brackets Use only the s...

Page 11: ...Contact your service representative if any of the product s internal components require maintenance adjustment or repair Do not disassemble or modify the product Doing so may cause injury or malfunct...

Page 12: ...hrow the batteries into fire or water Do not connect the positive and negative terminals on a battery with a wire Remove the batteries from the remote control that are past their suggested use period...

Page 13: ...cified herein may result in hazardous radiation exposure CAUTION Do not block the projection light when it is on If you do so the part that is blocking the projection light may get quite hot and defor...

Page 14: ...g images using 3D glasses with projector How 3D images are viewed may vary according to the individual Do not use 3D glasses for viewing any material other than 3D images Before viewing 3D images make...

Page 15: ...and handle the machine as indicated Main unit 5 4 1 2 3 1 Do not look into the lens when the product is on The bright light may damage your eyes Do not place anything in front of the lens The object...

Page 16: ...16 3 4 5 Power Switch Symbols The meanings of the symbols for the switches on this machine are as follows STANDBY...

Page 17: ...s User Information on Electrical and Electronic Equipment If you wish to discard this product please contact your local authorities the shop where you bought this product your local dealer or sales se...

Page 18: ...local authorities the shop where you bought this product your local dealer or sales service representatives Laser Notice IEC 60825 1 2014 CLASS 1 LASER PRODUCT RISK GROUP 2 For EU countries and Japan...

Page 19: ...ices 18 Introduction 20 Product Features 20 Package Overview 21 Product Overview 22 Projector Components 22 Built in Keypad 25 Input Output I O Panel 26 LED Status Indicators 27 Remote Control 28 Proj...

Page 20: ...rojection system w TI DDP4422 solution 7 200 ANSI lumens platform Power Zoom Focus and full lens shift Support LAN network control HDBaseT support network control and video streaming Support PIP PBP f...

Page 21: ...2 1 3 5 4 6 8 7 9 Gamma Bright Cont PIP 0 Info Mode Auto Input Menu Exit Hot Key AV Mute Pattern Focus Lens H Lens V Keystone H Keystone V Zoom Enter Lens Ring For Type A3A Lens Ring For Type A2 A4 o...

Page 22: ...stallation markets Projector Components Front View 1 2 3 4 Ind Part Name Description 1 Front IR Receiver Receives signals from the IR remote Keep the signal path to the sensor unobstructed for uninter...

Page 23: ...ed communication with the projector 3 Connector Panel Connects the projector to external devices 4 Power Switch Switch the power button to turn on the power source 5 Power Connector Connect to the sup...

Page 24: ...ngs to note when installing projectors Leave 1 m or over space between the projectors when projectors are installed side by side so that intake and exhaust vents of the projectors are not obstructed I...

Page 25: ...off 2 Menu Display menus 3 Exit Return to previous level or exit menus if at top level 4 Input Select an input for the main or PIP PBP image 5 Enter Confirm a selection 6 Arrow Keys Adjust a setting U...

Page 26: ...ut I O Panel 1 2 3 4 5 6 7 8 9 10 11 12 Ind Connector Name Ind Connector Name 1 DVI D 7 USB 2 Computer In 8 Remote In 3 Monitor Out 9 PC Control 4 HDMI Out 10 LAN Ethernet 5 HDMI In 11 HDBaseT 6 Servi...

Page 27: ...Power on Warm up Flashing Power on Laser diode on Steady Steady Steady Power off Cooling down Flashing AV mute is off Image is displayed Steady Steady Steady AV mute is on Image is black Steady Steady...

Page 28: ...N OFF 2 1 3 5 4 6 8 7 9 Gamma Bright Cont PIP 0 Info Mode Auto Input Menu Exit Hot Key AV Mute Pattern Focus Lens H Lens V Keystone H Keystone V Zoom Enter 1 2 3 4 5 6 7 8 9 10 11 12 13 14 15 16 17 18...

Page 29: ...of the image horizontally 11 Lens V Adjust the position of the image vertically 12 Keystone H Adjust the horizontal keystone 13 Keystone V Adjust the vertical keystone 14 AV Mute Display or blank the...

Page 30: ...sec and release enter 0 then enter 1 within 2 sec 0010 2 Press Hot key for 3 sec and release enter 0 then enter 2 within 2 sec 0011 3 Press Hot key for 3 sec and release enter 0 then enter 3 within 2...

Page 31: ...AAA R03 type battery Avoid contact with water or liquid Do not expose the remote control to moisture or heat Do not drop the remote control If the battery has leaked in the remote control carefully wi...

Page 32: ...ont of the projector ON OFF 2 1 3 5 4 6 8 7 9 Gamma Bright Cont PIP 0 Info Mode Auto Input Menu Exit Hot Key AV Mute Pattern Focus Lens H Lens V Keystone H Keystone V Zoom Enter ON OF F 2 1 3 5 4 6 8...

Page 33: ...flat surface at a right angle to the screen The projector with the standard lens must be at least 3 feet 0 9m from the projection screen Position the projector to the desired distance from the screen...

Page 34: ...to the lens assembly Center the lens while the projector is switched on by pressing the lens horizontal or vertical button and then pressing Enter 2 Turn Off the projector Turn the projector OFF 3 Wa...

Page 35: ...uipped with elevator rubber feet for adjusting the image height 1 Locate the adjustable foot you wish to modify on the underside of the projector 2 Rotate the adjustable ring clockwise to raise the pr...

Page 36: ...used to connect to various devices Due to the difference in applications for each country the accessories required in some regions may be different from those shown This diagram is for illustrative p...

Page 37: ...ter 2 VGA in Cable 5 HDMI Cable 3 3 RCA Component Cable NOTE The diagram shows the cables connectors that may be used to connect to various devices Due to the difference in applications for each count...

Page 38: ...e Input key on the remote control to select an input source VGA HDMI HDBaseT or DVI 3 4 The projector detects the source you selected and displays the image NOTE The first time the projector is used t...

Page 39: ...e remote control to turn off the projector A warning message will appear on the displayed image 2 Press on the built in keypad or press on the remote control again to confirm your selection If you do...

Page 40: ...5X 1 9X 1 9X Zoom Focus Adjustment Motorized Throw Ratio WXGA 0 79 1 00 1 00 1 28 1 28 1 61 1 60 3 07 3 04 5 78 Throw Distance WXGA 0 83 6 45m 1 08 8 27m 1 38 10 40m 1 72 19 84m 3 27 37 35m Throw Rati...

Page 41: ...Motorized Lens Shift Lens shift range based on 1 2 screen width and height A2 A4 A5 lens shift range Lens shift range A1 A3A lens shift range Lens shift range Darker Lens shift accuracy 0 5 pixel per...

Page 42: ...60 0 81 1 29 0 97 1 23 1 23 1 57 1 57 1 96 1 98 3 77 3 74 7 1 70 0 94 1 51 1 13 1 43 1 43 1 84 1 84 2 30 2 31 4 4 4 38 8 31 80 1 08 1 72 1 29 1 63 1 64 2 1 2 10 2 61 2 64 5 03 4 99 9 46 90 1 21 1 94 1...

Page 43: ...gate within the menu and adjust a setting up or down Press ENTER to select a highlighted menu item or use it to change or accept a value Select the next item that you want to adjust in the menu and ad...

Page 44: ...0 100 50 Frequency 0 100 50 Horz Position 0 100 50 Vert Position 0 100 50 3D Display 3D Enable Auto Auto Frame Packing Side by Side Top and Bottom Frame Sequential Off 3D Invert Off Off On DLP Link Of...

Page 45: ...27 Red S 0 254 133 Red G 0 254 127 Green H 0 254 127 Green S 0 254 127 Green G 0 254 127 Blue H 0 254 96 Blue S 0 254 127 Blue G 0 254 127 Cyan H 0 254 102 Cyan S 0 254 124 Cyan G 0 254 127 Magenta H...

Page 46: ...0 Reset RGB Gain Offset Color Enhancement 0 2 1 Color Wheel Speed 2X 3X 3X Film Mode Off Off On Extreme Black Off Off On DynamicBlack Off Off On OUTPUT Aspect Ratio Auto Auto 4 3 16 9 16 10 Native Ove...

Page 47: ...0 Bottom Right Horz Adjust 0 120 0 Bottom Right Vert Adjust 0 80 0 PIP PBP PIP PBP Enable Off Off On Main Source VGA VGA HDMI DVI D HDBaseT Sub Source VGA HDMI DVI D HDBaseT Swap Size Small Large Med...

Page 48: ...or go step Zoom out motor run Lens Shift Left shift up motor stop Left shift up motor go step Left shift up motor run Left shift down motor stop Left shift down motor go step Left shift down motor run...

Page 49: ...start Network Network Factory Reset Serial Port Baud Rate 9600 19200 14400 19200 38400 57600 115200 Serial Port Path RS232 RS232 HDBaseT Projector Address 0 99 0 OPTION Auto Source Off On On High Alti...

Page 50: ...ode Constant Power Constant Power Constant Luminance Eco Mode Constant Power Settings 0 99 99 Constant Luminance Settings 0 99 99 Total Projector Hours Light Sensor Light Sensor Calibration Calibrated...

Page 51: ...TURE 3D Display HSG Adjustment Advanced PICTURE 2 2 Display Mode Optimize the projector for displaying images under certain conditions such as Presentation Video Bright REC709 DICOM SIM 2D High Speed...

Page 52: ...oper frequency ensures that the image quality is consistent across the screen the aspect ratio is maintained and that the pixel phase can be optimized Horz Position Move the image right or left within...

Page 53: ...e appropriate gamma from Video Film Bright CRT DICOM and Gamma 2 2 Color Temperature Change the intensity of the colors Color Space Select a color space that has been specifically tuned for the input...

Page 54: ...16 9 aspect ratio 16 10 Retain 16 10 aspect ratio Native Display in its native resolution Overscan Remove noise around the image Overscan Zoom enlarges image 3 from original size Overscan Crop cuts 3...

Page 55: ...nd right borders of the image are unequal in length This is intended for use with horizontally on axis applications B A B A Ind WUXGA A 7 1 B 5 2 V Keystone Adjust the keystone vertically and make a s...

Page 56: ...the PIP PBP Swap Change the main image to PIP PBP and the PIP PBP to main image Swapping is available only when PIP PBP is enabled Size Select the PIP PBP size Available options Small Medium or Large...

Page 57: ...57 PIP PBP Layout PIP PBP Size Small Medium Large PIP Bottom Right P P P PIP Bottom Left P P P PIP Top Left P P P PIP Top Right P P P...

Page 58: ...cent screen Lens Function Focus Adjust focus function on the projected image Zoom Adjust zoom function on the projected image Lens Shift Shift the projected image Lens Calibration Perform calibration...

Page 59: ...Gateway MAC Address Display the network MAC Address value Apply Apply Network settings Network Projector Name Display the projector hostname for Network Restart Network Restart the network Network Fa...

Page 60: ...TPUT SETUP OPTION OPTION Service OPTION 2 2 Auto Source Off The projector will only search current input connection On The projector will search for other signals if the current input signal is lost H...

Page 61: ...r This item allows the projector to automatically power off after it has been on for a specified amount of time Light Source Settings Light Source Mode Select Constant Power Constant Luminance or Eco...

Page 62: ...d No Light Sensor has not been calibrated Information Display the projector information for source resolution and software version on the screen Factory Reset Restore all settings to their default val...

Page 63: ...the cables and power connections are correctly and securely connected as described in the Installation section Ensure the pins of connectors are not crooked or broken Make sure you have removed the l...

Page 64: ...he following settings Resolution select a screen resolution ex 1920 x 1080 that you want for the display Refresh Rate select a refresh rate ex 60p Hz that you want for the display Scaling select the C...

Page 65: ...computer is not displaying your presentation Some Notebook PCs may deactivate their own screens when a second display device is in use Each has a different way to be reactivated Refer to your com pute...

Page 66: ...ollowing Please setup the display format as 16 9 wide aspect ratio type on your DVD player Image is too small or too large Move the projector closer to or further from the screen Press the MENU button...

Page 67: ...if they are exhausted Ensure that you have set your remote to the correct IR code setting When making a direct connection from your computer to the projector If you have network connection problem fro...

Page 68: ...onnection use the following items click Internet Protocol TCP IP and then click Properties Step 5 Click Use the following IP address and type in as below 1 IP address 192 168 0 101 2 Subnet mask 255 2...

Page 69: ...ck Internet Options click the Connections tab and click LAN Setting Step 7 All items in the Local Area Network LAN Setting window must unchecked Then click OK button twice Step 8 Connect a cat5 Ethern...

Page 70: ...70 On Screen Messages y y Power off confirm...

Page 71: ...75 V V V 848x480 42 968 85 V V V 1024x768 48 4 60 V V V V 1024x768 60 022 75 V V V V 1024x768 68 7 85 V V V V 1024x768 98 726 120 V V V V 1152x720 37 024 50 V V V 1152x720 44 858 60 V V V 1152x720 56...

Page 72: ...V V V 1400x1050 82 278 75 V V V V 1440x900 55 935 60 V V V V 1440x900 70 635 75 V V V 1600x900 60 60 V V V 1600x1200 75 60 V V V V 1680x1050 65 29 60 V V V V 1920X1080 74 17 50 V V V 1920X1080 66 586...

Page 73: ...ide 1080i 60 V V Top and Bottom 720p 50 V V Top and Bottom 720p 60 V V Top and Bottom 1080p 24 V V Frame sequential 3D 800x600 77 285 120 V V 1024x768 98 726 120 V V 1280x720 90 1 120 V V NOTE RB mean...

Page 74: ...A 2 RXD RXD 3 TXD TXD 4 N A N A 5 GND GND 6 N A N A 7 N A N A 8 N A N A 9 N A N A Setup Information RS 232 protocol Baud Rate 9600 bps default Data Length 8 bit Parity Check None Stop Bit 1 bit Flow...

Page 75: ...mensions W x D x H 484 W x 529 D x 185 H mm without lens w o elevators 19 06 W x 20 82 D x 7 28 H Power supply AC 100 240 V 50 60 Hz Power consumption y y 770W 15 110VAC in Normal brightness mode y y...

Page 76: ...C power cord x 1 y y VGA cable x 1 y y Lens rings x 2 Small size Compatible with A2 A4 or A5 lens Large size Compatible with A3A lens y y User s Manual CD x 1 y y Read this first Paper x 1 y y Warrant...

Page 77: ...77 Cabinet dimension Unit mm Screw type M6 x 4 Maximum screw length 10mm...

Page 78: ...ista Internet Explorer and PowerPoint are either a registered trademark or trademark of Microsoft Corporation in the United States and or other countries y y HDMI the HDMI Logo and High Definition Mul...

Page 79: ...Y0BD 6221 AU EN US EN GB EN...

Reviews: