background image

Checking the Contents of the Product

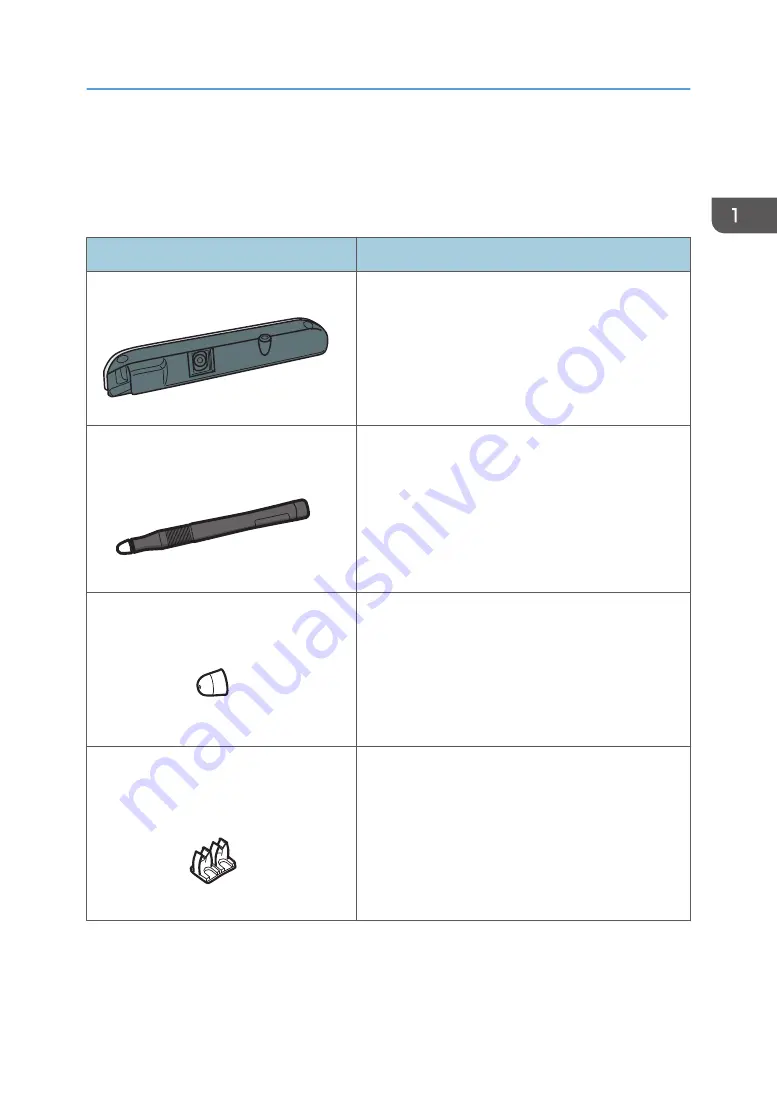
The following accessories are packaged with the product. Make sure all of these accessories are
included.

Accessories

Usage

Interactive sensor

Y0E5IX0071

Attach this to the projector.
For details about how to attach the interactive sensor,
see page 10 "Attaching the Interactive Sensor to the
Projector".

Interactive pen × 2

Y0E5IX0072

Use this pen to manipulate and perform operations on
the computer screen projected by the projector.
The interactive pen is only to be used with this product.
Do not use this pen with any other products. Likewise,
do not use any other pens with this product.
For details about the interactive pen, see page 20
"Using the Interactive Pen".

Interactive pen replacement nib × 5

Y0E5IX0073

Replace the pen nib of the interactive pen if it is
damaged or lost.
For details about how to replace the pen nib, see
page 22 "Replacing the Pen Nib".

Cable clip for the RICOH PJ WX4153
series × 2

Y0E5IX0073

Attach this to the RICOH PJ WX4153 series and secure
the USB cable.
For details about how to attach the cable clip, see
page 11 "Attaching the interactive sensor to the
RICOH PJ WX4153 series".

Checking the Contents of the Product

7

Summary of Contents for PJ Interactive Kit Type 3

Page 1: ...For safe and correct use be sure to read Safety Information before using the machine Appendix Troubleshooting Before Using RICOH PJ Interactive Kit Type3 Operating Instructions ...

Page 2: ......

Page 3: ...Supplied Software on a Computer 15 Connecting the Projector and a Computer 16 Aligning Pen Recognition Positions 17 Using the Interactive Pen 20 Interactive Pen Parts and Their Functions 20 How to Use the Interactive Pen 20 Installing Batteries into the Interactive Pen 21 Replacing the Pen Nib 22 2 Troubleshooting What to Do When a Message Is Displayed 25 RICOH PJ Interactive Setup Software Messag...

Page 4: ...nual contains detailed instructions and notes on the operation and use of this product For your safety and benefit read this manual carefully before using the product Keep this manual in a handy place for quick reference 2 ...

Page 5: ... any damages whatsoever arising out of failures of this product losses of documents or data or the use or non use of this product and operation manuals provided with it Make sure that you always copy or have backups of important documents or data Documents or data might be erased due to your operational errors or malfunctions of the machine Also you are responsible for taking protective measures a...

Page 6: ...4 ...

Page 7: ...u can write information and perform various other operations on the screen RICOH PJ Interactive Kit Type3 can be used with the following projectors RICOH PJ WX4153 series RICOH PJ WUC4650 WXC4660 series To perform various operations on the screen it is necessary to configure the interactive function on both the projector and the computer For information about how to configure the interactive funct...

Page 8: ...Visual overview of using the product with the RICOH PJ WUC4650 WXC4660 series PDF Y0E5IX0062 1 Before Using RICOH PJ Interactive Kit Type3 6 ...

Page 9: ... is only to be used with this product Do not use this pen with any other products Likewise do not use any other pens with this product For details about the interactive pen see page 20 Using the Interactive Pen Interactive pen replacement nib 5 Y0E5IX0073 Replace the pen nib of the interactive pen if it is damaged or lost For details about how to replace the pen nib see page 22 Replacing the Pen N...

Page 10: ...ICOH PJ WUC4650 WXC4660 series Hexagon wrench 2 mm Y0E5IX0082 Used when attaching the interactive sensor to a projector or attachment USB cable Y0E5IX0083 Used to connect the interactive sensor to the computer For details about how to connect the interactive sensor to the computer see page 16 Connecting the Projector and a Computer CD ROM Battery four AAA batteries for the interactive pen Operatin...

Page 11: ...he projector and computer In Windows use a duplicate desktop for projection instead of an extended desktop When using the interactive function using the projector remote control may cause unexpected operations Operating a computer on the projection screen with the interactive pen The interactive function allows you to operate a computer connected to the projector directly on the projection screen ...

Page 12: ...er 3 Connect the projector and a computer See page 16 Connecting the Projector and a Computer 4 Align pen recognition positions using the RICOH PJ Interactive Setup Software See page 17 Aligning Pen Recognition Positions Attaching the Interactive Sensor to the Projector This section explains how to attach the interactive sensor to the projector Do not lift the projector by holding the attached int...

Page 13: ...rojector Loosen the screws by using the hexagon wrench and then hold the screws and lift them upward together Y0E5IX0027 2 1 2 Pull out the power cables Pull out the tape Y0E5IX0028 3 Connect the power cables to the interactive sensor Y0E5IX0029 Preparations for Using the Interactive Function 11 ...

Page 14: ... the two locations by using the hexagon wrench Y0E5IX0030 2 1 6 Attach the cable clips to the projector Attach the cable clips to the top and bottom of the intake vents on the right side of the projector avoiding the intake vents Y0E5IX0032 1 Before Using RICOH PJ Interactive Kit Type3 12 ...

Page 15: ... used to secure the attachment Be careful not to touch the adhesive surface of the tape Be careful of the position and orientation when attaching the attachment Correctly oriented Y0E5IX0088 Incorrectly oriented Y0E5IX0089 Attachment reference Y0E5IX0090 1 2 Preparations for Using the Interactive Function 13 ...

Page 16: ...es for securing it 3 Peel the release liner off the double sided tape and then align the edge of the attachment with the attachment reference 1 groove Y0E5IX0035 4 Align the corner of the attachment with the attachment reference 2 groove and then secure the attachment to the projector Fully push the attachment onto the projector Y0E5IX0079 1 Before Using RICOH PJ Interactive Kit Type3 14 ...

Page 17: ... install the software on a computer log on as a user with administrator privileges 1 Insert the CD ROM in the CD ROM drive of your computer 2 Select the language for the installation and then click Select 3 Click Setup Software 4 Click Install under Installation of RICOH PJ Interactive Setup Software 5 When the installation has completed click Next 6 Click Install under Installation of RICOH Inter...

Page 18: ...ctor and a computer 1 Connect the computer to the projector using RGB cables or an HDMI cable For the connection procedure see the operating instructions provided with the projector Y0E5IX0033 Y0E5IX0077 2 Connect the USB cable Y0E5IX0034 1 Before Using RICOH PJ Interactive Kit Type3 16 ...

Page 19: ...teractive function may not work normally 1024 768 1280 800 1366 768 1920 1080 1 Turn on the projector to project the screen To turn on the projector or project the screen see the operating instructions provided with the projector 2 Project the computer screen on the projector screen For the projecting procedure see the operating instructions provided with the projector 3 Start the RICOH PJ Interac...

Page 20: ...angle by using the hexagon wrench to make the bottom of the projected image as close to the bottom of the blue frame as possible Y0E5IX0037 Y0E5IX0078 7 Click Finish 8 Click Alignment under STEP 2 Alignment 9 Click Auto Alignment Returns to previous screen if successful If it fails an error message is displayed Try again 1 Before Using RICOH PJ Interactive Kit Type3 18 ...

Page 21: ...he projected screen with the interactive pen You cannot operate the computer display with the interactive pen when RICOH PJ Interactive Setup Software is still running Due to fluctuations in brightness Auto Alignment may work less precisely immediately after turning the projector on Wait at least two minutes after turning on the projector to perform Auto Alignment Avoid approaching the projector d...

Page 22: ...h like the double click of a mouse You cannot operate the computer display with the interactive pen when the RICOH PJ Interactive Setup Software is still running Upon the completion of aligning pen recognition positions click Start IWB Lt under STEP 3 Start Handwriting Software to close the RICOH PJ Interactive Setup Software Do not block the area between the interactive pen and the interactive se...

Page 23: ...nals on a battery with a wire Remove the batteries that are past their suggested use period or that are depleted Remove the batteries when they will not be used for extended periods A battery can be damaged for example when it is dropped Do not use any such potentially damaged battery Keep the batteries out of the reach of children Children may swallow or choke on the batteries If this happens con...

Page 24: ...eries Check that the batteries have been installed in the right direction Y0E5IX0041 3 Re install the battery cover Y0E5IX0042 Replacing the Pen Nib Replace the pen nib whenever it becomes worn out and shorter 1 Before Using RICOH PJ Interactive Kit Type3 22 ...

Page 25: ...1 Remove the pen nib Y0E5IX0085 2 Attach a new pen nib Push it in until it clicks Y0E5IX0086 Using the Interactive Pen 23 ...

Page 26: ...1 Before Using RICOH PJ Interactive Kit Type3 24 ...

Page 27: ...s correctly projected Go back to STEP 1 and perform sensor adjustment again Pattern images for the alignment are not correctly projected The sensor angle is not correctly adjusted Check the condition of the projector or the projected screen to make sure that pattern images are correctly projected Go back to STEP 1 Adjust Sensor Angle and try again Manual alignment has failed Correctly touch the ce...

Page 28: ...rd Lt on the computer It is already running You have attempted to start the RICOH PJ Interactive Setup Software when it is already running You cannot start another instance of the RICOH PJ Interactive Setup Software when one instance is already running Use the RICOH PJ Interactive Setup Software instance that is already running 2 Troubleshooting 26 ...

Page 29: ...nect these correctly see the operating instructions provided with the projector 4 Check that the computer screen is projected on the projector screen To project the screen correctly see the operating instructions provided with the projector 5 Check to see whether the batteries of the interactive pen are out of charge If the batteries of the interactive pen are out of charge replace them For detail...

Page 30: ...ligning Pen Recognition Positions 8 Check to see whether the pen recognition positions are correctly aligned If it is not correct align the pen recognition positions again using the RICOH PJ Interactive Setup Software For details about aligning pen recognition positions see page 17 Aligning Pen Recognition Positions If you experience a problem with the actual projector such as a problem starting t...

Page 31: ...settings see the computer manual The interactive pen does not operate properly Use the screen in a place where the screen surface is not exposed to direct sunlight Use the projector where the camera lens in the interactive sensor is not exposed to a light source or to direct sunlight Do not use the interactive pen around an infrared radiation device such as a plasma display motion sensor or automa...

Page 32: ...2 Troubleshooting 30 ...

Page 33: ...are as follows The product names of Windows 8 1 are as follows Microsoft Windows 8 1 Microsoft Windows 8 1 Pro Microsoft Windows 8 1 Enterprise The product names of Windows 10 are as follows Microsoft Windows 10 Home Microsoft Windows 10 Pro Microsoft Windows 10 Enterprise Other product names used herein are for identification purposes only and might be trademarks of their respective companies We ...

Page 34: ...MEMO 32 EN GB EN US EN AU Y0E5 7521 ...

Page 35: ... 2020 Ricoh Co Ltd ...

Page 36: ...Y0E5 7521 AU EN US EN GB EN ...

Reviews: