RDC-i700 Windows XP Installation Guide - 5
(1) Insert the software CD-ROM that came packaged with your
RDC-i700 into your computer’s CD-ROM drive.
(2) Turn the camera mode dial to
PC
and press the ON/OFF
button.
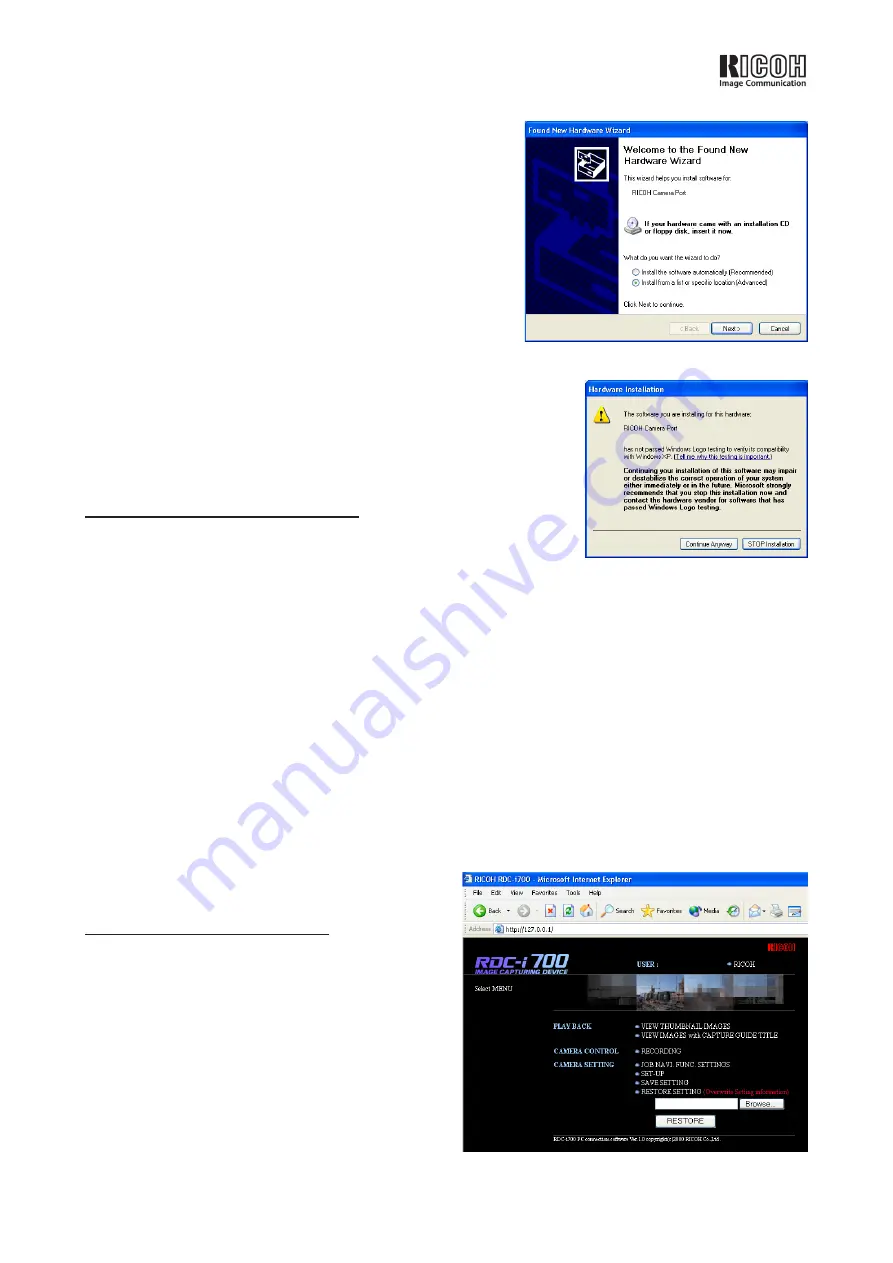
(3) The Found New Hardware Wizard should appear. When it
does, select “Install from a list or specific location
(Advanced)” and click
Next
. (See Figure 1.)
(4) In the screen that follows, make sure “Search removable
media” is selected, then click
Next
to start the installation.
(5) Windows will display a warning message, but this message
can safely be ignored. Click
Continue Anyway
to continue.
(See Figure 2.)
(6) Click
Finish
when the wizard notifies you that the installation
has finished.
5. Installing the Explorer Plug-in
(1) Browse to the folder where you saved the downloaded files.
Locate the
Disk1
folder and open it.
(2) Click on the
setup.exe
icon to start the installation.
(3) Choose your preferred language from the list and click
OK
.
(4) Click
Next
at the Welcome screen.
(5) Click
Next
at the Choose Destination Location screen to accept the default or
Browse
to select a
different location.
(6) Select
Typical
to install the standard components or
Custom
to customize your installation, then click
Next
. (Note: If you choose the Custom option, the Explorer Plug-in and Virtual Server Process options
must be selected for the camera to work properly.)
(7) Specify a program folder (if desired) and click
Next
.
(8) Click
Finish
to finish the installation.
6. Using the Explorer plug-in
(1) Connect the PC to the camera using the USB
cable provided. Turn the camera mode dial to PC
and press the ON/OFF button.
(2) Launch Explorer.
(3) Enter the URL displayed on the RDC-i700’s LCD
display into Explorer’s Address field, then press
Enter
.
(4) Select the options that best suit your needs from
the on-screen display. (See Figure 3.)
Figure 1:
Found New Hardware wizard
Figure 2:
Ignore this warning
Figure 3:
RDC-i700 main menu


