Ricoh ISC 2525 Operating Instructions Manual Download Page 39

Placing Originals

17

1

Placing Originals on the Exposure Glass

Place originals on the exposure glass.

Important

Do not lift the exposure glass cover or ADF forcefully. Otherwise, the cover
of the ADF might open or be damaged.

A

Lift the exposure glass cover or ADF.

Be sure to lift the exposure glass cover or ADF by more than 30 degrees. Oth-
erwise, the size of the original might not be detected correctly. 

B

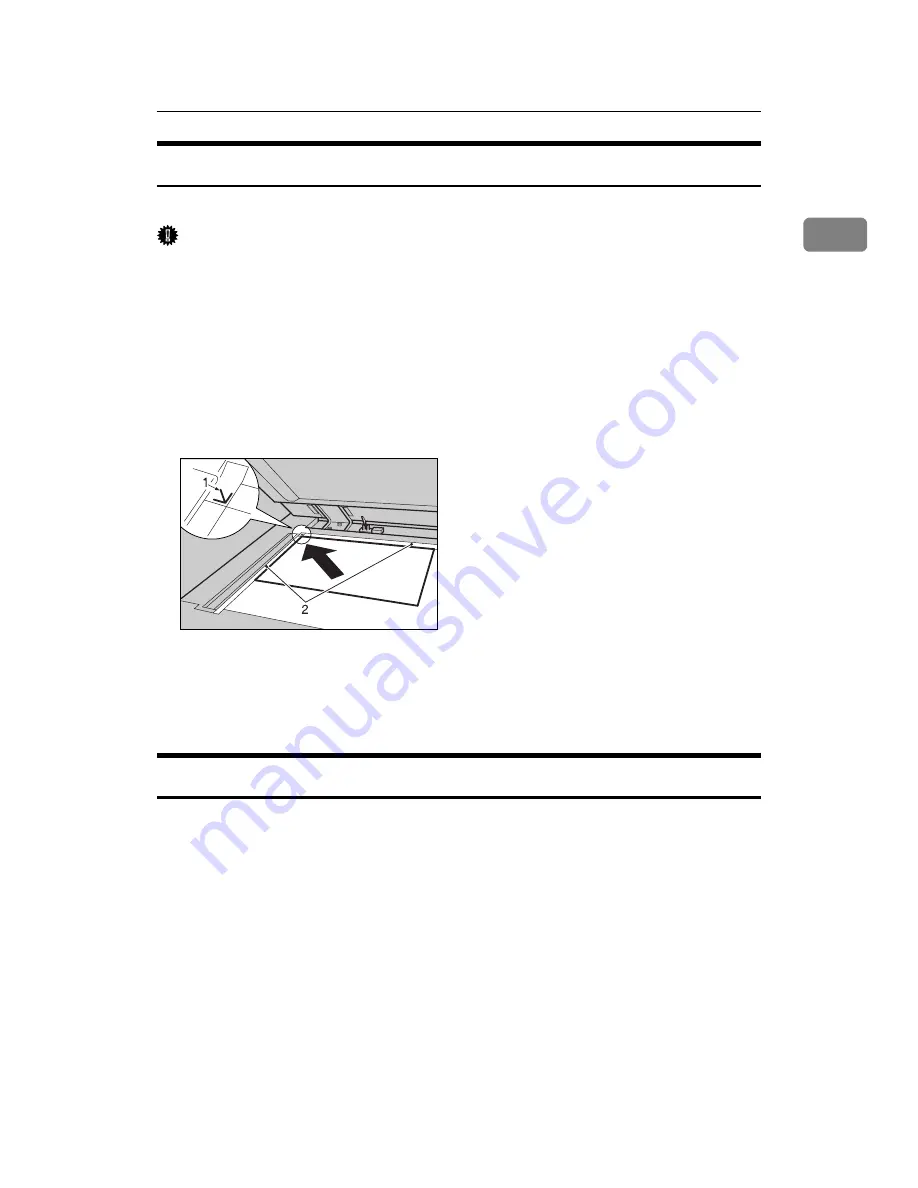
Place the original face down on the exposure glass. The original should be
aligned to the rear left corner. 

Start with the first page to be copied.

A

Positioning mark

B

Left scale

C

Lower the exposure glass cover or ADF.

Placing Originals in the Auto Document Feeder

Place originals in ADF.
Settings should be made in the following situations:

When placing originals consisting of more than 50 pages: 

See “Batch mode”.

When placing originals one by one: 

See “SADF mode”.

When copying originals of various sizes:

See “Mixed size mode”.

When placing custom size originals:

See “Custom sizes”.

AMF020S

Summary of Contents for ISC 2525

Page 1: ...this manual carefully before you use this machine and keep it handy for future reference For safe and correct use be sure to read the Safety Information in About This Machine before using the machine...

Page 2: ...ther than those specified in this manual might result in hazardous radiation exposure Notes The model names of the machines do not appear in the following pages Check the type of your ma chine before...

Page 3: ...the machine It explains security func tions that the administrators can use to protect data from being tampered or prevent the machine from unauthorized use Also refer to this manual for the procedure...

Page 4: ...canner Guide PostScript3 Supplement UNIX Supplement Manuals for DeskTopBinder Lite DeskTopBinder Lite Setup Guide DeskTopBinder Introduction Guide Auto Document Link Guide Note Manuals provided are sp...

Page 5: ...ginals used and the desired finish See p 41 Selecting a Colour Mode Full Colour Copy Copies using four colours yellow magenta cyan and black Black White Copy Copies in black and white even if the orig...

Page 6: ...Erase Specified Colour See p 43 Erase Colour Copies by deleting a specific colour in the original Colour Background See p 44 Colour Background Copies by adding a colour to the whole page AMF039S AMF04...

Page 7: ...can be yellow red cyan magenta green blue and black Printed inserts types Background Numbering See p 106 Background Numbering Preset Stamp See p 107 Preset Stamp User Stamp See p 109 User Stamp Date...

Page 8: ...cyan Black can be made by combining yellow magenta and cyan how ever as there might be some slight differences black will be expressed us ing a black toner Adjust Colour Adjusts the specific colours...

Page 9: ...copies See p 45 Colour Balance Adjusting Images See p 49 Image Adjustment Sharp Soft Adjust the outline of the image See p 50 Adjusting the sharpness softness Contrast Adjust the shades of the image S...

Page 10: ...Adjust the background density of the image See p 51 Adjusting the background density Other Adjustments Adjust U C R See p 52 Adjusting the U C R Text Photo Sensitivity See p 52 Adjusting the Text Pho...

Page 11: ...ne type and options Reference See p 3 Functions Requiring Optional Configurations Types of Duplex Copies 1 Sided 2 Pages 2 Sided 1 Page See p 82 Duplex 2 Sided 1 Page 2 Sided 1 Page See p 82 Duplex 1...

Page 12: ...ided 1 Page See p 88 Two Sided Combine 1 Front 2 Back 2 Sided 16 Pages Combine 2 Sided 1 Page See p 88 Two Sided Combine 1 Front 2 Back 2 Sided 2 Pages Combine 2 Sided 1 Page See p 88 Two Sided Combin...

Page 13: ...ombine 2 Sided 1 Page See p 88 Two Sided Combine 1 Front 2 Back 2 Sided 8 Pages Combine 2 Sided 1 Page See p 88 Two Sided Combine 1 Front 2 Back Bound Originals 2 Sided 1 Page See p 93 Booklet Magazin...

Page 14: ...xii Front Back Bound Originals 2 Sided Pages See p 93 Booklet Magazine Copying Book Originals 1 Sided 4 Pages Booklet See p 93 Booklet Magazine Open to left Open to right GCBOOK0E GCBOOK1E...

Page 15: ...xiii 2 Sided 2 Pages Booklet See p 93 Booklet Magazine Open to left Open to right 1 Sided Magazine See p 93 Booklet Magazine Open to left Open to right GCAH010E GCAH020E GCBOOK3E GCBOOK4E...

Page 16: ...Sided Magazine See p 93 Booklet Magazine Open to left Open to right Combining Multiple Pages onto a Single Page See p 86 One Sided Combine 1 Sided 2 Pages Combine 1 Sided 1 Page GCAH030E GCAH040E GCS...

Page 17: ...xv 1 Sided 4 Pages Combine 1 Sided 1 Page 1 Sided 8 Pages Combine 1 Sided 1 Page 2 Sided 1 Page Combine 1 Sided 1 Page GCSHVY8J GCSHVY3J GCSHVYOJ...

Page 18: ...xvi 2 Sided 2 Pages Combine 1 Sided 1 Page 2 Sided 4 Pages Combine 1 Sided 1 Page Copying Originals Such as Books Bound Originals 1 Sided 2 Pages See p 91 Series Copies GCSHVYBJ GCSHVY4J CP2B0100...

Page 19: ...Front Back Bound Originals 2 Sided Pages See p 93 Booklet Magazine Copying 2 Sided Pages onto 1 Sided Pages See p 91 Series Copies 2 Sided 1 Page 1 Sided 2 Pages Copying onto Thick Paper Copying onto...

Page 20: ...Requiring Optional Configurations 3 Display 4 Simplified Display 5 User Tools Menu Copier and Document Server Features 6 1 Placing Originals Originals 11 Sizes and Weights of Recommended Originals 11...

Page 21: ...pier Functions 57 Adjusting Copy Image Density 57 Selecting the Original Type Setting 59 Selecting Copy Paper 60 Preset Reduce Enlarge 63 Zoom 65 Auto Reduce Enlarge 66 Size Magnification 68 Direction...

Page 22: ...rver Display 144 Simplified Display 145 Preview Display 146 Using the Document Server 147 Storing Data 147 Changing User Name File Name or Password of a Stored Document 152 Checking the Details of a S...

Page 23: ...no responsibility for its completeness or accuracy If you have any questions con cerning the legality of copying or printing certain items consult with your legal advisor The colour samples in this m...

Page 24: ...g these notes could result in moderate or minor injury or damage to the machine or to property Be sure to read these notes They can be found in the Safety Information section of About This Machine Ind...

Page 25: ...ons as fol lows Stack Internal Shift Tray 500 sheet finisher 1000 sheet finisher or booklet fin isher Staple 500 sheet finisher 1000 sheet finisher or booklet finisher Staple Booklet booklet finisher...

Page 26: ...re quently used reduce enlarge ratios other than the fixed reduce enlarge ratios See Shortcut R E General Settings Guide 4 Numbers of originals scanned into memory copies set and copies made 5 Display...

Page 27: ...ied display contains main functions only Enlarged characters and keys make for easier operation Simplified Copier Screen 1 Key Colour Use this to intensify the screen contrast by changing the colour o...

Page 28: ...ys and sizes shown on the initial display Original Orientation in Duplex Mode You can set the original orientation when making two sided copies Copy Orientation in Du plex Mode You can set the copy or...

Page 29: ...2 Sided Auto Margin TtoB When using the 1 sided 2 sided Duplex function you can spec ify margins on the back side Erase Border Width You can specify the width of erased border margins using this func...

Page 30: ...ormat for the Date Stamp function Font You can select the Date Stamp font Size You can set the Date Stamp size Superimpose You can have the Date Stamp printed in white where it overlaps black parts of...

Page 31: ...one original at a time in the ADF the Auto Feed in dicator lights for a specified time after an original is fed to show the ADF is ready for another original Rotate Sort Auto Paper Continue You can co...

Page 32: ...in Colour Con vert and the colour specified for Erase Colour in 5 levels A C S Sensitivity This 5 step setting determines the level of the standard used for discriminating between black white origina...

Page 33: ...describes recommended paper sizes and non recommended orig inals for the ADF Metric version Inch version Note About 50 originals can be placed in the ADF The weight range for originals in the Mixed m...

Page 34: ...parts Sticky originals such as translucent paper Thin highly flexible originals Thick originals such as postcards Bound originals such as books Transparent originals such as OHP transparencies or tra...

Page 35: ...to 81 2 11 K with User Tools Sys tem Settings Exposure glass ADF Note When you copy custom size originals make sure you specify the size of the originals If not the image may not be copied properly Re...

Page 36: ...s or other projecting parts Transparent originals such as OHP transparencies or translucent paper Dark originals with a lot of text and drawings Originals which partially contain a solid image Origina...

Page 37: ...riginals Reference See p 11 Originals Original Orientation You can set the original orientation in the following ways When placing the original on the exposure glass set it facing downwards Standard o...

Page 38: ...1 17 L originals with the Staple function selected A Press Special Original B Select the original orientation or and then press OK Note It is recommended to use this function together with the Auto Pa...

Page 39: ...correctly B Place the original face down on the exposure glass The original should be aligned to the rear left corner Start with the first page to be copied A Positioning mark B Left scale C Lower th...

Page 40: ...o may cause the machine to detect the size of the scanned image incorrectly or dis play a paper misfeed message Also be sure not to place originals or other ob jects on the top cover Doing so may caus...

Page 41: ...art of the original and then press the Start key D After the first part of the original has been fed place the next part then press the Start key Note When SADF is displayed in step B set the Batch mo...

Page 42: ...neral Settings Guide A Press Special Original B Press SADF and then press OK C Place one page of an original and then press the Start key D When the machine instructs you to place another original pla...

Page 43: ...per might become jammed or parts of the original image might not be copied The sizes of the originals that can be placed in this mode are follows Metric version A3L B4 JISL A4KL B5 JISKL Inch version...

Page 44: ...of the originals Regular sizes Select the size of the originals from the regular sizes A Press Special Original B Press Original Size C Press Regular Size D Select the size of original and then press...

Page 45: ...placed with this function A Press Special Original B Press Original Size C Press Custom Size D Enter the horizontal size of the original with the number keys and then press q key E Enter the vertical...

Page 46: ...Placing Originals 24 1...

Page 47: ...s set enter your login user name and user password so that the machine accepts copy jobs Ask the user ad ministrator for the login user name and login password For details see When the Authentication...

Page 48: ...ear entered values press the Clear Stop key or Cancel on the screen To confirm settings press the Check Modes Interrupt Copy Use this function if you want to interrupt a long copy job to make urgently...

Page 49: ...ns General Settings Guide Job Preset You can set up the next copy content during copying If a long copy job is in progress and you do not want to wait for it to finish you can use this function to set...

Page 50: ...Copying 28 2 Note You can switch the display to the current copy job by pressing To Copying Screen You can switch the display to the preset job by pressing To Reserv Screen...

Page 51: ...cument Note You cannot use the Job List function when Interrupt Copy is active Documents printed using the facsimile function and scanner function are not displayed in the job list Job List screen Thi...

Page 52: ...bs A Switches between job lists for each function B Switches between Current Waiting Job List and Job History C Displays reserved job numbers D Displays the function used to print jobs Job printed usi...

Page 53: ...Select the job you want to check C Press Details and then check the contents D Press Exit Changing the order of jobs You can change the order in which print jobs in the job list are served A Press Job...

Page 54: ...rinting A Press Job List B Select the job s to hold C Press Suspend Printing Deleting jobs You can delete a job that is queued or currently printing A Press Job List B Select the job you want to delet...

Page 55: ...cking Job History You can view the history contents of printed jobs A Press Job List B Press Job History A list of completed print jobs appears C Press Details to check the contents of the displayed j...

Page 56: ...ypass tray The machine can detect the following sizes as regular size copy paper A3L A4L 8 13 L If you want to use the size of paper other than the above be sure to specify the size When copying on OH...

Page 57: ...larger than A4L or 81 2 11 L Fan paper to get air between the sheets and avoid a multi sheet feed A Extender C Press Bypass and then press the q key D Select the size and type of the paper E Place the...

Page 58: ...copies onto regular size paper from the bypass tray A Open the bypass tray and then align the paper guide to the paper size B Insert the paper face down until you hear the beep C Press the q key D Pre...

Page 59: ...il you hear the beep C q key D Press Custom Size E Enter the horizontal size of the original with the number keys and then press q F Enter the vertical size of the original with the number keys and th...

Page 60: ...g it on the tray When copying onto OHP transparencies remove copied sheets one by one A Open the bypass tray and then align the paper guide to the paper size B Insert the paper face down until you hea...

Page 61: ...r 3 Thick 1 Dup Back Thick 2 Dup Back and Thick 3 Dup Back and then press OK Select Thick Paper 1 when copying paper lighter than 169 g m2 45 0 lb or less Select Thick Paper 2 when copying paper light...

Page 62: ...and then press the Start key I When the copy job is finished press the Clear Modes key to clear the set tings Note When placing an original on the exposure glass place the original with the bottom li...

Page 63: ...n Judges the colour of the original automatically and copies either in full colour or black white Full Colour Copy Copies by overlaying yellow magenta cyan and black Black White Copy Copies in black r...

Page 64: ...p to 4 Colours To use this function Full Colour must be selected If any other Colour mode is selected you cannot select Convert Colour A Press Full Colour B Press Edit Colour C Make sure that Colour i...

Page 65: ...e Colour width can be adjusted in User Tools This adjustment will be valid in Erase Colour See Colour Sensitivity General Settings Guide When you want to change the converted Colour in step F press fr...

Page 66: ...to 1 Colour Background Copies by adding a Colour in the whole page Important Since the Colour Background function overprints the entire original the Col our of the image may change A Press Edit Colour...

Page 67: ...nce by pressing Lighter or Darker E Press OK twice Note The adjusted settings will be deleted and the initial values will be reset when Auto Clear has been performed when the Clear Modes key has been...

Page 68: ...ur balance settings so that you can use them later A Change the Colour balance B Press Program Colour Balance C Press m Program D Select a program number 1 3 for this setting The Colour balance settin...

Page 69: ...fter the programmed contents are changed press Program Colour Balance G Press Program and then press the program number to be overwritten H Press Yes The program is overwritten I Press OK twice Copyin...

Page 70: ...is selected before pressing Program Colour Balance D Press Delete and then select the program number registered by the Colour balance to delete E Press Yes F Press OK twice Colour Adjustment Adjusts...

Page 71: ...e adjustment functions see What You Can Do with This Machine Colour Functions Colour Adjustments Reference See p iii What You Can Do with This Machine Colour Functions Colour Adjustments Image Adjustm...

Page 72: ...tings will be deleted and the initial values will be reset when Auto Clear has been performed when the Clear Modes key has been pressed or when the power has been turned off For types and examples of...

Page 73: ...ust by pressing Lighter or Darker B Press OK Note Adjustments should be made lightly when copying dark textured origi nals such as newspaper or recycled paper Adjustments should be made darker when da...

Page 74: ...ter or Darker B Press OK Adjusting the Text Photo sensitivity Adjusts the standard level in judging the image in the text and photo part when using Text Photo A Adjust by pressing Text or Photo B Pres...

Page 75: ...shades might vary depending on the condition of the machine In order to correctly reproduce originals the values which have been input are corrected inside the machine and copies are made using the be...

Page 76: ...Colour A Press Edit Colour B Press Colour and then press User Colour C Select the number 1 15 for the Colour you want to register D Select the Colour to be used as a base for registration from the bas...

Page 77: ...Colours by Directly Specifying the Density of Each Colour with Number Keys Creates Colours by directly specifying the density of each Colour using the number keys A Press Edit Colour B Press Colour a...

Page 78: ...nt You can not delete Colours registered in the program or user colours that are currently being used A Press Edit Colour B Press Colour and then press User Colour C Press Delete D Select the number o...

Page 79: ...paper will be copied so that background will not be reproduced Manual image density You can adjust the density of the overall original in nine steps Combined auto and manual image density Adjusts the...

Page 80: ...selected press Auto Density to cancel it B Press W or V to adjust the image density The density indicator moves Combined auto and manual image density Adjusts the density of an image only for dark tex...

Page 81: ...tion Copy If your originals are copies generation copies the copy image can be repro duced sharply and clearly Select this type from Others when Original Type Display Copier Docu ment Server Features...

Page 82: ...ric version Inch version Note Only the paper trays set to No Display or Recycled Paper in Paper Type in Tray Paper Setting in System Settings and also set to Yes in Apply Auto Pa per Select can be sel...

Page 83: ...ct is selected Trays with a key mark will not be automatically selected See Paper Type General Settings Guide Manual Paper Select Choose the tray containing the paper you wish to copy onto a paper tra...

Page 84: ...rging onto A3 B4 JIS or 11 17 81 2 14 size paper In this case place your original in the L orientation You cannot use the Rotated Copy function if Left 2 Top 2 is selected for sta pling when using the...

Page 85: ...ed When the original is placed on the exposure glass the upper left cor ner will be the base point When it is placed in the ADF the bottom left corner will be the base point A Base point when placed o...

Page 86: ...ction reduces the image to 93 of its original size to place the reduced image at the centre By combining it with the Reduce Enlarge function you can further increase a margin A Press Create Margin dis...

Page 87: ...Enlarge B Select a preset ratio which is close to the desired ratio C Adjust the ratio with o or n To change the ratio in increments of 1 press o or n To change the ratio increments of 10 press and h...

Page 88: ...and then press q key D Press OK twice E Place your originals and then press the Start key Auto Reduce Enlarge The machine can choose an appropriate reproduction ratio based on the paper and original...

Page 89: ...e originals for the Auto Document Feeder Where original is placed Original size and orientation Exposure glass A3L B4 JISL A4KL B5 JISKL 8 13 L ADF A3L B4 JISL A4KL B5 JISKL A5KL 11 17L 81 2 11 KL 8 1...

Page 90: ...duce Enlarge B Press Size Magnification C Enter the length of the original with the number keys and then press q key You can enter sizes between 1 to 999 mm in 1 mm steps D Enter the length of the cop...

Page 91: ...zontally and vertically a Horizontal ratio b Vertical ratio To enter the ratio with the number keys Select a ratio using the number keys A Press Reduce Enlarge B Press Direct Mag C Press Horizontal D...

Page 92: ...Adjust the ratio using n or o Pressing n or o changes the ratio in increments of 1 Pressing and hold ing down n or o changes it in increments of 10 F Press Vertical G Adjust the ratio with n or o H P...

Page 93: ...l copy size amm D Vertical copy size bmm Measure and specify the lengths of the original and copy by comparing A with a and B with b A Press Reduce Enlarge B Press Dir Size Mag mm C Enter the horizont...

Page 94: ...w value Sort The machine assembles copies as sets in sequential order Important To use the Rotate Sort function two paper trays loaded with same size and type paper but in different orientation KL are...

Page 95: ...A Press Finishing B Select Sort or Rotate Sort and then press OK When a finisher is not installed When the 500 sheet finisher is installed When the 1000 sheet finisher is installed When the booklet f...

Page 96: ...Guide Sample copy Use this function to check the copy settings before making a long copy run Important This function can be used only when the Sort function is turned on A Select Sort and any other n...

Page 97: ...used when the Sort function is turned on A While Copying is displayed press the Clear Stop key B Press Change Quantity C Enter the number of copy sets with the number keys and then press the q key D...

Page 98: ...you can separate each job by page Important You cannot use the bypass tray with this function A Press Stack B Enter the number of copies with the number keys C Place your originals and then press the...

Page 99: ...setting Place all the originals in the ADF in the orientation in which they can be read normally When placing the original on the exposure glass keep the same ori entation but set the original facing...

Page 100: ...2 1000 sheet finisher Booklet finisher This table shows the stapling positions not the orientation of delivery Left 2K and Top 2L are not available for larger than A4 size paper A Press Finishing AMG0...

Page 101: ...the number keys D Place your originals and then press the Start key Note When placing an original on the exposure glass start with the first page to be copied When placing an original in the ADF set...

Page 102: ...Copying 80 2 Punch You can make punch holes in copies 2 holes 3 holes 4 holes Important You cannot use the bypass tray with this function GCPNCH1E GCPNCH3E GCPNCH0E...

Page 103: ...e punch hole positions not the orientation of delivery 2 hole left K and 2 hole top L are not available for larger than A4 size paper A Press Finishing B Select one of the punch hole positions C Place...

Page 104: ...Copying 82 2 Duplex There are two types of duplex 1 Sided 2 Sides Copies 2 one sided pages on 1 two sided page 2 Sided 2 Sided Copies 1 two sided page on 1 two sided page...

Page 105: ...The resulting copy image will differ according to the orientation in which you place your originals vertical or horizontal The table shows the orientation of images on the front and back of copies not...

Page 106: ...set so that the last page is on the bottom You can also select 1 Sided to 2 Sided or 2 Sided to 2 Sided directly by pressing the Copy Function Key in step A In that case proceed to step D To change o...

Page 107: ...Top to Bottom A Select orientation original and copy and then press OK Note The default setting is Top to Top You can change the default orientation with Copier Features in User Tools See Copy Orienta...

Page 108: ...of a sheet 1 Sided 8 Pages Combine 1 Side Copies 8 one sided originals to one side of a sheet 2 Sided 1 Page Combine 1 Side Copies 1 two sided original to one side of a sheet 2 Sided 2 Page Combine 1...

Page 109: ...iginals read from top to bottom A Press Dup Combine Series B Press Combine C Select 1 Sided or 2 Sided for Original and then press Combine 1 Side for Copy D Select the number of originals to combine E...

Page 110: ...in Combine Separation Line in Combine General Settings Guide Reference See p 85 Originals and copy orientation Two Sided Combine Combines various pages of originals into one sheet with two sides There...

Page 111: ...one sheet with eight pages per side A Front B Back 2 Sided 2 Pages Combine 2 Side Copies 2 two sided originals to one sheet with two pages per side 2 Sided 4 Pages Combine 2 Side Copies 4 two sided or...

Page 112: ...et with eight pages per side A Front B Back A Press Dup Combine Series B Press Combine C Select 1 Sided or 2 Sided for Original and then press Combine 2 Sides for Copy D Select the number of originals...

Page 113: ...s Separately copies the front and back of a two sided original or the two facing pages of a bound original onto two sheets There are two types of Series Copies Important You cannot use the Book 1 Side...

Page 114: ...s Dup Combine Series B Press Series C Select 2 Sided 1 Sided or Book 1 Sided and then press OK If you selected 2 Sided 1 Sided you can change the orientation D Place your original on the exposure glas...

Page 115: ...six types of Booklet Magazine Important The following table shows the paper sizes of two sided original and two sid ed copy when copying at a ratio of 100 Metric version Inch version 1 Sided Booklet M...

Page 116: ...Copying 94 2 Open to right 2 Sided Booklet Make two sided originals to copies in page order for a folded booklet as shown Open to left Open to right GCBOOK1E GCAH010E GCAH020E...

Page 117: ...riginals to make copies in page order when they are folded and stacked Open to left Open to right 2 Sided Magazine Copies two or more originals of two sided to make copies in page order when they are...

Page 118: ...pies a two page spread original onto one sheet with one page per side You cannot use the bypass tray with Book 2 Sided or Front Back 2 Sided Front Back 2 Sided Copies each two page spread original as...

Page 119: ...and open A Open to left B Open to right How to fold and unfold copies to make a magazine As shown below fold and stack copies to make a magazine and open Open to left Open to right A Select Open to Le...

Page 120: ...2 Sided and Front Back 2 Sided E Select the paper F Press OK G Place your originals and then press the Start key Note You cannot use the bypass tray with this function When placing an original on the...

Page 121: ...n setting the top and bot tom margins and then press OK Margin on the back side of the page is valid when 1 Sided 2 Sided or Com bine 2 Sides is selected E Place your originals and then press the Star...

Page 122: ...image This function has the following three types Border This mode erases the edge margin of the original image Centre This mode erases the centre margin of the original image Centre Border This mode...

Page 123: ...The erase width is set to 10 mm 0 4 inch as a default You can change this setting with User Tools See Erase Centre Width Erase Border Width General Settings Guide Border Erase same width This mode era...

Page 124: ...anges the width in increments of 10 mm 0 4 inch F Press OK twice G Place your originals and then press the Start key Note To change the value entered in step E press n and o to set a new val ue Border...

Page 125: ...wice G Place your originals and then press the Start key Centre Erase This mode erases the centre margin of the original image A Press Edit Colour B Press Erase C Press Erase Centre Border D Press Era...

Page 126: ...image A Press Edit Colour B Press Erase C Press Erase Centre Border D Press Erase Centre Border E Press Same Width F Press Centre and then set the erase centre width with n and o G Press Border and th...

Page 127: ...e margins of the original image A Press Edit Colour B Press Erase C Press Erase Centre Border D Press Erase Centre Border E Press Different Width F Press the key for the order you want to change and s...

Page 128: ...ray with this function A Press Edit Colour B Press Stamp C Press Background Numbering D Enter the number to start counting from with the number keys and then press q key E Press OK twice F Place your...

Page 129: ...y one message can be stamped at a time The following eight messages are available for stamping COPY URGENT PRIORITY For Your Info PRELIMINARY For Internal Use Only CONFIDENTIAL DRAFT Stamp position an...

Page 130: ...ll Pages or 1st Page Only to select the print page F After you specify all desired settings press OK G Press OK twice H Place your originals and then press the Start key Note When the Full Colour Copy...

Page 131: ...the stamp position size and density A Press Change B Select the position for print size and density and then press OK User Stamp Copies a scanned image as a stamp Letters or images you use frequently...

Page 132: ...rientation The user stamp positions differ according to the orientation in which you place your originals A Press Edit Colour B Press Stamp C Press User Stamp D Select the stamp you require You can ch...

Page 133: ...selected the full Colour counter will ad vance to 1 The default user stamp Colour is red See Stamp Format 1 4 Stamp Colour 1 4 General Settings Guide Changing the user stamp Colour Changes the stamp...

Page 134: ...Make sure that the machine is in copier mode B Press the User Tools Counter key C Press Copier Document Server Features D Press Stamp E Press User Stamp F Press Program Delete Stamp G Press mProgram...

Page 135: ...t Exits settings and gets ready to copy Note Stamp numbers with m already have settings in them If the stamp number is already being used the machine will ask you if you want to overwrite it Press Yes...

Page 136: ...er you want to delete H Select Yes and then press Exit I Press Exit The display returns to the Copier Document Server Features main menu J Press Exit Exits settings and gets ready to copy Date Stamp U...

Page 137: ...fer according to the orientation in which you place your originals Important You cannot use the bypass tray with this function A Press Edit Colour B Press Stamp C Press Date Stamp D Select the stamp f...

Page 138: ...e Stamp Colour format and position of the date to be stamped The default Colour is Black See Date Stamp General Settings Guide To change the date stamp Colour Changes the stamp Colour A Press Stamp Co...

Page 139: ...Copier Functions 117 2 To change the date stamp position Changes the stamp position A Press Change under Stamp Position B Select the desired date stamp position and then press OK...

Page 140: ...ere are six types of page numbering P1 P2 1 5 2 5 1 2 P 1 P 2 1 2 1 1 1 2 Stamp position and original orientation The page stamp positions differ according to the orientation in which you place your o...

Page 141: ...tings press OK F Press OK G Place the originals and then press the Start key Note You can specify the stamp Colour position pages to be stamped and numbering The default Colour is black See Stamp Gene...

Page 142: ...nd then press OK Specifying the first printing page and start number P1 P2 1 2 P 1 P 2 1 2 Below explains the example when P1 P2 is selected The steps are the same for other cases A Press Change under...

Page 143: ...ch to stop number ing with the number keys and then press the q key If you want to number all pages to the end press to the End E When page designation is complete press OK F Press OK twice Specifying...

Page 144: ...E Press Total Pages enter the total number of original pages with the number keys and then press the q key F When page designation is complete press OK twice G Place the originals and then press the S...

Page 145: ...e Clear or Clear Stop key and then enter a new number If you selected 1 5 2 5 and want to change the settings the first print ing page the number of page from which to start numbering or total number...

Page 146: ...2 11 K or Original 51 2 81 2 L Copy paper 81 2 11 L Original A5K Copy paper A4L or Original A5L Copy paper A4K Original 51 2 81 2 K Copy paper 81 2 11 L or Original 51 2 81 2 L Copy paper 81 2 11 K A...

Page 147: ...r the area of the image repeatedly copied You can set any value in the range of X1 0 412 mm 0 16 2 X2 20 432 mm 0 8 17 0 Y1 0 277 mm 0 10 8 and Y2 20 297 mm 0 8 11 6 B Select the size of copy paper an...

Page 148: ...hen press the Start key Double Copies One original image is copied twice on one copy as shown Important You cannot use the bypass tray with this function See the following table for original and copy...

Page 149: ...e copy paper Important You cannot use the bypass tray with this function The original sizes and directions for centring are listed below Metric version Inch version Original placed on Original size an...

Page 150: ...Copying 128 2 A Select the paper B Press Edit Colour C Press Edit Image D Press Centring E Press OK F Place your originals and then press the Start key GCCNTR0E...

Page 151: ...be reversed and inverted to complimentary Colours Important If your original is black and white copy images are inverted If your original is Colour the density darkness and brightness of each Colour w...

Page 152: ...Mirror Copies by reversing the image from left to right as reflected in a mirror A Press Edit Colour B Press Edit Image C Press Mirror Image D Press OK E Place the originals and then press the Start...

Page 153: ...nserted before the first copy Copy Blank Front Back Covers The first and last pages of your original are copied on specific paper for use as covers or a cover sheet is inserted before the first copy a...

Page 154: ...nals nor cover sheets in the by pass tray When selecting Copy in step C select whether the front and back covers are copied 1 Sided or 2 Sided Designate Use this function to have certain pages of your...

Page 155: ...location of the first page of the first chapter with the number keys and then press the q key F To specify another page location repeat steps D to E Up to 20 pages can be specified G Select the paper...

Page 156: ...plex 1 Sided 2 Sided or Combine function A Press Cover Slip Sheet B Press Designate Chapter C Press Chapter D Press the key to select the chapter number To select chapters 11 to 20 press 11 20 E Enter...

Page 157: ...ip sheet Since a slip sheet is inserted for every page you can protect printed surfaces This function is useful in copying OHP transparencies Important Before using this function set the special paper...

Page 158: ...the bypass tray D Place the originals and then press the Start key Note Press the q key and select OHP Transparency in Special paper When copying OHP transparencies set on the bypass tray if Internal...

Page 159: ...t them as you want Important Data stored in the machine might be lost if some kind of failure occurs The manufacturer shall not be responsible for any damage that might result from the loss of data A...

Page 160: ...tored data is deleted automatically For details about changing settings see Auto Delete File in Document Server General Settings Guide To check if the document has been stored press the Document Serve...

Page 161: ...rogramming Defaults in Initial Display Paper settings are stored based on paper size So if you place more than one paper tray of the same size the paper tray prioritized with User Tools Sys tem Settin...

Page 162: ...gainst them already have settings made for them If you do not want to enter the program name in step E proceed to step F Changing a Stored Program Changes program settings A Check the program settings...

Page 163: ...tents of program A Press the Program key B Press Delete C Press the program number you want to delete D Press Yes The program is deleted and the display returns to the initial copy display Recalling a...

Page 164: ...e Density Special Original Original Orientation Cover Slip Sheet Edit Colour Dup Combine Series Reduce Enlarge Finishing A Specify scan settings and any other settings you require in the initial dis p...

Page 165: ...List display Available Printing Available Transmission Unavailable Fax Functions Storing method Fax List display Available Printing Available Transmission Available Transmission is done by use of the...

Page 166: ...e memory as well as the number of paper sets and copied are displayed 3 Keys for the operation is dis played 4 The function used for the storing as well as the colour mode is dis played 5 The function...

Page 167: ...screen by pressing the Simplified Display key The simplified display contains main functions only Characters and keys are enlarged on this screen making for easier operation Simplified Document Serve...

Page 168: ...ment to be displayed 3 Exit The login screen will appear 4 Display File Used to display the document name Switch is displayed on the preview screen for the stored documents Above key is used to switch...

Page 169: ...t the password After the operation be sure to press the Clear Modes key to cancel the selected state of the document User names registered to the stored documents of the Document Server are used for i...

Page 170: ...eration sets up the user name document name and password When not changing a document name the name will be automatically set D Set the original E Specify the original scanning conditions F Press Star...

Page 171: ...tic deletion See Auto Delete File in Document Server General Settings Guide When storing a document which is not to be automatically deleted in the Document Server specify Off for Auto Delete File in...

Page 172: ...elect the user name and then press OK The user name change screen will appear C Press Manual Entry D Enter the user name and then press OK To register or change a user name When no name is registered...

Page 173: ...the document name to be automatically set D Enter document name and then press OK Note In Step C pressing Backspace allows you to delete up to any desired loca tion You can enter up to 10 full size o...

Page 174: ...press OK You can use four to eight digits for specifying the password D Four double check enter the password again and then press OK Changing User Name File Name or Password of a Stored Document Foll...

Page 175: ...F Press OK Note Depending on the security setting Access Privileges may appear instead of User Name For details about specifying Access Privileges consult the administrator Checking the Details of a S...

Page 176: ...ed document from user name or document name You can rearrange the currently chronologically ordered documents in any de sired order To search by file name Following describes the procedure for searchi...

Page 177: ...at matches completely from the starting character will be searched and displayed on the document selection screen Note Pressing Display All displays ever stored document To search by user name Followi...

Page 178: ...red Document Following describes the procedure for printing a stored Using Web Image Monitor allows you to print a document stored in the Docu ment Server from your PC A Select the document to be prin...

Page 179: ...the next printing The fax feature does not have the function of storing the printing conditions When two or more documents are specified the printing conditions are stored on the first document but n...

Page 180: ...procedure for interrupting printing work A Press Clear Stop key B Press Suspend Changing Number of Print Copies while Printing is in Progress Following describes the procedure for changing the number...

Page 181: ...is set enter it and then press OK B Press Sample Copy key Only one copy will be printed C Press Continue Printing will be resumed Note You can search the target document using in step A User Name or F...

Page 182: ...the target document using in step A User Name or File Name situated in the upper left side of the screen In the display order field of step A you can sort the documents by User Name File Name Date Pr...

Page 183: ...ments by User Name File Name Date Press the item to be used for the sorting When canceling the selection in step A press the highlighted document again Printing a Specified Range You can print the pag...

Page 184: ...er Name File Name Date Press the item to be used for the sorting When canceling the selection in step A press the highlighted document again Deleting a Document Following describes the procedure for d...

Page 185: ...sults When canceling your selection press the highlighted document again For the Web Image Monitor starting procedure see Displaying a Docu ment in Document Server with Web Image Monitor Displaying a...

Page 186: ...mage Monitor will be displayed C Click Document Server List of the documents will be displayed D Click of the document you want to download E Select File format PDF Multi page TIFF and then click Down...

Page 187: ...given below shows which modes can be used together Blank space These modes can be used together These modes cannot be used together The first mode selected will be the mode you are working in These mo...

Page 188: ...ed is specified the combination with the front cover or slip sheet Designate is 2 Combination of Staple Top and Punch Left is Combination of Staple Left and Punch Top is Combination of Staple Center a...

Page 189: ...KL PostcardL 148 200 mmKL When the beeper is turned off it will not sound if you insert paper into the bypass tray See Panel Tone General Settings Guide Preset Enlarge Reduce You can select one of 12...

Page 190: ...ize Magnification If the calculated ratio is over the maximum or under the minimum ratio it is automatically adjusted to within available range However with some ratios parts of the image might not be...

Page 191: ...ion are A4KL B5 JISKL and 81 2 11 KL The number of copies that can be placed on the tray is as follows When the number of copies exceeds capacity remove copies from the tray Internal tray A4 81 2 11 o...

Page 192: ...ing 50 to 10 copies 2 to 9 leaf binding 100 copies A3L B4 JISL 11 17L 81 2 14 L 10 to 30 leaf binding 50 to 10 copies 2 to 9 leaf binding 50 copies Booklet finisher Booklet tray A3L B4 JISL A4L 11 17L...

Page 193: ...orientation that can be used in the Staple function and the stapler capacity are as follows 500 sheet finisher A3L B4 JISL 11 17 L 81 2 14 L 30 sheets A4KL B5 JISKL 81 2 11 KL 50 sheets 1000 sheet fin...

Page 194: ...image is rotated the staple orientation changes by 90 The maximum original image size that can be rotated is as follows Metric version A4 Inch version 81 2 11 When using Staple Slant Staple Bottom Sl...

Page 195: ...ISKL A5K 11 17 L 81 2 14 L 81 2 11 KL 71 4 101 2 KL 81 2 13 L 81 4 13 L 8 13 L 8KL 16KKL 2 and 3 holes type 3 holes A3L B4 JISL A4K B5 JISK 11 17 L 81 2 11 K 71 4 101 2 K 8KL 16KK 4 holes type A3L B4...

Page 196: ...ne The machine sets the reproduction ratio automatically to meet the paper size and copies the originals together onto the paper The reproduction ratios you can specify are 25 400 If the machine is eq...

Page 197: ...sion Exposure glass A3L B4 JISL A4KL B5 JISKL ADF A3L B4 JISL A4KL B5 JISKL A5KL Inch version Exposure glass 11 17 L 81 2 14 L 81 2 11 KL ADF 11 17 L 81 2 14 L 81 2 11 KL 5 2 81 2 L Background Numberi...

Page 198: ...let function Page Numbering When page numbering is used with Combine mode page numbers are printed as follows Page Numbering per original With 1 Sided 2 Sided using the Combine function With the Magaz...

Page 199: ...will not be counted as a copy Front and back covers are two sided copied depending on the settings made in Display Time in Cover Sheet Tray of User Tools System Settings At Mode Selected Depends on t...

Page 200: ...White Copy iii 41 Book 1 Sided 91 Book 2 Sided 93 Booklet 97 Booklet Magazine xii xvi 93 167 Border Erase 100 101 102 105 border erase 104 Bypass tray 37 bypass tray 36 Bypass Tray Copy 167 C Centre 1...

Page 201: ...2 format of date 116 Front Back 2 Sided 93 Front Back Covers 131 Front cover 131 Front Cover Front Back Cover 167 Full Colour Copy iii 41 Function Compatibility 165 G General Features 6 Generation Cop...

Page 202: ...the First Page 160 program 112 142 Programs 139 Punch 80 Punch hole positions 81 Punch holes 80 R ratio 65 66 Recalling a Program 141 reflect 130 Registering the adjusted Colour balance 46 Regular siz...

Page 203: ...ge a user name 149 150 To search by file name 155 To search by user name 155 To set or change a Password 152 Two Sided Combine 88 U User Colour 53 User Stamp v 109 110 111 112 113 V various sizes 21 W...

Page 204: ...182 AE AE B230 7658...

Page 205: ...means POWER ON b means POWER OFF c means STAND BY Acrobat is a registered trademark of Adobe Systems Incorporated Other product names used herein are for identification purposes only and might be trad...

Page 206: ...Operating Instructions Copy Document Server Reference Type for MP C2500 Aficio MP C2500 ISC 2525 Type for MP C3000 Aficio MP C3000 ISC 3030 AE AE B230 7658...

Reviews: