background image

VRS Getting Started Guide

12

Kofax Image Products

6.


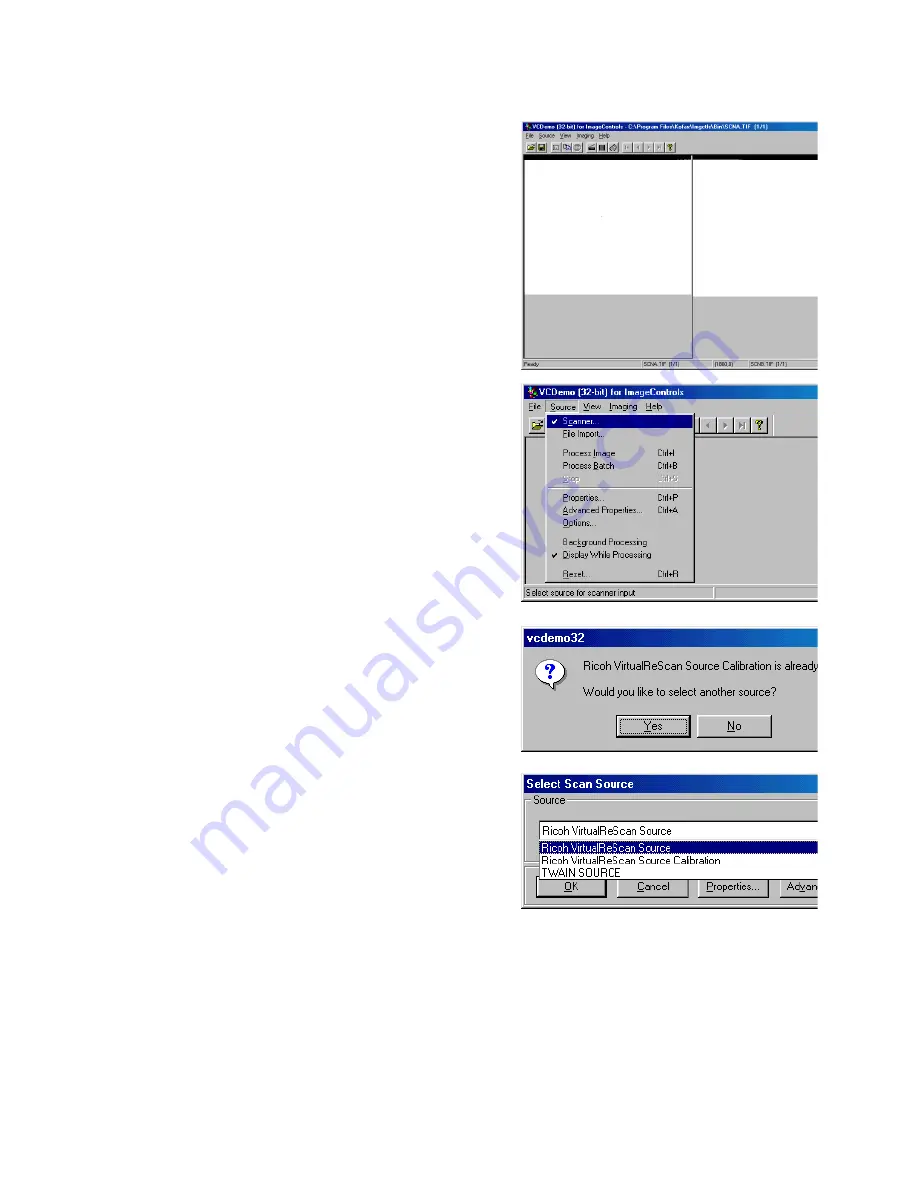
If Calibration is successful, the display
windows will be visible as in the example to
the right.

7.


Select Source, Scanner from the pull-down
menu in preparation for an ADF scan.

8.


A Window will display stating that the source
is already in use, click on Yes to change.

9.


Select Ricoh VirtualReScan Source, then click
on OK.

Summary of Contents for G413

Page 1: ...SUPPLEMENTAL OPERATING INSTRUCTIONS G413 IMAGE SCANNER RICOH...

Page 2: ...and Adrenaline are registered trademarks and VirtualReScan is a trademark of Kofax Image Products All other product names and logos mentioned herein are the property of their respective companies Disc...

Page 3: ...VirtualReScan 9 Opening the VRS Menu 10 First Time Calibration 10 VRS Menu Commands 13 Defining Exception Conditions 14 Warnings Tab 14 Selecting the Threshold 15 Selecting an Action 16 Errors Tab 16...

Page 4: ...Products Using the Profiles Tab 31 Using the Options Tab 33 VRS Refresh 34 Intelligent Contrast Adjustment Brightness Adjustment 34 Using the Analysis Tab 35 Using the About Tab 36 Previewing Images...

Page 5: ...can even remove color that may interfere with the data you are collecting VRS will also detect paper jams bent corners and equipment conflicts It is no longer necessary to pre sort mixed batches and i...

Page 6: ...ner meet the following requirements PC Pentium II class PC with a 200 Mhz processor or greater Pentium II class PC with a 400 Mhz or greater grayscale scanning 64 Mbytes RAM 128 Mbytes RAM grayscale s...

Page 7: ...r To install VRS under Windows NT you must have administrator rights If an earlier version of Kofax ImageControls exists on your computer you can upgrade it by completing the installation procedure in...

Page 8: ...ialog Box 2 5 Click Next The installation begins and a progress indicator stays in view until the process is done When the VRS installation finishes the Setup Complete dialog box displays similar to F...

Page 9: ...ve the older Kofax accelerators before you install the Adrenaline Hardware Accelerator Precautions When handling your Adrenaline Hardware Accelerator follow these precautions Keep the accelerator in i...

Page 10: ...the Scanner Control Unit are in the configuration illustrated below Configure the Accelerator Windows 95 After installing the Adrenaline Hardware Accelerator power on your PC Windows detects the Adren...

Page 11: ...NT 1 Select Settings Control Panel Kofax Configuration Manager The following dialog box opens Figure 6 Kofax Configuration Manager KCM Dialog Box Note If your Control Panel does not include the Kofax...

Page 12: ...ector attaches to the PC and the Scanner connector attaches to the scanner To connect the scanner to your PC 1 Attach the cable connector marked Kofax to the connector on the Kofax Adrenaline Hardware...

Page 13: ...al that VRS is active Note During the VRS installation process the VirtualReScan Source is automatically created and set as the default scanning source If you have questions about how to select the so...

Page 14: ...t click on the VirtualReScan icon to open the VRS menu Figure 10 VRS Menu 2 When using VRS the first time begin by selecting the Configure command For more information see the section Defining Excepti...

Page 15: ...menu then click on OK 3 Select Source Properties 4 Verify that the settings are as follows ADF 200DPI Maximum Page Size Duplex click on OK 5 Place the 12 by 12 Calibration Sheet in ADF The Document G...

Page 16: ...display windows will be visible as in the example to the right 7 Select Source Scanner from the pull down menu in preparation for an ADF scan 8 A Window will display stating that the source is alread...

Page 17: ...see the section Using the Profiles Tab on page 31 Mode Use this command to select an operating mode which determines the conditions under which the VRS user interface opens during a scanning session...

Page 18: ...s or customize how VRS handles each exception type The settings on the VRS Administration Utility dialog box remain in effect until you change them again For detailed information on changing the setti...

Page 19: ...ined acceptable value in the Contrast Out of Range setting in the Warnings tab Based on this real time evaluation VRS either accepts the image and allows it to be passed on to the scanning application...

Page 20: ...ction When a warning condition occurs VRS handles it according to the Action setting you select For details on selecting an action type see the section Action Options on page 17 Errors Tab The Errors...

Page 21: ...C Timeout Scanner is unable to respond within the predefined period of time Auto Crop Failure Due to excessive skew or other condition VRS is unable to detect the edges of the scanned document With so...

Page 22: ...ning occurs the dialog box would open with the focus on the Clarity tab where the brightness setting can be adjusted To define exception condition parameters 1 From the Windows taskbar right click on...

Page 23: ...are ready to scan the document again With the Auto Resolve check box cleared the Auto Resolve Manager enters manual mode and enables the Rescan VRS and Ignore buttons As a result VRS takes no action u...

Page 24: ...cur Stop on First Page VRS dialogs open when you scan the first page of a batch and when exception conditions occur Stop Never VRS dialogs remain out of view even if exception conditions occur In this...

Page 25: ...ning Exception Conditions on page 14 As defined by the active operating mode See Selecting a Mode on page 20 When you select the Preview feature See Previewing Images on page 37 When you select the VR...

Page 26: ...with a range of image magnification levels Figure 17 VRS Viewer Zoom Menu Using the Zoom Menu to adjust the view From the Zoom menu you can select a setting to magnify or reduce the image in the Viewe...

Page 27: ...djustments to resolve the condition VRS Interactive Properties Dialog Box Tabs The VRS Interactive Properties dialog box consists of the following tabs Clarity Use this tab to adjust the settings for...

Page 28: ...ge the settings on the VRS Interactive Properties dialog box they remain in effect until you close VRS When VRS restarts the dialog box is reset to the default settings Rescan After reloading a docume...

Page 29: ...on Utility Warnings tab settings For example if the image brightness value matches the brightness setting on the Clarity tab or falls within the range defined by the Brightness Out of Range threshold...

Page 30: ...ointer so that the intersection of the crosshairs represents the desired values for brightness and contrast Then a dotted line appears on the brightness contrast scale The horizontal dotted line repre...

Page 31: ...2 Under Enhancement Filters you can select one of the following a None Disables all the enhancement filters b Descreening Activates a shade removal filter that is useful for removing halftone pattern...

Page 32: ...a Move the slider toward Small if removal of small dots will achieve the desired image quality b Move the slider toward Medium if removal of small and medium dots will achieve the desired image qualit...

Page 33: ...control arm to rotate the image If necessary you can fine tune the rotation with the Fine Angle Adjustment slider The Angle box on the Skew tab lists the current image angle When the Angle box lists...

Page 34: ...cursor in the Angle box click the arrows to review the list of settings and click your selection b Type a value for the correction angle directly into the Angle box The valid range for the angle is 45...

Page 35: ...image properties VRS uses the profile Default settings unless you define and select another one From the Profiles tab you can define update load and remove profiles Figure 22 Profiles Tab To set up a...

Page 36: ...refreshed with the new settings or 1 From the VRS Interactive Properties dialog select the Profiles tab 2 From the Available Profiles list double click the name of the profile you want to use or 1 Fro...

Page 37: ...will not straighten the data on the page if the data was not straight on the original document If you prefer to correct the skew angle on an individual image basis do not select Automatic Deskew use t...

Page 38: ...to update an image when you apply property changes enable the VRS Refresh function With VRS Refresh you ensure that VRS updates images as quickly as possible Intelligent Contrast Adjustment Brightnes...

Page 39: ...ocuments that have a purple background If you are not sure how to adjust the contrast and brightness settings to achieve the best possible image quality for purple documents scan a sample page Then ch...

Page 40: ...and e mail address for Kofax Image Products For direct access to the Internet you can do the following Click the VRS Online button to visit the VRS product web site which includes information on how...

Page 41: ...perties Dialog Box on page 23 To preview an image 1 Scan a document that is similar to the document type you plan to use for batch scanning 2 From the VRS menu select Preview to display the sample ima...

Page 42: ...f the Kofax technical support staff instructs you to do so To reset the VRS configuration 1 From the Windows taskbar right click on the VRS icon to open the VRS menu 2 From the VRS menu select the Res...

Page 43: ...ine you are using Operating system you are using Description of how the problem occurred including error message text Headquarters European Headquarters Kofax Image Products 16245 Laguna Canyon Road I...

Page 44: ......

Page 45: ...Clarity tab 25 Cleanup image 27 Communication error 17 Configure command 13 Connecting PC to Scanner 6 Contrast 23 25 26 contrast adjustment intelligent 34 Cover Open error 17 D descreening 27 Deskew...

Page 46: ...reshold selecting 15 Thresholds Blank Page 15 Brightness Out of Range 15 Contrast Out of Range 15 Missing Corner 15 Timeout error 17 V VirtualReScan starting 9 VRS Administration Utility dialog box 14...

Page 47: ...VRS Getting Started Guide 2 Kofax Image Products...

Reviews: