background image

Power Connection

Only connect the copier to the power source described on the inside
front cover of this manual. Avoid multi-wiring as it could cause an
electric shock or fire.
Avoid using an extension cord. Make sure the wall outlet is near the
copier and freely accessible so it can be unplugged easily in the event of
an emergency.

Make sure the plug is firmly inserted in the outlet.

Voltage must not fluctuate more than 10%.

Do not set anything on the power cord.

Always turn the copier off when you have finished copying for the day.

.........................

..........................

.........................

..........................

.........................

..........................

.........................

..

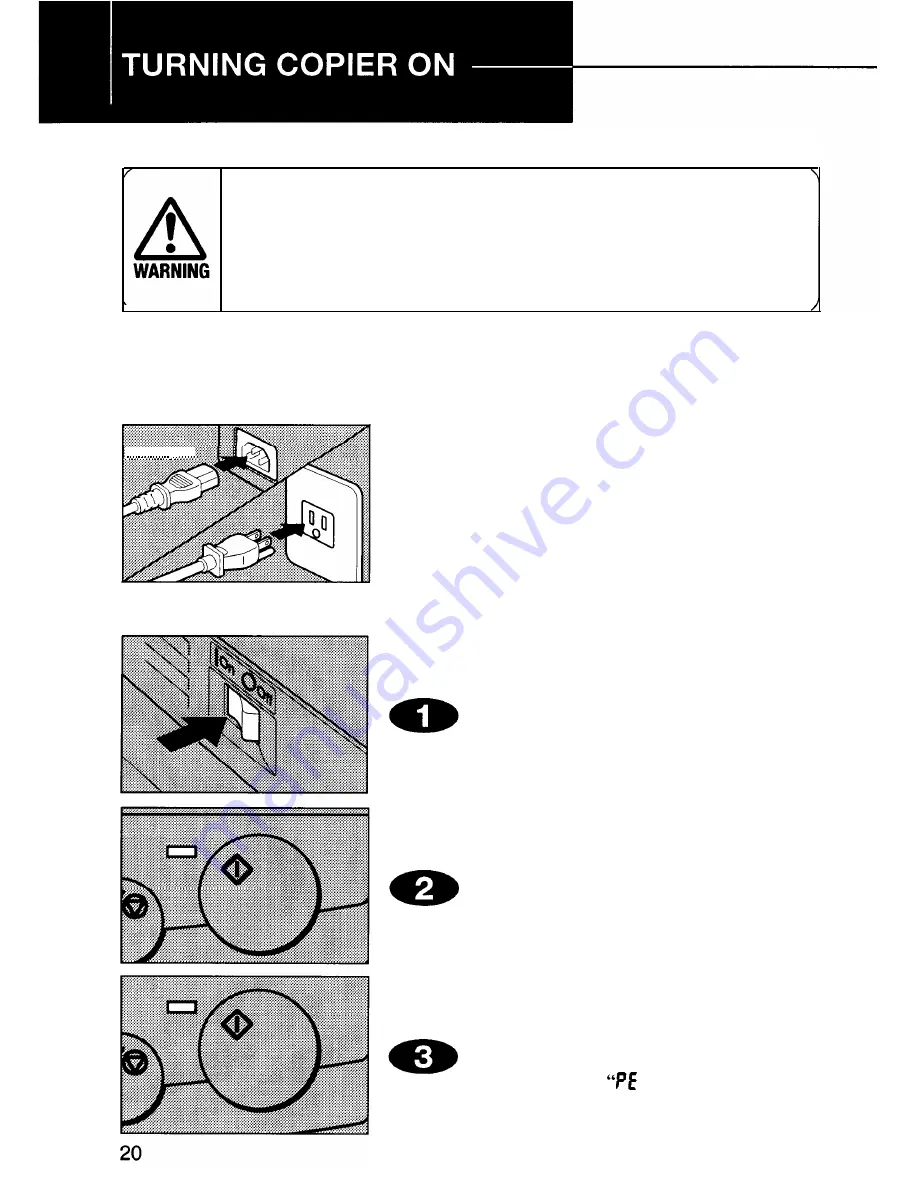
Firmly insert the plug into the
copier and outlet.

Turning Copier On

Turn the main switch on.

Wait for the copier to warm up.
During warm-up, the 

Start 

indica-

tor lights red.

When the 

Start 

indicator turns

green, the copier is ready to make
copies.

If Load Paper 

   indication is on

when starting, load paper.

Summary of Contents for FT 1008

Page 1: ...RICOH FT1008 1208 OPERATOR S MANUAL Read this manual carefully before you use this product and keep it handy for future reference For safety please follow the instructions in this manual ...

Page 2: ...r good copy quality Ricoh recommends that you use genuine Ricoh toner Ricoh shall not be responsible for any damage or expense that may result from the use of parts and supplies other than genuine Ricoh parts in your Ricoh office product Note Some illustrations may be slightly different from your machine Power Source 220 240 V 50 60 Hz 6 A Please make sure to connect the power cord to a power sour...

Page 3: ...contains important information related to user safety and the prevention of equipment problems ESSENTIAL SYMBOLS The following essential symbols are used in this manual Ignoring this warning could cause serious injury or even death Ignoring this caution could cause injury or damage to property A v Symbol A means a situation that requires you to take care 0 DO NOT carry out the operation represente...

Page 4: ...tions to this copier There is a risk of fire electric shock explosion or loss of sight Damage Warning If the copier looks damaged or breaks down smoke is coming out there is a strange smell or anything looks unusual immediately turn off the main switch then unplug the power cord from the wall Do not continue using the copier in this condition Contact your service representative Do not incinerate u...

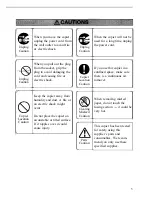
Page 5: ... Do not place the copier on an unstable or tilted surface If it topples over it could cause injury e Unplug Caution 8 Copier Location Caution Clearing Misfeed Caution n 1 l Parts Caution When the copier will not be used for a long time unplug the power cord If you use this copier in a confined space make sure there is a continuous air turnover When removing misfed paper do not touch the fusing sec...

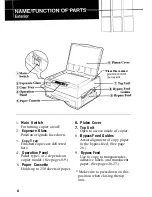
Page 6: ...pends on copier model See pages 8 9 5 Paper Cassette Holds up to 250 sheets of paper 6 Platen Cover 7 Top Unit Open to access inside of copier 8 Bypass Feed Guides Assist alignment of copy paper in the bypass feed See page 26 9 Bypass Feed Use to copy to transparencies adhesive labels and translucent paper See pages 26 27 Make sure to press down on this position when closing the top unit 6 ...

Page 7: ...per B This unit may be very hot When accessing the inside of the copier use caution 4 Image Density Recalibration Switch When you want to adjust the image density after using the copier for a long time adjust this switch See page 34 5 Transfer Corona Wire If white streaks appear on copies or image density ap pears uneven clean this wire See page 45 6 Guide Plates If the reverse side of copies appe...

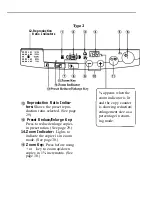
Page 8: ...es Shows reduction enlargement size in in zooming mode Type 2 panel only PE display tells you to replenish paper and displays other data 5 Start Indicator Lights green when copier is ready to make copies 8 6 Start Key Press to start copy ing 7 Manual Image Density Indi cators Lights up when image density is adjusted manually See page 28 8 Image Density Adjustment Key Used to adjust image density S...

Page 9: ...ress to reduce enlarge copies in preset ratios See page 29 14 Zoom Indicator Lights to indicate the copier is in zoom mode See page 30 Zoom Key Press before using or key to zoom up down copies in 1 increments See page 30 appears when the zoom indicator is lit and the copy counter is showing reduction enlargement size as a percentage in zoom ing mode ...

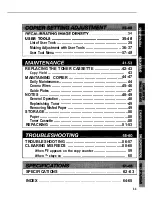
Page 10: ...ray 19 TURNING COPIER ON 20 21 Auto off mode for automatically saving power 21 NOTES ON INSTALLATION LOCATION 22 PLACEMENT OF ORIGINALS 24 Alignment of Originals 24 FULL SIZE COPYING 25 Auto Start Setting Copy Orders During Warm Up 25 BYPASS FEED COPYING 26 27 Original and Copy Directions 27 ADJUSTING COPY DENSITY 28 Auto image density 28 Manual image density 28 REDUCING ENLARGING 29 30 Reducing E...

Page 11: ...INTAINING COPIER 44 47 Daily Maintenance 44 Corona Wires 45 46 Guide Plates 47 NOTES 48 49 General Operation 48 Replenishing Toner 49 Removing Misfed Paper 49 STORAGE 50 Paper 50 Toner Cassette 50 REPACKING 51 53 TROUBLESHOOTING 56 57 CLEARING MISFEEDS 58 60 When PE appears on the copy counter 59 When stays on 60 I SPECIFICATIONS 62 63 1 INDEX 64 65 11 ...

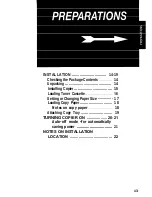
Page 12: ...g 14 Installing Copier 15 Loading Toner Cassette 16 Setting or Changing Paper Size 17 Loading Copy Paper 18 Notes on copy paper 18 Attaching Copy Tray 19 TURNING COPIER ON 20 21 Auto off mode for automatically saving power 21 NOTES ON INSTALLATION LOCATION 22 13 ...

Page 13: ......

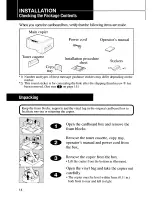
Page 14: ... 0 The removed shipping thumbscrews should be kept as shown in step a for future shipping m Do not turn on the main switch until the two shipping thumbscrews have been removed otherwise the copier may be damaged Store the two shipping thumbscrews as shown Only short thumbscrew with type 1 model m Make sure to keep the shipping thumb screws they must be attached prior to shipping aa Remove the pape...

Page 15: ...oner cassette m If these tapes are not removed the toner cassette may be damaged and unable to make a copy Open the top unit Confirm that the A mark 0 of the toner cassette is pointing upward Align guides on both sides of the toner cassette with the left with l mark and right with c mark guides of the toner cassette holder then insert the toner cassette into the copier as shown until it clicks int...

Page 16: ...plate halfway down 0 and carefully remove the two side guides by pushing and lifting the end of the side guides as illustrated Move the two side guides to your desired paper size while pushing the bottom plate halfway down To set the side guides confirm that the metal hook of the side guide is above the protrusion of the bottom plate 0 push the bottom plate halfway down 0 and insert the bottom hoo...

Page 17: ......

Page 18: ...Attach copy tray as shown 0 then depress it slightly to fix it in place 0 l Confirm that the copy tray is securely in place When you copy onto long size paper extend the copy tray as shown 19 ...

Page 19: ...emergency l Make sure the plug is firmly inserted in the outlet l Voltage must not fluctuate more than 10 l Do not set anything on the power cord l Always turn the copier off when you have finished copying for the day i Firmly insert the plug into the copier and outlet Turning Copier On Turn the main switch on Wait for the copier to warm up During warm up the Start indica tor lights red When the S...

Page 20: ...is reduced from less than 91W standby to less than 5W To re activate the copier press any key l The copier does not enter Auto off mode when the Start indicator is red You are accessing the user tools l Initial Auto off duration is 30 minutes To change this duration with the user tools follow the steps on page 38 l When the copier is in Auto off mode the Start indicator green blinks 21 ...

Page 21: ...r in a large well ventilated room with an air turnover of more than 3 times hr person Locations to Avoid Locations exposed to direct sunlight or strong light more than 2 000 lux Locations directly exposed to cool air from an air conditioner or heated air from a heater Sudden temperature changes may cause condensation within the copier Places where the copier might be subjected to frequent strong v...

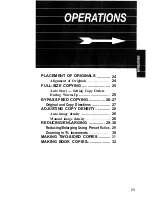
Page 22: ...rders During Warm Up 25 BYPASS FEED COPYING 26 27 Original and Copy Directions 27 ADJUSTING COPY DENSITY 28 Auto image density 28 Manual image density 28 REDUCING ENLARGING 29 30 Reducing Enlarging Using Preset Ratios 29 Zooming in 1 Increments 30 MAKING TWO SIDED COPIES 31 MAKING BOOK COPIES 32 23 ...

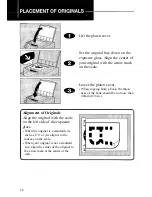
Page 23: ... book the thick ness of the book should be no more than 20mm 0 78 in Alignment of Originals Align the original with the scale on the left side of the exposure glass l When the original is a standard size such as 8 z or A4 align it to the indexes on the scale l When your original is not a standard size align the center of the original to the arrow mark at the center of the scale 24 ...

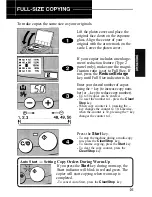
Page 24: ...ey to reduce copy number l Up to 50 copies can be entered l To reset the number to 1 press the Clear Stop key l When copy counter is 1 pressing the key changes the counter to 50 Likewise 0 o when the counter is 50 pressing the key 1 z 3 48 49 50 changes the counter to 1 eb Press the Start key l To stop the machine during a multi copy run press the Clear Stop key l To resume copying press the Start...

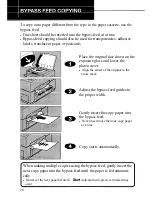
Page 25: ... glass and lower the platen cover l Align the center of the original to the arrow mark Q Adjust the bypass feed guides to the proper width Gently insert the copy paper into w the bypass feed l Never insert more than one copy paper at a time aD Copy starts automatically When making multiple copies using the bypass feed gently insert the next copy paper into the bypass feed until the paper is fed au...

Page 26: ...ies delivered to the copy tray one by one Set the originals and letterhead as shown Two sided copies Set the originals and copy paper for copying the reverse side as shown l Do not use paper that has been printed on using other copiers or printers l For instructions on making two sided copies see page 31 27 ...

Page 27: ......

Page 28: ......

Page 29: ......

Page 30: ... Press the Start key to make the first copy Place the original for the reverse side of the copy on the exposure glass and lower the platen cover Adjust the bypass feed guides to the proper width Insert the copy paper into the bypass feed blank side facing upward l If the paper is curled straighten it before insertion See page 48 Copy directions are as indicated 31 ...

Page 31: ......

Page 32: ...RECALIBRATING COPY DENSITY 34 USER TOOLS 35 40 List of User Tools 35 Making Adjustment with User Tools 36 37 User Tool Menu 37 40 33 ...

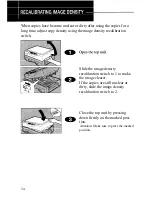
Page 33: ...density recalibration switch Slide the image density recalibration switch to 1 to make the image clearer If the copies are still unclear or dirty slide the image density recalibration switch to 2 Close the top unit by pressing GD down firmly on the marked posi tion Attention Make sure to press the marked position 34 ...

Page 34: ...h the User Tool number 1 2 3 4 5 6 7 8 Adjustable item See page Auto image density level 37 Darker side manual image density level 38 Lighter side manual image density level 38 Photo mode level 38 Auto off duration 38 Auto reset duration 39 Counter up down 39 Total copy number 39 40 35 ...

Page 35: ......

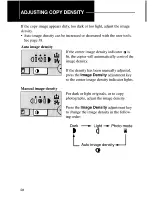
Page 36: ...n access another user tool number by pressing the and keys To exit user tools turn the main switch off and then back on again 1 Auto image density level User mode If the image density in the auto image density mode is too dark or too light adjust it using this function 1 Default Normal Number 0 Setting Normal Light Lighter Lightest Dark Darker Darkest Number 0 1 3 5 2 4 6 l If your desired image d...

Page 37: ...ghter Number 0 1 2 4 Photo mode level User mode 4 If the image density in the photo mode is too dark adjust it using this function Default Normal Number 3 Setting Lightest Lighter Light Normal Dark Darker Number 0 1 2 3 4 5 5 Auto off duration User mode 5 To conserve energy this copier automatically shifts to the Auto off mode 30 minutes after the last copying job has been completed This time can ...

Page 38: ... set to show the number of copies made count up or the number of copies remaining to be made count down Default Up Number 0 Setting U p Down Number 0 1 8 Total copy counter You can check the total number of copies made How to check the total copy counter User mode 8 Access user tool number 8 You will find the first two digits of the total copy quantity configured in six digits are displayed on the...

Page 39: ...t two digits of the total copy quantity are displayed on the copy counter l Example When 12345 copies are made 9s is displayed on the copy counter l For the last two digits the right image density indicator is lit l When you want to see the first two digits again press the Start key once When you want to see the second two digits press the Start key twice l To access another user tool number press...

Page 40: ...3 Copy Yield 43 MAINTAINING THE COPIER 44 47 Daily Maintenance 44 Corona Wires 45 46 Guide Plates 47 NOTES 48 49 General Operation 48 Replenishing Toner 49 Removing Misfed Paper 49 STORAGE 50 Paper 50 Toner Cassette 50 REPACKING 51 53 ...

Page 41: ...h the OPC blue material Copy image and copy quality could be affected l After a new toner cassette is installed the density of the first few copies may be slightly lighter Open the top unit Remove the used toner cassette carefully l Be careful not to stain your hands with the toner If toner is present clean up with a cold damp cloth Open the new toner cassette cardboard box Remove the toner casset...

Page 42: ......

Page 43: ...Platen Cover Copy Tray Bypass Feed 44 ...

Page 44: ......

Page 45: ...ol from the transfer m 0 corona wire and store it as shown l Keep this tool inside the copier Close the top unit by pressing down firmly on the marked posi B tion Attension Make sure to press the marked position 46 ...

Page 46: ...damp cloth and wipe them with a dry cloth l If you do not clean the guide plates the leading and trailing edges of the reverse side of copies become dirty Close the top unit by pressing down firmly on the marked posi tion Attension Make sure to press the marked position 47 ...

Page 47: ...ded copy l l Keep the used toner cassette horizontal If you tilt the unit toner may spill Do not store the toner cassette in high temperature and high humidity condi tions l If you make copies continuously under high temperatures the copier may stop to prevent overheating The Start indicator will turn red and ti is displayed on the copy counter In this case let the copier cool down and wait until ...

Page 48: ...until the tapes are completely removed Do not eat or swallow toner and keep it out of reach of children Replace the toner cassette with the new one turn the main switch on and let the copier warm up In several seconds it is ready to make copies in the initial status mode l Do not leave any tom scraps of paper inside the copier l After clearing misfeeds make sure that all units are returned to thei...

Page 49: ...erature and low humidity conditions store paper in a vinyl bag Do not store paper where it will be exposed to heat Store on a flat surface Use older stock first Do not lay heavy objects on paper Keep open reams of paper in the package and store as you would unopened paper l Store horizontally in a cool dark place l Never store toner cassette where it will be exposed to heat l Do not lay heavy obje...

Page 50: ......

Page 51: ...p unit by pressing down firmly on the marked posi tion Attention Make sure to press the marked position Remove the sticker and insert the two shipping thumbscrews into the holes then tighten them as shown Only short thumbscrew with type 1 model l Make sure to insert the shipping thumbscrews to prevent damage while moving the copier Remove copy tray as shown First gently lift it up 0 then pull it o...

Page 52: ...ardboard box l Lift the copier from the bottom as illustrated Insert the toner cassette copy tray operator s manual and power cord into the box aB A Firmly put the foam blocks on the copier am Seal the box firmly using tape 53 ...

Page 53: ...TROUBLESHOOTING 56 57 CLEARING MISFEEDS 58 60 When Pz appears on the copy counter 59 When stays on 60 55 ...

Page 54: ...s on A misfeed has occurred Clear misfed paper 59 The copier has entered Auto off mode 30 minutes The copier has shifted to the Press any key to re activate after a copy was Auto off function the copier 21 made or a key was pressed Copies have white streaks Corona wires are dirty Clean the corona wires 45 Copy image density is uneven t i is displayed on Wait for a while until the the copy counter ...

Page 55: ...r colored background Adjust the image density 28 The image density is too dark The platen cover or Clean platen cover exposure glass is dirty and exposure glass 44 The reverse side of an The image density is original image is copied too dark The original has a low Adjust the image contrast image density 28 Copies are too light The image density is too light Damp or rough grain Use dry paper withou...

Page 56: ... units are returned to their original positions and the top unit is closed When a paper misfeed occurs the copier keeps track of the selected copy modes and how many copies have been completed It is not necessary to reset the copy modes or the copy quantity after removing misfed paper Repeat the procedures described in this section until the Check Paper Path indicator goes out The indicators do no...

Page 57: ...t there are no scraps of paper inside the copier If paper remains in the paper cassette and there is no misfed paper follow the steps below 1 Make sure that the end plate and side plates are positioned prop erly to match the paper size you are using 2 If PE is still displayed change the paper type If the PE indication does not go out call for a service representa tive See the back cover of this ma...

Page 58: ...m w pletely l If it is difficult to remove the misfed paper gently take it out through the copy tray area Close the top unit by pressing m down firmly on the marked posi tion l Make sure that the Check Paper Path indicator is turned off 60 ...

Page 59: ...SPECIFICATIONS 62 63 61 ...

Page 60: ...e 2 only Zoom Type 2 only From 70 to 141 in 1 increments Copying Speed 8 copies minute Warm Up Time First Copy Time Copy Number Input A4 lengthwise or 8 l 2 x 11 in lengthwise Less than 15 seconds at 23 C or 73 F Less than 10 seconds A4 lengthwise or 8 l 2 x 11 in lengthwise key 1 to 50 Manual Image Density Selection Automatic Reset count up or count down 4 steps including halftone 1 minute standa...

Page 61: ... I 1 300W I Copy cycle condition 1 450W Warm up condition 790W Standbv condition 91W Auto off condition 1 5W Less than 55dB Standby condition less than 40dB Copy cycle condition less than 62dB Noise Emission Sound pressure level Measured according to IS0 7779 at operator position Noise Emission Sound power level Measured according to IS0 7779 Dimensions Weight Copier with toner cassette Less than ...

Page 62: ......

Page 63: ......

Page 64: ...is machine uses the following symbols for the main switch I means POWER ON 0 means POWER OFF 1I CC Declaration of Conformity The Product complies with the requirements of the EMC Directive 89 336 EEC and the Low Voltage Directive 73 23 EEC 67 ...

Page 65: ...e 38 40 65760 Eschborn Phone 49 0 6196 9060 Spain RICOH ESPANA S A Av Litral Mar 12 14 08005 Barcelona Phone 34 0 93 295 7600 Italy RICOH ITALIA SpA Viale Della Metallurgia 12 Zona Basson 37139 Verona Phone 39 0 45 8181500 Hong Kong RICOH HONG KONG LTD 23 F China Overseas Building 139 Hennessy Road Wan Chai Hong Kong Phone 852 2862 2888 Singapore RICOH ASIA PACIFIC PTE LTD 260 Orchard Road 15 01 0...

Reviews: