background image

59

TECHNICAL REFERENCE

7.

 TECHNICAL

REFERENCE

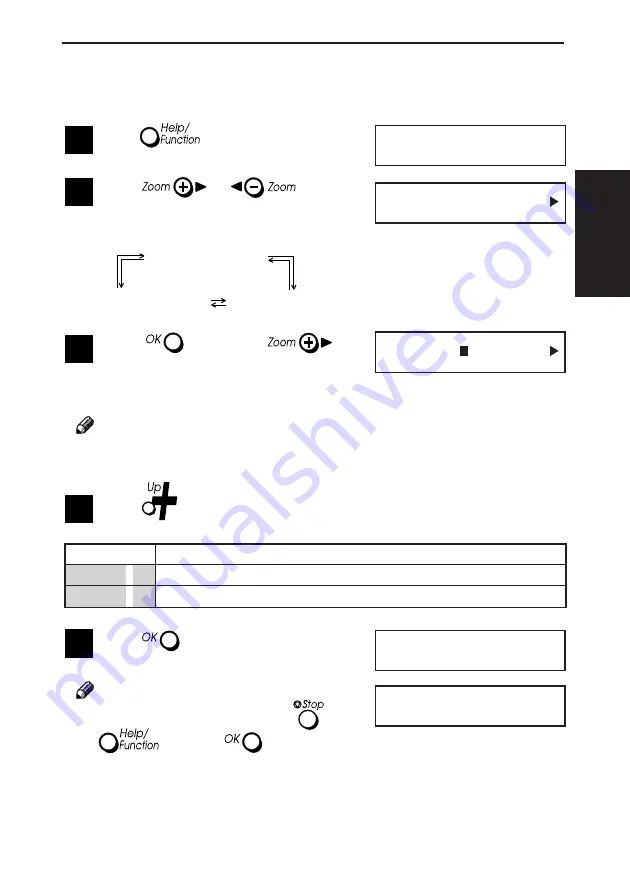
Selecting Toner Saving Mode

The toner saving mode status has two settings.

3 User param.      

02:0000 0 00       

Prt Help List     

O K

1

Press 

. “Prt Help List” appears.

2

Press 

 or 

  until “3

User Param.” appears. The messages
change in the following order.

1 Tray Pap. Size

3 User Param. 


2 Language

3

Press 

 and press 

 to

move the flashing block cursor until it
appears in one of the positions shown
in the illustration to the right.

 Note

The bits other than the one highlighted in the
illustration are unrelated to this setting.

4

Press 

 to change the bit setting to

1 or 0, as desired.

Display

Heater status

02:0000 0000

Off (Default)

02:0000 0100

On (Density will be lighter)

5

Press 

. “Please wait”, then “Reg-

istered” appears.

 Note

• To cancel this change, press 

 or

 instead of

. “Please wait”

and “Not Registered” appear on the display.

• Do not turn off the machine while “Please

wait”, “Registered” or “Not Registered”
is displayed.

Please wait

Registered

Summary of Contents for BizWorkz 406

Page 1: ...5888 Overseas Affiliates U S A RICOH CORPORATION 5 Dedrick Place West Caldwell New Jersey 07006 Phone 1 973 882 2000 The Netherlands RICOH EUROPE B V Groenelaan 3 1186 AA Amstelveen Phone 31 0 20 547...

Page 2: ...in the field by a qualified Customer Engineer The laser chassis is not repairable in the field Customer engineers are therefore directed to return all chassis and laser subsys tems to the factory or...

Page 3: ...this machine uses the following symbols for the main switch a means POWER ON b means POWER OFF The Product complies with the requirements of the EMC Directive 89 336 EEC and the Low Voltage Directive...

Page 4: ...ause serious injury or even death CAUTION Ignoring this caution could cause injury or damage to property Symbol examples The d d d d d symbol means a situation that requires you take care The m symbol...

Page 5: ...seri ous eye damage When the machine needs to be checked adjusted or re paired contact your service representative Do not take apart or attempt any modifications to this machine There is a risk of fir...

Page 6: ...from the socket grip the plug to avoid damaging the cord and causing fire or electric shock If you use the machine in a confined space make sure there is a continuous air turnover Do not reuse staple...

Page 7: ...rinting equipment by means of energy saving features such as Low Power mode Low Power Mode This machine automatically lowers its power consumption 15 minutes after the last printing job has been compl...

Page 8: ...NG ACQUAINTED Paper and Other Media 9 Loading Paper 10 To load plain paper into the upper paper tray 10 To load small size paper 12 Loading Other Media 14 To load envelopes 14 To load transparencies 1...

Page 9: ...29 Reduction and Enlargement 30 To set the reduction factor 30 To set the enlargement factor 31 Zoom In 1 Increments 32 To use zoom 32 Adjusting Copy Image 33 To select the resolution photo setting 33...

Page 10: ...TECHNICAL REFERENCE Printing the Help List 54 Selecting the Language 55 Selecting 300 dpi or 600 dpi 56 Economy Mode 58 Changing the Economy Mode 58 Selecting Toner Save Mode 59 8 SPECIFICATIONS 60 In...

Page 11: ...o this port Computer port Connect your computer here SIMM cover Open this cover when you want to install a SIMM and expand memory Platen cover Lift this cover to access the exposure glass when you wan...

Page 12: ...to fit the size of the paper you are feeding Original Guide Guides the original correctly into the machine Set the original so it is under this guide Top unit Upper paper tray Exposure glass Operatio...

Page 13: ...ce an image during copying Available reduction ratios are 50 71 82 87 and 93 Operation Panel 5 Enlarge Press this key to enlarge an image during copying Available enlargement ratios are 115 122 141 an...

Page 14: ...s to tune the preset reduction and enlargement factors to the exact value you want D Help Function Press this key and then input a function number to perform various settings and list printing functio...

Page 15: ......

Page 16: ...t could cause injury If you use the machine in a confined space make sure there is a continuous air turnover Location Conditions Optimum Recommended Temperature 10 to 35 C 50 to 95 F 15 to 25 C 59 to...

Page 17: ...l dren Important Be sure to hold the starter toner cassette by its handle Note Keep the vinyl bag for later repackaging when necessary 3 Holding the starter toner cassette by its handle gently shake i...

Page 18: ...close the top unit press down firmly but gently on both sides of it until the top unit closes and clicks securely into place Note Background gray cast is sometimes evident just after installing a new...

Page 19: ...of the holes for in sertion of the upper paper tray on both sides 2 To install the upper paper tray press down on both sides of the tray making sure that it is inserted as far as it will go Note Pape...

Page 20: ...NG UP 1 SETTING UP Other Settings for Type 2 To remove the protective sheet 1 Open the ADF cover 1 and then re move the protective sheet 2 2 Close the ADF cover and make sure it locks securely into pl...

Page 21: ...the document output tray should fit 2 Insert the pin at one side of the tray by gently bending the document tray until it fits in the insert hole 3 Make sure the small pieces of plastic film curl upwa...

Page 22: ...uter is turned off before making the connection 1 Plug one end of the your printer cable into the lower port on the side of the machine and secure it in place as shown in the illustration Note The mac...

Page 23: ...damage break or make any modifications to the power cord Do not place heavy objects on it pull it hard or bend it more than necessary These actions could cause an electric shock or fire Do not plug o...

Page 24: ...51 2 p 10 81 2 13 81 2 13 p 10 8 101 2 8 101 2 p 10 Legal 81 2 14 Legal 81 2 14 p 10 A5 210mm 148mm A5 p 12 C5 Envelope 162mm 229mm C5 Env p 12 14 C6 Envelope 114mm 162mm C6 Env p 12 14 DL Envelope 11...

Page 25: ...misfeeds To load plain paper into the upper paper tray 1 Fan the stack of paper to make sure that all pages are free and are not sticking together The upper paper tray holds up to 100 sheets of plain...

Page 26: ...pears 8 After pressing press or until the desired size ap pears The sizes change in the follow ing order A4 A5 81 4 13 Legal 81 2 14 Letter 81 2 11 8 101 2 81 2 13 81 2 51 2 9 When the correct paper s...

Page 27: ...in the upper paper tray 2 Open the small panel on the back of the machine by unlatching it as shown in the illustration Opening the small panel makes it easy to handle small size paper 3 Set paper int...

Page 28: ...er size 7 Press Tray guide OK appears 8 After pressing press or until the desired size ap pears The sizes change in the follow ing order A5 C5 Env DL Env C6 Env 9 When the correct paper size is on the...

Page 29: ...flaps because heat generated during the printing process can cause the adhe sive to melt and get on rollers Note Refer to the paper select operation on page 13 To load transparencies Load only one tr...

Page 30: ...h of key Note Make sure that the power of your computer is turned off before making the con nection To connect to a second printer 1 Turn off both the machine and your sec ond printer 2 Connect one en...

Page 31: ...wer socket before installing the paper feed unit 1 Remove all the packing tapes from the paper feed unit and pull the paper tray out of the unit 2 After removing all tapes and cardboard from inside of...

Page 32: ...he bottom of the machine properly CAUTION When lifting the machine make sure your hands are at the locations indicated by in the illustration This protects against pinching your fingers between the ma...

Page 33: ...80 g m2 or 20 lb can be inserted into the pa per tray as shown in the illustration Make sure that the top of the stack is not higher than the limit mark on the side fence Note Make sure the leading c...

Page 34: ...e guide slide it to the correct position for the desired paper size To specify the paper size After you install the paper feed unit option you can select between the upper paper tray and the paper fee...

Page 35: ...select the paper source 100 U 01 100 L 01 Note Refer to page 10 for details on using the upper paper tray Note The actual message that appears on the machine s display depends on the paper source you...

Page 36: ...to install 8MB 16MB or 32MB SIMM Note The following are the required specifications for a SIMM used with this machine 72 pin 60ns Extend Date Out EDO parity non parity Important Make sure you touch so...

Page 37: ...d insert it down into the slot Gently rock it back and forth until you hear it snap into place Important Make sure the SIMM board is oriented cor rectly when you insert it into the slot 6 Make sure th...

Page 38: ...under Connecting to a computer p 7 and Load ing Paper p 10 before trying to perform the following procedures To install the printer driver under Windows 95 1 If the New Hardware Found window is open...

Page 39: ...INSTALL replacing X with the name of the drive from which you are installing and then click OK Follow the instructions that appear on your computer screen Note that installation takes a few minutes A...

Page 40: ...600 300 600 Graphics Resolution High High High High High Halftone Screening Screening Screening Screening Dithering Job Settings True Type Mode Name Configuration Device Configuration Feeder Toner Sav...

Page 41: ...de to Off Note Refer to page 15 for details on connecting a second printer To print to the second printer 1 Press The Second Printer indicator lights Important Whenever you change printers be sure to...

Page 42: ...he scale For Type 2 Users When the original is smaller than the paper you are copying to place a second sheet of paper that is larger than the paper you are copying to on top of the original when you...

Page 43: ...3 Press to perform the copy opera tion Note During the copy operation the display shows the number of copies printed so far and that to be printed For example 02 10 appears while the second copy of a...

Page 44: ...k should be no more than 30mm 1 18 1 Lift the platen cover 2 Open to the page you want to copy and lay the page face down on the exposure glass Be sure to align one of the cor ners of the page with th...

Page 45: ...he original face down at the arrow mark on the scale 2 Close the platen cover 3 2 Press until the desired size ra tio appears The sizes change in the fol lowing order 100 93 87 82 50 71 A4 A5 3 Press...

Page 46: ...en cover 3 2 Press until the desired size ra tio appears The sizes change in the fol lowing order 100 115 122 200 141 A5 A4 3 Press to perform the copy op eration Note Press to clear the setting after...

Page 47: ...factor in increments of 1 To use zoom 1 Lift the platen cover 1 Place the original face down at the arrow mark on the scale 2 Close the platen cover 3 2 Press decrease or increase until the desired s...

Page 48: ...display to indicate the current setting 1 3 2 4 Press to perform the copy op eration Note Press to clear the setting after copying The following describes when you should use each setting Setting Use...

Page 49: ...ce down at the arrow mark on the scale 2 Close the platen cover 3 3 Press to perform the copy op eration Note Press to clear the setting after copying 2 Press the Density key to select the im age dens...

Page 50: ...re than 10 sheets of plain pa per onto the ADF 2 Straighten up all four sides of the stack by tapping them on a desk or table top 3 Place the stack of originals face down on the ADF and slide the docu...

Page 51: ...the originals must be clear to be read correctly Uniform page size All pages should be the same size Page condition Avoid using originals that are bent curled damaged or stapled and originals printed...

Page 52: ...g the copy operation The number of originals that can be scanned at one time depends on how much memory you have installed Refer to page 21 for de tails on increasing memory capacity To turn sorting o...

Page 53: ...38 COPYING 3 When you press to start the copy operation all of the originals on the ADF are scanned into memory before they are printed Note Press to clear the setting after copying...

Page 54: ...aper turn the ma chine off and then back on Af ter machine initialization is complete load the paper back into the machine Use a SIMM with the required specifications Page p 8 p 21 p 21 p 8 P 21 Cause...

Page 55: ...sides of the paper Printing on an envelope that is too thick Misfeeding of the envelope flap Toner is distributed un evenly in the toner cassette Heat damage to the toner cassette caused by turning o...

Page 56: ...ad is not in stalled Copyingtosmall sizepaper with the Type 2 machine Different size original and copy paper Non white original back ground Dirty platen cover or expo sure glass Dirty ADF transport pa...

Page 57: ...to turn off the machine before calling Remedy Close the top unit Load paper and set the copy quantityagainduringacopyjob Prepare a toner cassette for re placement Correctly load the toner cassette int...

Page 58: ...section because it could be very not Important Hold a misfed sheet with both hands and slowly pull it out Do not use a tool such as a screwdriver or tweezers as this may damage the unit Type 1 1 Pull...

Page 59: ...ear the misfeed using this procedure use the procedure on page 47 instead Sometimes toner may get on your hands 5 Install the toner cassette into the ma chine Note Be sure to hold the toner cassette b...

Page 60: ...Area 1 or 2 1 Pull the top release lever 1 and open the top unit 2 2 Pull out the toner cassette Note Be sure to hold the toner cassette by its handle Keep the toner cassette horizontal to avoid spill...

Page 61: ...ear the misfeed using this procedure use the procedure on page 47 instead Sometimes toner may get on your hands 5 Install the toner cassette into the ma chine Note Be sure to hold the toner cassette b...

Page 62: ...result in damage to the original 2 Pull out the misfed original 3 Close the ADF cover and make sure it locks securely into place Important Make sure to specify the desired copy quantity again Paper fe...

Page 63: ...he misfed paper 3 Slide the paper tray back into the paper feed unit until it locks into place Tip If you cannot find a remedy for unexpected printout results here check the printer driver s online he...

Page 64: ...MAIN TENANCE 6 USER MAINTENANCE Daily Maintenance Clean with a damp cloth and wipe dry Note Turn off the machine before cleaning Exposure glass Platen cover Type 2 Exposure glass ADF Platen cover Plat...

Page 65: ...ens the life of a toner cassette WARNING Do not incinerate used toner or toner containers Toner dust might ignite when exposed to an open flame Dispose of the used toner cassettes according to local r...

Page 66: ...ake sure that it is inserted as far as it can go Do not forget to install the cleaning pad whenever you install a new toner cassette 7 Prepare the new toner cassette Hold ing the toner cassette by its...

Page 67: ...e sure to hold the toner cassette by its handle 10 To close the top unit press down firmly but gently on both sides of it until the top unit closes and clicks securely into place Note Background gray...

Page 68: ...ns store paper in a vinyl bag Do not store paper where it will be exposed to heat Store on a flat surface Use older stock first Do not lay heavy objects on paper Keep open reams of paper in the packag...

Page 69: ...can print out the help list Prt Help List OK Press Start 1 While the machine is not performing any other operation press The message Prt Help List appears 2 Press Press Start appears 3 Press to print...

Page 70: ...until 2 Language appears The messages change in the following order 1 Tray Pap Size 3 User Param 2 Language 3 Press and press or until the desired language appears The languages change in the followi...

Page 71: ...2 Press or until 3 User Param appears The messages change in the following order 1 Tray Pap Size 3 User Param 2 Language 3 Press and press to move the flashing block cursor until it appears in the pos...

Page 72: ...e wait Registered 5 Press Please wait then Reg istered appears Note To cancel this change press or instead of Please wait and Not Registered appear on the display Do not turn off the machine while Ple...

Page 73: ...peration panel is off Note During the Economy Mode the heater turns back on in the following cases when any key on the operation panel is pressed when the platen cover is opened when paper is set in o...

Page 74: ...l it appears in one of the positions shown in the illustration to the right Note The bits other than the one highlighted in the illustration are unrelated to this setting 4 Press to change the bit set...

Page 75: ...Memory 4MB Expandableto8MB 16MBor32MB EDO SIMM 60 ns 72 pin Dimensions 297mm 352mm 576mm H W D 11 70 13 87 22 69 H W D Weight 15 5 kg 34 18 lb 8 SPECIFICATIONS General Specifications Type 1 Type 2 Po...

Page 76: ...Swiss 742 SWC Swiss 742 Italic SWC Swiss 742 Bold SWC Swiss 742 Bold Italic SWC Swiss 742 Condensed SWC Swiss 742 Condensed Italic SWC Swiss 742 Condensed Bold SWC Swiss 742 Condensed Bold Italic SWC...

Page 77: ...opy Reduction and Enlargement 50 71 82 87 93 115 122 141 200 Paper Media Types Plain paper Envelopes Transparencies Label paper Paper Weight 60 to 90 g m2 16 to 24 lb Original Types Exposure glass Typ...

Page 78: ...Installing 6 E Economy Mode 58 Economy Mode Clear Modes key xi Enlarge x Enlargement 30 envelopes 14 Exposure glass viii ix Extend tray viii ix F Front guide 16 19 Front paper support 16 H Help List 5...

Page 79: ...Scanner lock viii ix Unlocking 3 Second Printer Additional Printer port viii ix Second Printer Additional Printer x Connecting 15 Using 26 Side guide 16 19 SIMM cover viii ix SIMM 21 Small size paper...

Page 80: ...5888 Overseas Affiliates U S A RICOH CORPORATION 5 Dedrick Place West Caldwell New Jersey 07006 Phone 1 973 882 2000 The Netherlands RICOH EUROPE B V Groenelaan 3 1186 AA Amstelveen Phone 31 0 20 547...

Reviews: