2
Installation Manual:
JAX ARM
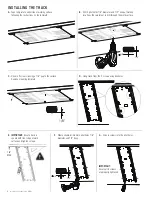
INSTALLING THE TRACK
A.
Tape template to underside of working surface
following the instructions on the template.
C.
Drive in 2 screws, leaving a 1/8" gap to the surface.
Remove mounting template
E. IMPORTANT:
Ensure track is
square with front edge of work
surface and tighten screws.
G.
Drive 6 screws into the pilot holes.
IMPORTANT:
Ensure all 8 screws
are properly tightened.
B.
Drill 2 pilot holes 1/8" diameter and 1/2" deep at marked
locations. Be careful not to drill through the work surface.
D.
Hang track from the 2 screws using keyholes.
F.
Where shown, drill 6 more pilot holes 1/8"
diameter and 1/2" deep.
1/2"
1/8"
1/8"
1/2"
1/8"
1/8"
MAX
!
Installation Manual:
JAX ARM
3
G.
After installing technology, route cables through
cable manager leaving proper slack for the arm
to move up and down.
B.
Lift front of tray head and hold, push arm down, then release.
C.
Push the arm to the back of the track.
D.
Install front plate.
E.
Pull out arm
F.
Mount the tray to the tray head.
1
2
2
1
A.
Remove strap, slide arm
base into track until glides are
completely inside the track.
MOUNTING THE ARM
Strap
Cable manager


