Step 6: Mounting the hood on the wall
•
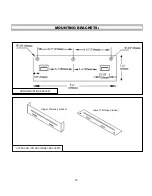
Hang the range hood on the range hood hooks on the lower mounting brackets.(See figure #4)
•
Screw the Range hood to the wall and chimney to the upper bracket (requires screws A) (See
figure # 5 & 6)
•
Install the ducting pipes onto the damper.
•
Connect the range hood to a designated standard outlet (120-Volt,
•
60Hz, AC only) or cut off the plug and connect three wires (black, white and green) to house
wires and cap with wire connectors. Connect according to colors (i.e. black to black, white to
white, and green to green) Store excess wiring in electrical box.
Step 7: Installing the decorative chimney flue & lower chimney bracket:
•
Use 2 screws (requires screws F )to fix two chimneys together with the lower chimney bracket,
make sure inside chimney is moving freely.(see figure #7)
•
Install the chimneys on the hood. Pull out the inside chimney and adjust height according to the
position of inside chimney bracket on the wall, then fix the inside chimney on the bracket with
two screws (requires screw F)(see figure #8).
•
To avoid scratching the chimney, extend the upper chimney
slowly
and
carefully
to the
chimney-mounting bracket and tighten screws
•
13.
CAUTION
Make certain the range hood is secure before releasing!
(S
(S
.
.
.
)
60 Hz, AC only).
4
5
6
7
#6
#7
Summary of Contents for 45 0 C FM
Page 4: ......
Page 11: ... ...
Page 18: ...18 ...
Page 20: ... bracket bracket UPPER AND LOWER CHIMNEY BRACKETS ...
Page 21: ...Decorative chimney bracket 19 to 38 1 4 ...
Page 26: ......
Page 31: ......
Page 32: ......
Page 33: ... ...
Page 40: ...41 ...
Page 42: ... SUPPORT CHEMINÉE HAUT SUPPORTS CHEMINÉE HAUT ET BAS SUPPORT CHEMINÉE BAS ...
Page 43: ...19 3 4 19 to 38 1 4 ...


