background image

Page 

11

 / 

18


4.4- Switch On/Off  
 

Switch On/Off 


Connect the tool to the main power source. 


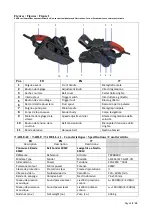
Pull the power trigger switch (4) to start the sander. 


For continuous sanding operation, pull the power trigger switch (4), then press the trigger 
lock (5). To stop the sander, press the trigger lock (5) again to release the trigger. 


V. OPERATION


5.1- Intended use 

This power tool is intended for indoor domestic use. This is suitable for sanding surfaces of 
wood, plastic and metal materials, as well as painted surface. Do not use on materials containing 
asbestos or other hazardous materials. The tool is not intended for artisanal, commercial, 
professional and / or industrial use. 


5.2- Operation 
 

Sanding operation 


Hold the machine with both hands in a stable position, then switch on the machine without 
loading for few seconds.  


Rotate the speed admentment dial (9) to adjust the abrasive belt speed. 


Stop the machine immediately in case of abnormal vibration or noise. 


Gently place the tool on the workpiece surface.  


Always keep the belt flush with the workpiece and move the tool back and forth. 


5.3- Tips  


Wait until the motor running in full speed before starting your work. 


Never force the tool. Excessive pressure could result in stalling, motor overheating, 
burning of workpiece or possible kickback. 


When finishing sanding, lift the sander off the work surface and release the trigger. 


To maintain efficiency, empty the dust collection bag when no more than half full. 


VI. MAINTENANCE AND STORAGE


WARNING!  
Before any intervention on product, ensure that power is set to the “OFF” position 
and disconnect from main power source. 


Reminder: In order to maintain the machine in good working condition, carry out regular 
maintenance of the machine after each use and before storage. Any breach or inadequate 
maintenance reduces the life of the machine and increases the risk of breakdowns and accidents. 


6.1- Cleaning 


Before cleaning, turn off the tool and disconnect from power source. 


Clean the machine with a dry clean cloth. Do not use water or detergent for cleaning. 


Never immerse the machine in water or any liquids. 


Always keep the ventilation holes clean. 


Summary of Contents for 513346

Page 1: ...W User and maintenance manual Original instructions IT LEVIGATRICE A NASTRO 900W Manuale di istruzione e di manutenzione Traduzioni delle istruzioni originali R f Art Nr PRPBD900 513346 Imp par by Rib...

Page 2: ...perating this appliance Incorrect operation may cause injury and or damages Please keep this manual for future reference Note Non contractual information and photos which may be changed without prior...

Page 3: ...rter ult rieurement Conserver ce manuel port e de main pour toute r f rence ult rieure Laisser le manuel avec le produit par ex lors de son utilisation lors de son pr t lors de la cession ou transfert...

Page 4: ...ncipale Pour r duire les risques de blessures loignez les enfants et les personnes pr sentes lorsque vous utilisez cet outil lectrique Ne laissez jamais le produit fonctionner sans surveillance N util...

Page 5: ...l IV MISE EN ROUTE 4 1 D ballage Retirez le produit de son emballage V rifiez si le produit et les accessoires le cas ch ant sont intacts 4 2 Contenu 1 ponceuse 1 bande abrasive 1 sac de r cup ration...

Page 6: ...nt pour le pon age des surfaces en bois en plastique et en m tal ainsi que pour les surfaces peintes Ne pas utiliser sur des mat riaux contenant de l amiante ou d autres mat riaux dangereux L outil n...

Page 7: ...onnement propre l abri du gel et de la chaleur ne pas d passer 50 C Tenir hors de port e des enfants par exemple le verrouiller 6 3 Mise au rebut En fin de vie ne pas jeter le produit avec les ordures...

Page 8: ...it later whenever any questions arise Always be sure to include this manual when selling lending or otherwise transferring the ownership of this product Symbols Explanation of symbols appearing on the...

Page 9: ...air loose clothing finger and any parts of body away from openings or moving parts To reduce the risk of electric shock do not use near water or any liquid Do not touch with wet hands Do not expose th...

Page 10: ...e abrasive belt Pull the belt tension knob 10 until it snaps into position see Fig 2 Align the belt direction with the direction of roller movement so that the arrow printed on the belt back indicate...

Page 11: ...l on the workpiece surface Always keep the belt flush with the workpiece and move the tool back and forth 5 3 Tips Wait until the motor running in full speed before starting your work Never force the...

Page 12: ...ool accessories and packaging according to local regulations regarding the protection of the environment Our warranty conditions are available from our STAV department and on our website Should you ha...

Page 13: ...portata di mano in modo da poter far riferimento in un secondo momento in caso di dubbi Assicurasi di includere questo manuale in caso di vendita prestito o in ogni altro caso di trasferimento di prop...

Page 14: ...ogni momento Mantenere le maniglie e le superfici di presa asciutte pulite e prive di olio e grasso Tenere capelli indumenti larghi dita e qualsiasi parte del corpo lontano da aperture o parti in movi...

Page 15: ...sacco raccolta polveri 1 manuale di istruzioni 4 3 Assemblaggio AVVERTIMENTO Prima di qualsiasi intervento sul prodotto assicurarsi che l interruttore sia in posizione OFF e scollegarlo dalla fonte di...

Page 16: ...egno plastica e metallo nonch superfici verniciate Non utilizzare su materiali contenenti amianto o altri materiali pericolosi Lo strumento non destinato all uso artigianale commerciale professionale...

Page 17: ...iente pulito dove non si geli o non sia troppo caldo superare i 50 C Tenere lontano dalla portata dei bambini ad es Bloccarlo 6 3 Smaltimento Non gettare insieme ai rifiuti domestici Non gettare nell...

Page 18: ...de tension de la courroie Belt tension knob Manopola di tensione della cinghia 11 Bande abrasive Abrasive belt Nastro abrasivo TABLEAU TABLE TABELLA 1 Caract ristiques Specifications Caratteristiche F...

Reviews: