background image


FREQUENTLY ASKED QUESTIONS 

1. 

Where is my serial number located? 

Your serial number is located on the back of the safe and also on the inside of the door, 
visible only when the doorback is removed.  This manual also has the serial number on the 
cover.  It usually starts with the model number, followed by a series of numbers. 


2. 

How do I clean my safe? 

A clean cloth dampened with water works well. Use a dusting cloth with no lint residue.  


3. 

My Rhino safe has external hinges. Are they more vulnerable to an attack than internal 
hinges?  

No. Your safe has a locking bar on the hinge side of the door, which locks behind 

the door frame, to prevent the door from opening if the hinges are sawed off. Also, in a fire, 
internal hinged safes are vulnerable to heat transfer as there is a large unprotected area 
where the hinges are welded to the inside of the body. External hinges help provide you the 
best fire and theft protection possible.


4. 

Should I bolt my safe down? 

Definitely! If you had the ability to get your safe into your house, a burglar will be able to 
get it out. Bolting your safe down ensures the best possible protection for your valuables. 
Also, safes are very heavy and when unsecured can be a safety hazard. 


5. 

How do I bolt my safe down? 

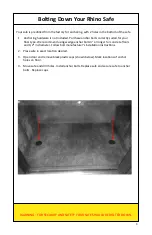
Your safe has pre-drilled anchoring holes in the floor (Refer to page 9).


6. 

Can my electronic lock be hot-wired by a burglar to gain entry? 

U.L. Listed electronic locks are designed to block any attempts at hot-wiring, shorting, and 
manipulation.  The only way to open your lock is with the existing combination. 


1. 

I  can’t get the combination to work on my manual lock.  
 

Review the opening procedure on page 5.


2. 

I have an electric lock and my safe won’t lock. 
 

The most common issue is low current from the battery. If your safe won’t lock, try   

  installing a new 9 volt battery with “use date” at least 4 years in the future.  


3. 

Should I clean my doorbolts? 

Yes, if there is friction when turning the handle, you should wipe the doorbolts with a clean 
rag and then use furniture polish or apply a  thin silicone based lubricant on the doorbolts. 


TROUBLESHOOTING GUIDE 

10 

Summary of Contents for PSIW2418

Page 1: ...1 SAFE OWNER S MANUAL MODEL NO SERIAL NO ___________________________ PSIW2418 ...

Page 2: ...elieve our ultimate responsibility is to provide a quality product that creates peace of mind and unmatched value for our customers We are thankful you chose Rhino Metals Inc to help protect your valuables and are confident you will be satisfied with your safe for years to come The Rhino Metals Inc Team 2 ...

Page 3: ...ination ___________________________________________ Purchased From ___________________________________________ Date ___________________________________________ Rhino Metals Inc Makers of Rhino and Bighorn Safes 607 Garber Street Caldwell ID 83605 208 454 5545 208 459 0819 FAX www rhinosafe com Toll Free 800 701 9128 For Technical Support issues it is helpful to be near your safe when you call 3 ...

Page 4: ...the Company 2 Safe Information 3 Contents 4 Getting Started Manual Lock 5 Getting Started Electric Lock 6 Electric Lock Operation 7 8 Bolting Down your Rhino Safe 9 Frequently Asked Questions 10 Troubleshooting Guide 10 11 Warranty 12 4 ...

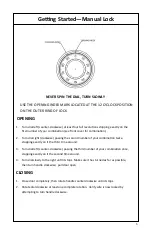
Page 5: ...ation twice stopping exactly on it the third time around 3 Turn dial left counter clockwise passing the third number of your combination once stopping exactly on it the second time around 4 Turn dial slowly to the right until it stops Make sure it has turned as far as possible then turn handle clockwise pull door open CLOSING 1 Close door completely then rotate handle counterclockwise until it sto...

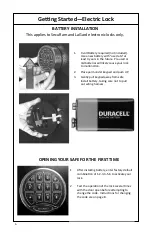
Page 6: ...pad away from safe Install battery taking care not to pull out wiring harness This applies to SecuRam and LaGard electronic locks only Getting Started Electric Lock OPENING YOUR SAFE FOR THE FIRST TIME 1 After installing battery enter factory default combination of 1 2 3 4 5 6 to activate your lock 2 Test the operation of the lock several times with the door open before attempting to change the co...

Page 7: ...k has engaged by turning the handle clockwise WRONG TRY PENALTY Entry of 4 consecutive invalid codes starts a 5 minute delay period LED will flash at 5 or 10 second intervals This lock will indicate an invalid code entry with a triple signal At the end of the lock out period two more incorrect codes will restart an additional 5 minute delay period LOW BATTERY INDICATIONS Repeated beeping during op...

Page 8: ...e cases static electric discharge could damage your electric lock or keypad To reduce this risk always touch the handles or body of the safe before you touch the keypad to enter your combination CAUTION DO NOT ATTEMPT TO CHANGE YOUR COMBINATION WITH YOUR SAFE DOOR SHUT OPEN THE DOOR AND EXTEND THE DOORBOLTS BEFORE PROCEEDING CHANGING YOUR CODE Press the 0 zero button six times Enter your existing ...

Page 9: ...sing wedge anchor bolts 3 or longer for concrete floors and 1 2 in diameter Follow bolt manufacturer s installation instructions 2 Place safe in exact location desired 3 Open door and remove black plastic caps shown below Mark locations of anchor holes on floor 4 Move safe and drill holes Install anchor bolts Replace safe and secure safe to anchor bolts Replace caps WARNING FOR SECURITY AND SAFETY...

Page 10: ...y safe down Definitely If you had the ability to get your safe into your house a burglar will be able to get it out Bolting your safe down ensures the best possible protection for your valuables Also safes are very heavy and when unsecured can be a safety hazard 5 How do I bolt my safe down Your safe has pre drilled anchoring holes in the floor Refer to page 9 6 Can my electronic lock be hot wired...

Page 11: ...he combination has been pressed an incorrect code has been entered In some cases this may also indicate a low battery 7 I ve changed my battery and the safe is still not locking unlocking If you are attempting to unlock the safe rotate the handle counter clockwise while you enter your combination Once you hear the two beeps wait for 2 seconds and then rotate clockwise to open If you are attempting...

Page 12: ...t be accepted The Company will not be responsible for their disposition and or cost of return to the owner 7 The Company will not assume any responsibility for any loss or damage incurred in shipping All returned products should include a copy of the original invoice in order that this warranty may be honored 8 This warranty is not an insurance policy The Company is not responsible for damage or t...

Reviews: