background image

41

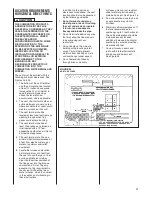
GAS SUPPLY AND PIPING

GAS SUPPLY 

THIS FURNACE IS EQUIPPED AT
THE FACTORY FOR USE ON
NATURAL GAS ONLY.
CONVERSION TO LP GAS
REQUIRES A SPECIAL KIT
SUPPLIED BY THE DISTRIBUTOR
OR MANUFACTURER. MAILING
ADDRESS IS LISTED ON THE
WARRANTY. FAILURE TO USE
THE PROPER CONVERSION KIT
CAN CAUSE FIRE, CARBON
MONOXIDE POISONING,
EXPLOSION, PROPERTY
DAMAGE, PERSONAL INJURY OR
DEATH. See the conversion kit
index supplied with the furnace.
This index identifies the proper LP
Gas Conversion Kit required for
each particular furnace. 

IMPORTANT: 

Any additions,

changes or conversions required for
the furnace to satisfactorily meet the
application should be made by a
qualified installer, service agency or
the gas supplier, using factory-
specified or approved parts. 

IMPORTANT:

Connect this furnace

only to gas supplied by a commercial
utility.

IMPORTANT:

A U.L. recognized

fuel gas and CO detector(s) are
recommended in all applications,
and their installation should be in
accordance with the manufacturer’s
recommendations and/or local laws,
rules, regulations or customs.

GAS PIPING

Install the gas piping according to all
local codes and regulations of the
utility company. 

If possible, run a separate gas supply
line directly from the meter to the
furnace. Consult the local gas
company for the location of the
manual main shut-off valve. 

The gas

line and manual gas valve must be
adequate in size to prevent undue
pressure drop and never smaller
than the pipe size to the com-
bination gas valve on the furnace.

Refer to Table 3 for the recom-
mended gas pipe size. See Figure 37
for typical gas pipe connections. 

!

WARNING

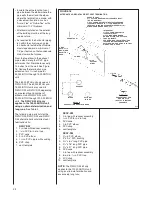
FIGURE 37

GAS PIPING INSTALLATION

GROMMET

TOP VIEW OF GAS LINE AND VALVE

IN OPT. POSITION

NOTE: WHEN GAS LINE
IS IN OPT. POSITION,
SWAP LOCATION OF
GROMMET AND PLUG.

OPT. GAS LINE
POSITION

PLUG
(IN NORMAL
POSITION)

MANIFOLD
PRESSURE
TAP

IGNITOR

MANIFOLD

GAS VALVE

UNION

DRIP LEG

GROMMET
(IN NORMAL
POSITION)

4 TO 5 FEET
ABOVE
FLOOR REQ’D
BY SOME
UTILITIES.

MAIN GAS

VALVE

BURNERS

GROMMET

TOP VIEW OF GAS LINE AND VALVE

IN OPT. POSITION

MAIN GAS

VALVE

4 TO 5 FEET ABOVE
FLOOR REQ’D BY
SOME UTILITIES.

GROMMET
(IN NORMAL
POSITION)

DRIP LEG

UNION

GAS VALVE

BURNERS

MANIFOLD

IGNITOR

MANIFOLD
PRESSURE
TAP

PLUG
(IN NORMAL
POSITION)

NOTE: WHEN GAS
LINE IS IN OPT.
POSITION, SWAP
LOCATION OF
GROMMET AND
PLUG.

DOWNFLOW

I328

UPFLOW

MANUAL GAS VALVE

UNION

DRIP LEG

BURNERS

MANIFOLD

GAS VALVE

I524

IMPORTANT:

DO  NOT  RUN  A  FLEXIBLE  GAS  CONNECTOR  INSIDE  THE

UNIT. Extend the 1/2" black pipe from the gas valve to the outside of the cabinet.
Connect any flexible gas connector from there to the gas piping.

HORIZONTAL

Summary of Contents for GF901D Series

Page 1: ...ions and their installation should be in accordance with the manufacturer s recommendations and or local laws rules regulations or customs Upflow Models Downflow Horizontal Models Model Number Input Btu Tons Model Number Input Btu Tons GF901U045AS36 45 000 3 GF901D045AS36 45 000 3 GF901U060AS36 60 000 3 GF901D060AS36 60 000 3 GF901U075AS36 75 000 3 GF901D075AS36 75 000 3 GF901U105AS60 105 000 5 GF...

Page 2: ...n diameter exhaust pipe ft of pipe intake air no of elbows intake air ft of pipe exhaust pipe no of elbows exhaust pipe Exhaust vent temp TERMINATIONS DIRECT VENT VERTICAL Intake 12 min above roof snow level Correct relationship exhaust to intake HORIZONTAL VERTICAL CONCENTRIC RXGY E03 Intake 12 min above roof snow level Intake Y rotated above center Exhaust sloped toward furnace HORIZONTAL STANDA...

Page 3: ...tate of California to cause cancer or birth defects such as fiberglass insulation lead in brass and combustion products from natural gas All new equipment shipped for sale in California will have labels stating that the product contains and or produces Proposition 65 chemicals Although we have not changed our processes having the same label on all our products facilitates manufacturing and shippin...

Page 4: ...S IN PLACE SET FURNACE INPUT RATE AND TEMPERATURE RISE PER RATING PLATE MARKING MEANS FOR PROVIDING OUTDOOR AIR REQUIRED FOR COMBUSTION RETURN AIR TEMPERATURE MAINTAINED BETWEEN 55 F 13 C AND 80 F 27 C AND CLEAN FURNACE DUCT WORK AND COMPONENTS UPON SUBSTANTIAL COMPLETION OF THE CONSTRUCTION PROCESS AND VERIFY FURNACE OPERATING CONDITIONS INCLUDING IGNITION INPUT RATE TEMPERATURE RISE AND VENTING ...

Page 5: ...CAL LAWS RULES REGULATIONS OR CUSTOMS IMPROPER INSTALLATION ADJUSTMENT ALTERATION SERVICE OR MAINTENANCE CAN CAUSE INJURY PROPERTY DAMAGE OR DEATH REFER TO THIS MANUAL INSTALLATION AND SERVICE MUST BE PERFORMED BY A QUALIFIED INSTALLER SERVICE AGENCY OR THE GAS SUPPLIER IN THE COMMONWEALTH OF MASSACHUSETTS INSTALLATION MUST BE PERFORMED BY A LICENSED PLUMBER OR GAS FILTER FOR APPROPRIATE FUEL DUCT...

Page 6: ...ause FIRE PROPERTY DAMAGE PERSONAL INJURY OR DEATH WARNING DO NOT LIFT THE UNIT BY THE HEAT EXCHANGER TUBES DOING SO CAN CRACK THE HEAT EXCHANGER ASSEMBLY AND CAUSE CO2 TO BE RELEASED INTO THE ENVIRONMENT WHICH CAN RESULT IN PERSONAL INJURY OR DEATH UPFLOW FURNACE A SOLID METAL BASE PLATE MUST BE INSTALLED IN THE FURNACE BOTTOM WHEN USING SIDE RETURN FAILURE TO INSTALL A BASE PLATE COULD CAUSE THE...

Page 7: ...IDE ADEQUATE VENTILATION AND DO NOT ASSEMBLE NEAR HEAT SOURCE OR AN OPEN FLAME DO NOT SMOKE AVOID SKIN OR EYE CONTACT OBSERVE ALL CAUTIONS AND WARNINGS PRINTED ON MATERIAL CONTAINERS FAILURE TO FOLLOW THESE GUIDELINES MAY RESULT IN FIRE EXPLOSION OR ASPHYXIATION CAUSING PERSONAL INJURY OR DEATH WARNING WARNING ALL FURNACE INSTALLATIONS MUST COMPLY WITH THE NATIONAL FUEL GAS CODE AND LOCAL CODES TO...

Page 8: ...DRAPES CARPETS AND OTHER HOUSEHOLD ARTICLES CAUTION WARNING HOLES IN THE VENT PIPE OR HEAT EXCHANGER CAN CAUSE TOXIC FUMES TO ENTER THE HOME RESULTING IN CARBON MONOXIDE POISONING OR DEATH THE VENT PIPE OR HEAT EXCHANGER MUST BE REPLACED IF THEY LEAK WARNING WARNING THE MEASURED TEMPERATURE RISE SHOULD BE AS CLOSE TO THE MIDDLE OF THE STATED RANGE AS POSSIBLE FOR EXAMPLE IF THE RISE RANGE IS 40 TO...

Page 9: ...ght of eight 8 feet above grade directly in line with the exhaust vent terminal for the horizontally vented gas fueled heating appliance or equipment The sign shall read in print size no less than one half 1 2 inch in size GAS VENT DIRECTLY BELOW KEEP CLEAR OF ALL OBSTRUCTIONS 4 INSPECTION The state or local gas inspector of the side wall horizontally vented gas fueled equipment shall not approve ...

Page 10: ... B149 is available from CSA INTERNATIONAL 178 Rexdale Blvd Toronto Ontario Canada M9W 1R3 GENERAL INFORMATION FIGURE 1 UPFLOW FURNACE FIGURE 2 DOWNFLOW HORIZONTAL FURNACE ITEM ITEM NO PART NAME NO PART NAME 1 INDUCED DRAFT BLOWER 14 LOW VOLTAGE TERMINAL THERMOSTAT 2 CAPACITOR 15 TRANSFORMER 3 INLET AIR CHASE 16 PRESSURE SWITCH 4 DOOR SWITCH 17 OUTLET AIR PIPE 5 JUNCTION BOX 18 GAS VALVE 6 INLET PI...

Page 11: ... FUMES AND ODORS INTO THE HOME CAUSING PROPERTY DAMAGE FUMES AND ODORS FROM TOXIC VOLATILE OR FLAMMABLE CHEMICALS AS WELL AS AUTOMOBILE EXHAUST AND CARBON MONOXIDE CO CAN BE DRAWN INTO THE LIVING SPACE THROUGH LEAKING DUCTS AND UNBALANCED DUCT SYSTEMS CAUSING PERSONAL INJURY OR DEATH SEE FIGURE 3 IF AIR MOVING EQUIPMENT OR DUCTWORK IS LOCATED IN GARAGES OR OFF GARAGE STORAGE AREAS ALL JOINTS SEAMS...

Page 12: ... with this furnace a be sure the air passes over the heat exchanger before passing over the cooling coil The cooled air passing over the warm ambient air inside the heat exchanger tubes can cause condensation inside the tubes resulting in corrosion and eventual failure b install a parallel duct system to divert all the air from the furnace allowing it to pass over the cooling coil only Use dampers...

Page 13: ...per foot at 120V IMPORTANT Support this unit when installed Since this furnace is suitable for attic or crawl space installation it may be installed on combustible wood flooring or by using support brackets See Figure 5 5 IMPORTANT If installing in a utility room be sure the door is wide enough to a allow the largest part of the furnace to pass or b allow any other appliance such as a water heater...

Page 14: ...0 0 1 2 0 111 2 5 60 17 1 2 16 11 32 15 5 8 2 15 13 25 32 0 0 0 1 2 0 117 3 75 17 1 2 16 11 32 15 5 8 2 15 13 25 32 0 0 0 1 2 0 123 4 75 21 19 27 32 19 1 8 2 18 1 2 17 9 32 0 0 0 1 2 0 123 4 5 90 21 19 27 32 19 1 8 2 18 1 2 17 9 32 0 0 0 1 2 0 148 4 5 105 21 19 27 32 19 1 8 2 18 1 2 17 9 32 0 0 0 1 2 0 152 5 120 24 1 2 23 11 32 22 5 8 2 22 20 25 32 0 0 0 1 2 0 160 A service clearance of at least 2...

Page 15: ...3 16 2 20 1 8 17 3 8 0 0 0 1 2 0 123 90 21 19 11 32 19 3 16 2 20 1 8 17 3 8 0 0 0 1 2 0 148 105 21 19 11 32 19 3 16 2 20 1 8 17 3 8 0 0 0 1 2 0 152 120 24 1 2 23 11 32 22 5 8 2 23 5 8 20 7 8 0 0 0 1 2 0 160 A service clearance of at least 24 inches is recommended in front of all furnaces NOTE RXGY H01 is required for left hand alternate condensate drain NOTE IN DOWNFLOW CONFIGURATION OPTIONAL AIR ...

Page 16: ...2 0 123 75 21 19 27 32 19 3 16 2 20 1 8 17 3 8 0 0 0 1 2 0 123 90 21 19 27 32 19 3 16 2 20 1 8 17 3 8 0 0 0 1 2 0 148 105 21 19 27 32 19 3 16 2 20 1 8 17 3 8 0 0 0 1 2 0 152 120 24 1 2 23 11 32 22 5 8 2 23 5 8 20 5 8 0 0 0 1 2 0 160 A service clearance of at least 24 inches is recommended in front of all furnaces IMPORTANT This furnace is not approved or recommended for installation on its back wi...

Page 17: ...sition the unit to minimize long runs of duct or runs of duct with many turns and elbows 2 Open the return air compartment UPFLOW FURNACE A SOLID METAL BASE PLATE MUST BE INSTALLED IN THE FURNACE BOTTOM WHEN USING SIDE RETURN FAILURE TO INSTALL A BASE PLATE COULD CAUSE THE PRODUCTS OF COMBUSTION TO CIRCULATE INTO THE LIVING SPACE AND CREATE POTENTIAL LY HAZARDOUS CONDITIONS INCLUDING CARBON MONOXI...

Page 18: ...ES Furnaces are equipped with safety switches in the control compartment to protect against overtemperature VENTING AND COMBUSTION AIR PIPING WARNING WARNING 4 Connect the furnace to the supply air plenum 5 Connect the return air ducting to the return air opening at the top of the unit Make the connection air tight to prevent entraining combustion gases from an adjacent fuel burning appliance 6 Be...

Page 19: ...nces The following steps should be followed with each appliance remaining connected to the original common vent system Place the appliance to be tested in operation while the other appliances remaining connected to the common vent system are not in operation Test the operation of each appliance individually by the following method 1 Permanently seal any unused openings in the common venting system...

Page 20: ... the flue products and are highly corrosive after they condense ALL FURNACE INSTALLATIONS MUST COMPLY WITH THE NATIONAL FUEL GAS CODE AND LOCAL CODES TO PROVIDE ADEQUATE COMBUSTION AND VENTILATION AIR FOR THE FURNACE FAILURE TO DO SO CAN RESULT IN EXPLOSION FIRE PROPERTY DAMAGE CARBON MONOXIDE POISONING PERSONAL INJURY OR DEATH Combustion air requirements are determined by whether the furnace is i...

Page 21: ... Area Round Pipe Input Each Opening Size 45 000 11 25 square inches 4 60 000 15 00 square inches 5 75 000 18 75 square inches 5 90 000 22 50 square inches 6 105 000 26 25 square inches 6 120 000 30 00 square inches 6 b Where communicating with outdoors through horizontal ducts each opening shall have a minimum free area of 1 square inch for each 2 000 BTUH of total input rating of all equipment in...

Page 22: ...r spaces crawl or attic that freely communicate with the outdoors and shall have a minimum free area of a 1 square inch for each 3 000 BTUH of the total input rating of all equipment located in the enclosure and BTUH Free Area Round Pipe Input Each Opening Size 45 000 15 00 square inches 4 60 000 16 67 square inches 5 75 000 25 00 square inches 6 90 000 30 00 square inches 6 105 000 35 00 square i...

Page 23: ...mum clearances to combustibles are maintained between the PVC pipe and other pipes 5 All vent runs through unconditioned spaces where below freezing temperatures are expected should be insulated with 1 in thick medium density foil faced fiberglass An equivalent arm a flex or FIGURE 15 TEE TERMINAL FOR STANDARD HORIZONTAL SINGLE PIPE INSTALLATION FIGURE 16 ALTERNATE HORIZONTAL TERMINATION FOR NON D...

Page 24: ...R IMPROPER LOCATION OR INSTALLATION CAN CAUSE STRUCTURAL OR EXTERIOR FINISH DAMAGE TO THE BUILDING Non direct venting location requirements are slightly different in some cases than direct venting Install a non direct vent with the following minimum clearances See Figure 17 1 Locate the bottom of the vent terminal at least 12 inches above grade Increase the 12 in minimum to keep the terminal openi...

Page 25: ...25 FIGURE 17 OTHER THAN DIRECT VENT TERMINAL CLEARANCES Natural Gas and Propane Installation Code National Fuel Gas Code Canadian Installations US Installations Canadian Installations US Installations ...

Page 26: ...nt pipe length is 5 feet Size the exhaust and combustion air intake pipes as specified in Table 2 This table lists the maximum allow able length in feet of the exhaust and combustion air intake pipes that may be used for all furnace inputs as related to the number of elbows required and the termination see shaded area 7 The maximum exposed vent length above the roof line is 30ⴖ WARNING Standard Co...

Page 27: ...rd horizontal intake air termination for all models is a 2 in PVC coupling with a wind deflector vane provided attached Cut a 21 4 in length of 2 in PVC pipe Connect this pipe and another 2 in PVC coupling to the coupling at the wall The outer coupling must terminate 4 inches from the wall See Figure 23 Detail B for vane location Attach vane in vertical position with PVC solvent IMPORTANT To ensur...

Page 28: ...lternate horizontal direct vent termination kits RXGY D02 1 2 in tee with reducer assembly 2 1 2 in PVC 6 in dia trap 3 PVC vane 4 2 in PVC elbow 5 11 2 in PVC nipple with coupling 6 PVC strap 7 vent template RXGY D03 1 3 in tee with reducer assembly 2 1 2 in PVC 6 in dia trap 3 PVC vane 4 2 in PVC elbow 5 PVC strap 6 vent template RXGY D04 1 21 2 in PVC elbow 2 3 x 21 2 PVC bushing 3 21 2 x 61 2 ...

Page 29: ...ENT KIT NO RXGY E03 This kit is for vertical horizontal intake air vent runs and may be installed through roofs and sidewalls One 5 diameter hole is required for the installation See Figure 19 for the general layout Complete installation instructions are included with the kit MAINTAIN 12 IN MINIMUM CLEARANCE ABOVE HIGHEST ANTICIPATED SNOW LEVEL MAXIMUM OF 24 IN ABOVE ROOF NOTE The following IPEX b...

Page 30: ...ations in wall To prevent possibility of condensate freeze up or recirculation do not install vent kits one above the other NOTE The vent illustration in Figure 21 can be used for Non direct vent terminations also FIGURE 21 VENT KIT INSTALLATION OPTIONS FIGURE 20 VENT KIT INSTALLATION OPTIONS B EXHAUST AIR INTAKE A For 90000 thru 120000 BTUH models reduce to a length between 12 inches and 30 inche...

Page 31: ... THE LAST 12 INCHES WITH 11 2 PVC PIPE ON 45 000 THROUGH 75 000 BTUH MODELS SEE DETAIL A 6 30 MAXIMUM EXPOSED VENT LENGTH PITCHED ROOF INSTALLATIONS NOTES 1 SUPPORT HORIZONTAL PIPE EVERY FOUR FEET 2 WHEN 3 IN PIPE IS USED REDUCE TO 2 IN BEFORE PENETRATING OUTSIDE WALL 3 18 IN MAXIMUM 2 IN DIAMETER PIPE MAY BE USED INSIDE THE WALL 4 DETAIL A EXHAUST TERMINATION TERMINATE THE LAST 12 INCHES WITH 2 P...

Page 32: ...32 FIGURE 24 DIRECT VENT TERMINAL CLEARANCES Natural Gas and Propane Installation Code National Fuel Gas Code Canadian Installations US Installations Canadian Installations US Installations ...

Page 33: ...bustion air inlet minimum of 3 feet from the vent of any other gas or fuel burning appliance or clothes dryer to prevent recirculation of the flue gases into the furnace combustion air inlet The only exception to this requirement is the case of multiventing two or more furnaces which is covered in the section on multiventing in these instructions In addition to the minimum clearances listed above ...

Page 34: ... IS PERMITTED See Figures 26 and 27 for positioning of the terminations When more than two furnaces are to be vented there must be at least 4 feet between the first two furnaces and the third etc FIGURE 27 TWO FURNACE VENTING THROUGH WALL EXHAUST VENT MODELS 06 07 TO BE REDUCED TO 1 1 2 PVC LAST 12 3 MINIMUM 24 MAXIMUM 3 MINIMUM 24 MAXIMUM 8 MINIMUM 24 MAXIMUM 8 MINIMUM 24 MAXIMUM TWO PIPE VENTING...

Page 35: ...ipe fitting extending through the right side of the furnace top cover This opening has a pro tective cap which should be removed just prior to installing the exhaust pipe When 2 in pipe is used con nect it directly to this fitting When 3 in pipe is used connect with a 2 to 3 in coupling directly to the 2 in pipe The combustion inlet air connection is a 2 in extruded hole on the left side of the to...

Page 36: ...r drain or condensate pump IMPORTANT If installing the unit over a finished ceiling or living area be certain to install an auxiliary condensate drain pan under the entire unit extending out under the condensate tee IMPORTANT There are two options when choosing a height for the condensate riser CONDENSATE OVERFLOW With a 51 2 inch riser installed above the tee a blocked drain will result in overfl...

Page 37: ...UNTING PLATE TO FLOOR DRAIN DOWNFLOW UNITS To convert downflow models to left hand drain a kit RXGY H01 must be ordered from the distributor The kit includes a 24 piece of 1 2 black PVC pipe a 2 9 16 length of black hose a 2 rubber grommet a 1 5 8 plug and instructions Note the location of the alternate drain hole as shown in Figure 34 First remove the long molded hose from the trap Remove the dou...

Page 38: ...the elbow in the trap Cut the pipe so that it extends through the alternate drain hole in the left side of the cabinet one inch see Figure 34 Connect the1 2 PVC tee supplied with the furnace to the pipe with a 1 3 4 riser IMPORTANT Do not connect into a common drain line with an air conditioner evaporator coil drain located above the furnace A blocked or restricted drain line can result in overflo...

Page 39: ...ake place with the furnace in the horizontal position Refer to Figure 36 for Steps 6 11 5 Locate the parts bag in the burner compartment Install two plastic plugs in the side of the jacket from bottom side up 6 Attach the gasket onto the trap assembly so that the gasket holes on the gasket line up with the holes on the trap assembly 7 Fill the trap assembly with a cup of water 8 Insert the trap as...

Page 40: ... area where freezing temperatures may occur the furnace drain can freeze while shut off for long periods of time Provisions must be made to prevent freezing of condensate see Figure 2 Use a solvent cement that is compatible with PVC material NOTE See location requirements and combustion section for additional recommendations FILLING THE TRAP FILL THE TRAP ASSEMBLY WITH WATER BEFORE OPERATING THE F...

Page 41: ... line directly from the meter to the furnace Consult the local gas company for the location of the manual main shut off valve The gas line and manual gas valve must be adequate in size to prevent undue pressure drop and never smaller than the pipe size to the com bination gas valve on the furnace Refer to Table 3 for the recom mended gas pipe size See Figure 37 for typical gas pipe connections WAR...

Page 42: ...ation IMPORTANT ENSURE that the furnace gas control valve not be subjected to high gas line supply pressures DISCONNECT the furnace and its individual shut off valve from the gas supply piping during any pressure testing that exceeds 1 2 PSIG 3 48 kPa GAS PRESSURE Natural gas supply pressure should be 5 to 10 5 w c LP gas supply pressure should be 11 to 13 w c This pressure must be maintained with...

Page 43: ... use 10 of water column at the orifice This difference requires a deviation from the NFGC orifice size recommendations The Sea Level input should still be reduced by 4 per thousand ft and the orifice size must be selected based on the reduced input selection chart below To change orifice spuds for either conversion to LP or for elevation 1 Shut off the manual main gas valve and remove the gas mani...

Page 44: ...n the same gas line as the furnace 4 Note or adjust the line gas pressure to give A 5 10 5 w c for natural gas B 11 13 w c for LP gas 5 Shut off the gas at the manual gas valve and remove the U Tube manometer FIGURE 41 MANIFOLD PRESSURE TAP 6 Replace the pressure tap plug before turning on the gas If the supply gas line pressure is above these ranges install an in line gas regulator to the furnace...

Page 45: ...E 42 MANIFOLD PRESSURE READING FIGURE 43 UPFLOW GROUNDING CONNECTIONS JUNCTION BOX CONDENSATE TRAP CONTROL IS GROUNDED WHEN ATTACHED TO BLOWER LOW VOLTAGE TERMINALS IFC MOUNTING PLATE BLOWER COMPARTMENT I409 3 ...

Page 46: ...e electrical connections be certain that the voltage frequency and phase corresponds to that specified on the furnace rating plate For single furnace application maximum over current protection is 15 amperes Use a separate fused branch electrical circuit containing a properly sized fuse or circuit breaker Run this circuit directly from the main switch box to an electrical disconnect that is readil...

Page 47: ...ly and return Furnaces must have same heating and blower capacity Twinning furnaces must operate off the same phase of power It should be noted that both blowers will run simultaneously when there is a call for heating cooling or fan The OK LED will flash if twinning is not set up properly fireplace sun rays lamps televisions radios or air streams from registers Refer to instructions packed with t...

Page 48: ... IN CANADA AS AN ALTERNATE TO ADJUSTING THE BURNER ORIFICE SIZE THE MANIFOLD GAS PRESSURE MAY BE ADJUSTED THIS METHOD IS COVERED LATER IN THIS SECTION THIS METHOD OF ADJUSTING MANIFOLD PRESSURE MAY ONLY BE USED IN CANADIAN INSTALLATIONS 34 90 Plus furnaces installed at high elevations require the installation of a high altitude kit for proper operation The high altitude kit consists of a high alti...

Page 49: ...0 12 600 12 000 11 400 10 800 10 200 9 600 All calculations are performed by using the first three columns of information only Before beginning any calculations determine the individual burner Btu size and heating value at Sea Level for the installation site Each value shown in the Heat Value column is per burner at 3 5 W C NOTE Heat Value at Sea Level for the location of the installation is avail...

Page 50: ...TITUDE INPUT OUTPUT ORIFICE SIZE MANIFOLD PRESSURE 0 2000 45 000 60 000 75 000 90 000 105 000 120 000 40 500 54 000 67 500 81 000 94 500 108 000 1 15mm 10 W C 2001 4500 40 500 54 000 67 500 81 000 94 500 108 000 36 450 48 600 60 750 72 900 85 050 97 200 1 15mm 7 6 W C ORIFICE ORDERING INFORMATION Orifice sizes are selected by adding the 2 digit drill size required in the orifice part number Drill ...

Page 51: ...R DEATH SEQUENCE OF OPERATION UT ELECTRONIC CONTROLS INVESYS CLIMATE CONTROLS UT Electronic Controls Direct Spark Ignition 1 Each time the thermostat contacts close the induced draft blower inducer begins a prepurge cycle 2 The air proving negative pressure switch es closes 3 30 seconds after the pressure switch es close the spark igniter energizes The induced draft blower operates for the complet...

Page 52: ... OR LP GAS HEATING VALUE OF GAS BTU PER CU FT METER 900 1000 1040 1100 2500 LP INPUT SIZE BTU HR CU FT MIN SEC MIN SEC MIN SEC MIN SEC MIN SEC ONE 1 12 1 20 1 23 1 28 3 20 45 000 TEN 12 0 13 20 13 50 14 40 33 20 ONE 0 54 1 0 1 3 1 6 2 30 60 000 TEN 9 0 10 0 10 24 11 0 25 0 ONE 0 44 0 48 0 50 0 53 2 0 75 000 TEN 7 12 8 0 8 19 8 48 20 0 ONE 0 36 0 40 0 42 0 44 1 40 90 000 TEN 6 0 6 40 7 0 7 20 16 40...

Page 53: ... The difference is the temperature rise 5 Compare the measured temperature rise to the approved temperature rise range listed on the furnace name plate See Figure 48 If the measured temperature rise is above the approved range the air flow is too low More air must be moved by speeding up the blower by removing restrictions in the duct system or by adding more supply or return air duct If the measu...

Page 54: ...590 750 1520 717 HIGH 2115 998 2050 967 1990 939 1945 917 1900 897 1795 847 1690 795 DOWNFLOW 11 x 7 1 2 LOW 820 387 790 373 760 359 725 342 690 326 650 306 610 288 3 HORIZONTAL MED LO 930 439 890 420 850 401 815 384 785 370 750 354 720 340 45 000 MED HI 1150 543 1120 528 1090 514 1045 493 1002 473 950 448 900 425 HIGH 1414 667 1365 644 1320 622 1270 599 1220 576 1165 550 1115 526 DOWNFLOW 11 x 7 ...

Page 55: ...NG BLOWER SPEED DISCONNECT THE ELECTRICAL SUPPLY TO THE FURNACE BEFORE ATTEMPTING TO CHANGE THE BLOWER SPEED FAILURE TO DO SO CAN CAUSE ELECTRICAL SHOCK RESULTING IN PERSONAL INJURY OR DEATH The blower motor is wired for blower speeds required for normal operation as shown If additional blower speed taps are available speeds may be changed if necessary to fit requirements of the particular install...

Page 56: ...rt from filter wash with detergent and water air dry thoroughly and reinstall Keep the filters clean at all times Vacuum dirt from filter wash with detergent and water air dry thoroughly and reinstall NOTE Some filters must be resized to fit certain units and applications See Table 11 and Figure 50 1 21 90 000 105 000 BTUH units require removal of a 3 5 in segment of filter and frame to get the pr...

Page 57: ...JACKET ANGLE FILTER ROD SUPPORT ANGLE FILTER SUPPORT ANGLE SEE ANGLE DETAIL ATTACH WITH SHEET METAL SCREWS 2 REQÕD ANGLE DETAIL ROD FILTER SUPPORT ANGLE ASSEMBLY F FILTER ROD SUPPORT ANGLE FILTER SUPPORT ANGLE SEE ANGLE DETAIL FILTER ROD 45 24095 01 FILTER FILTER SUPPORT ANGLE FILTER ROD SUPPORT ANGLE UPFLOW DOWNFLOW AIRFLOW AIRFLOW AIRFLOW ...

Page 58: ...ty filters can restrict airflow The motor depends upon sufficient air flowing across and through it to keep from overheating SYSTEM OPERATION INFORMATION Advise The Customer 1 Keep the air filters clean The heating system will operate better more efficiently and more economically 2 Arrange the furniture and drapes so that the supply air registers and the return air grilles are unobstructed 3 Close...

Page 59: ... during ignition trial If yes go to F Did a limit open during ignition trial If yes go to D Check line voltage between HEAT and NEUTRAL on IFC Check wires connections and continuity between IFC and IBM Check IBM capacitor Check IBM CHECK grounding on IFC and unit check for proper polarity between L1 neutral flame sense rod clean if necessary wire continually between flame sense rod and appropriate...

Page 60: ...60 FIGURE 52 MODELS WITH UT ELECTRONIC CONTROLS 1097 200 ...

Page 61: ...61 FIGURE 53 MODELS WITH UT ELECTRONIC CONTROLS 1097 200 ...

Page 62: ...62 ...

Page 63: ...63 ...

Page 64: ...64 CM 0611 ...

Reviews: