background image

5.


Communication Software Guideline 

Software Operation 


                            VENUS X2                                    User Manual                                                  44


adjusted, the adjustment range is between 0~255.   

Click 

Set

‖ to confirm.   

OSD


Click the 

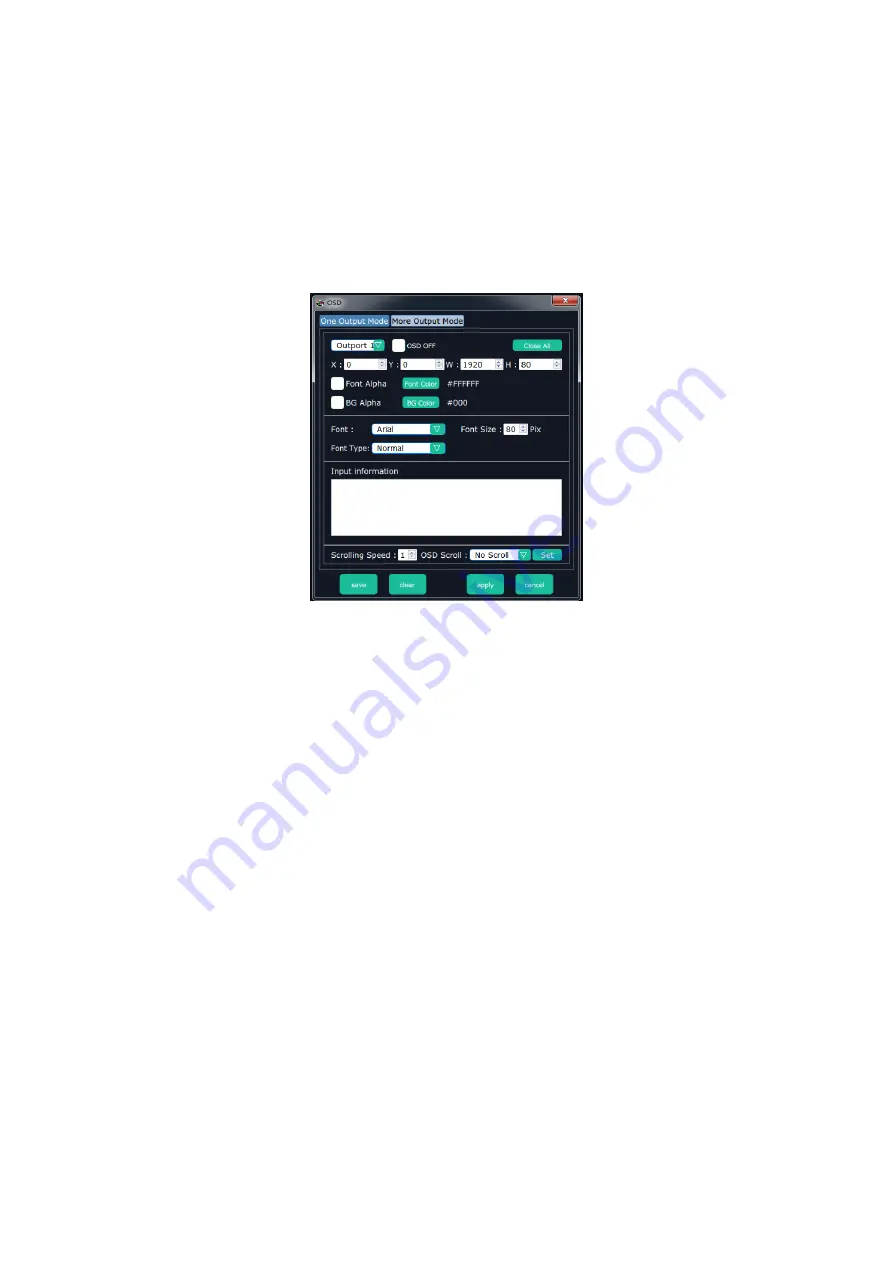
―OSD‖, and pop-up window as follows: 


Output Mode: 

One output mode or more output mode can be selected. In one 

output mode, user need to enable the OSD function and select the output first. 

The operations are as follows:   

Size  and  Position  Adjustment: 

The  size  and  position  can  be  adjusted  by 

setting X, Y, W and H.   

Font Setting: 

The font, font size, font type and font color can be set. Use can 

also select font alpha.   

BG Alpha: 

Can set the background color or background alpha.   

Input Information: 

Input the information that will display in the box.   

Scrolling Speed: 

The scrolling speed can be set, and the adjustment range is 

between 1~16.   

OSD Scroll: 

Can select no scroll, left scroll and right scroll.   

Click 

Save

‖ and ―

Apply

‖ after setting.   

Summary of Contents for venus x2

Page 1: ...VENUS X2 User Manual 1 VENUS X2 User Manual Manual RGB RD UM VENUS X2 E001 Revision V1 4...

Page 2: ...changes to the products and the programs described in this publication at any time without notice This publication would contain technical inaccuracies or typographical errors Changes are periodically...

Page 3: ...pendent service will be deemed invalid provided the damage is not proven to be attributed to the absence of properties guaranteed in writing or due to the intent or gross negligence or part of RGBlink...

Page 4: ...lding Baiwang R D Building Shahe West Road Xili Town Nanshan District Shenzhen Guangdong Province P R C Beijing office No 2702 Sino Light Building Tower B Wang Jing East Road Chaoyang District Beijing...

Page 5: ...ation Grounding the Product This product is grounded through the grounding conductor of the power cord To avoid electrical shock plug the power cord into a properly wired receptacle before connecting...

Page 6: ...t strictly observed could result in injury or death of personnel Note CAUTION The exclamation point within an equilateral triangle is intended to alert the user to the presence of important operating...

Page 7: ...0001 Add Optional Module Installation and Replacement Instruction Vira V1 2 2015 11 12 0002 1 Update the product picture 2 Update the back panel 3 Update the dimensions drawing 4 Update the menu tree...

Page 8: ...efinitions 14 System Overview 20 Application Questions 21 2 Hardware Orientation 22 In This Chapter 22 VENUS X2 Back Panel 23 Input Module Slots 23 VGA Input 23 S HDMI Input 23 3G SDI Input 24 Program...

Page 9: ...ch 25 Antenna 25 Illuminated Power Switch and Power 25 Power Module 25 VENUS X2 Front Panel 26 OLED Panel 27 USB Interface 27 Menu Button 27 Function Button 27 3 Hardware Installation 28 In This Chapt...

Page 10: ...Software Installation 35 Software Operation 38 Login to the Software 38 Web Links 39 Connect the Device 40 Output Settings 41 Operation Mode 45 Input Settings 59 Access Control 62 System Settings 63 A...

Page 11: ...l 11 1 Brief Introduction This chapter is designed to introduce you to the VENUS X2 User Manual Areas to be covered are Chapter Structure How to Use the Manual Terms and Definitions System Overview Ap...

Page 12: ...s of VENUS X2 operations Chapter 1 Brief Introduction Chapter 2 Hardware Orientation Chapter 3 Hardware Installation Chapter 4 Menu Orientation Chapter 5 Communication Software Guideline Appendix A Sp...

Page 13: ...ive search capabilities such as the Find tool and Search Index tool to perform comprehensive searches as required Table of Contents and Index Use the Table of Contents bookmarks to navigate a desired...

Page 14: ...ideo waveform without the video elements It includes the vertical sync horizontal sync and the chroma burst information Blackburst is used to synchronize video equipment to align the video output One...

Page 15: ...should yield a practical contrast ratio of 30 1 to 50 1 DVI Digital Visual Interface The digital video connectivity standard that was developed by DDWG Digital Display Work Group This connection stand...

Page 16: ...PEG typically achieves 10 1 compression with little perceptible loss in image quality Produces blocking artifacts MPEG Motion Picture Expect Group A standard committee under the auspices of the Intern...

Page 17: ...ced control lines RS 232 is a serial control standard with a set number of conductors data rate word length and type of connector to be used The standard specifies component connection standards with...

Page 18: ...cation protocol of the Internet Computers and devices with direct access to the Internet are provided with a copy of the TCP IP program to allow them to send and receive information in an understandab...

Page 19: ...ual 19 has a pixel by line resolution of 640 480 with a color palette of 16 bits and 256 000 colors YCrCb Used to describe the color space for interlaced component video YPbPr Used to describe the col...

Page 20: ...supports EDID editing for VGA HDMI input ports and read EDID for output ports the EDID can be modified by windows control program users can edit the EDID of input port according to the resolution of o...

Page 21: ...US X2 User Manual 21 Application Questions RGBlink offers solutions to demand technical problems Any application questions or required further information please contact with our Customer Support Engi...

Page 22: ...X2 User Manual 22 2 Hardware Orientation In This Chapter This chapter provides detailed information about the VENUS X2 hardware The following topics are discussed VENUS X2 Back Panel VENUS X2 Front P...

Page 23: ...HDMI USB and SDI Each VGA optional module includes 3 VGA inputs DB15port each CVBS optional includes 4 CVBS inputs BNC port each S HDMI optional module includes 4 HDMI inputs each USB optional include...

Page 24: ...ots VENUS X2 offers 4 program output module slots supports HDMI signal Each HDMI optional module includes 4 HDMI outputs HDMI Output Connect to the display device video processor or matrix Preview Out...

Page 25: ...NUS X2 adopt 3 5mm analog audio interface for multiple cascade U LINK OUT Interface Connect to the U LINK input of the next VENUS X2 adopt 3 5mm analog audio interface for multiple cascade DIP Switch...

Page 26: ...ion VENUS X2 Front Panel VENUS X2 User Manual 26 VENUS X2 Front Panel Plug in the power cord OLED module on the front panel will show as follows user can operate VENUS X2 through the menus on OLED mod...

Page 27: ...and for information interaction Push the knob button to confirm current options Function Button Menu and exit function reuse key Push the button to enter to the menu items Turn the knob to choose the...

Page 28: ...VENUS X2 User Manual 28 3 Hardware Installation In This Chapter This chapter provides comprehensive installation instruction for VENUS X2 hardware Following is the size of VENUS X2 for your reference...

Page 29: ...spect it for damage If you find any damage notify the shipping carrier immediately for all claims adjustments As you open the box compare its contents against the packing slip If you find any shortage...

Page 30: ...er This chapter describes all VENUS X2 processor menus including how they are accessed the functions that are available and descriptions of each menu tree in block diagram format The following topics...

Page 31: ...t s in selected state Push the knob to enter corresponding setting or view the menu RECALL Push the MENU button to go into the menu items turn the knob button to select RECALL show menus as follows SC...

Page 32: ...shown as follows SN Show the serial number of the device DEVICE INFO Show the version of input card output card COM CARD and KEYPAD TECH SUPPORT Show the factory sales customer service email and other...

Page 33: ...emperature UNIT User can set the unit as or LIGHT STYLE VENUS X2 provides 8 kinds of light styles user can choose the mode 0 to mode 7 according to actual need LANGUAGE Through this option user can ch...

Page 34: ...ual 34 5 Communication Software Guideline In This Chapter This chapter provides detailed information about the control communication software The following topics are discussed Software Installation S...

Page 35: ...bove open AERO effect Hard disk space Above 16G primary partitions NTFS format Monitor resolution must be 1280 x720 pixel or above it can not display normally if the resolution is lower than 1280 x720...

Page 36: ...re Installation VENUS X2 User Manual 36 Select Browse to choose the ROVA software install path Note User should get the rights in Roles Management when install the software to disk C if the system is...

Page 37: ...5 Communication Software Guideline Software Installation VENUS X2 User Manual 37 Click Finish and ready to run ROVA windows control program...

Page 38: ...icon on the desktop Log in interface will be enter after opening the user s name is Admin and there is no password enter into the software by clicking Login If user want to change the language to Chin...

Page 39: ...e contains the functions include web links search output settings operation mode input settings access control and system settings In the following parts we will introduce these in detail Web Links RO...

Page 40: ...device is on the same network segment Connect the ROVA to the computer with the network cable and power up the device Then click the shortcut Search on the operation interface Then it will search the...

Page 41: ...re Guideline Software Operation VENUS X2 User Manual 41 The software will automatically synchronize after connection as shown in the figure below Output Settings Click the Output Settings and enter th...

Page 42: ...ck the drop down arrow after the format and select the output resolution in the pull down menus according to actual need Format The width height and frequency can be set if select Custom in Format Cli...

Page 43: ...e port or all ports and enable the De function by sliding the De Switch The settings for De include X Y width height line polarity and scene polarity Vertical spliting can be selected in Output Port T...

Page 44: ...first The operations are as follows Size and Position Adjustment The size and position can be adjusted by setting X Y W and H Font Setting The font font size font type and font color can be set Use ca...

Page 45: ...ual 45 Operation Mode Click the Operation Mode and enter the interface as follows Videowall Mode Matrix Mode and Presentation Mode are included in operation mode specific as follows Videowall Mode Cli...

Page 46: ...to ON LED type and LCD type can also be selected by sliding the monitor type switch specific as follows LED Type LED is the default monitor type In LED type user can custom the H total V total row an...

Page 47: ...automatically For example set the top border bottom border left border and right border as 100 as shown in the figure below Close monitor Click the icon on the top right corner of the monitor to close...

Page 48: ...to the suitable position and release the mouse But this method can only adjust the size and location roughly if an accurate adjustment is needed select the monitor and set the X Y width and height in...

Page 49: ...the window Adjust Layer Two ways can change the size and location of the opened layer a Drag the opened layer by mouse The details are move the mouse to the brink of the opened layer when the mouse sh...

Page 50: ...to close one layer or click the shortcut key to close all layers Lock the layer Click the icon on the top right corner of the layer to lock the layer the layer can t be moved or adjusted if be locked...

Page 51: ...alpha sharpness brightness contrast saturation and color temperature setting are also included Click Set to confirm or click Reset if image quality distorts by improper operation H 264 Video Preview S...

Page 52: ...tched as shown in the figure below Click the arrow on both sides of the H 264 video the groups of the preview signals will be switched as shown in the figure below Take The take interface is shown as...

Page 53: ...usly Click Cut or Take the preview will be cut or seamless switch to LED display EDID Click the EDID shortcut and pop up window as follows The special display project or LED display application would...

Page 54: ...the loop function for the bank If select ON the bank play time can be set Sync Click the sync shortcut to synchronize the current data Load Script Click the load script shortcut and pop up window as...

Page 55: ...a to the computer Factory Reset Click the factory reset shortcut to reset to factory settings Out Card Set Click the out card set shortcut and pop up window as follows Click any output and pop up wind...

Page 56: ...ser Manual 56 In advanced setting scale and crop can be set Not recommended to use Advanced Setting Short Key Click the shortcut and pop up window as follows Use shortcut key to operate fast and easil...

Page 57: ...r it will enter the interface as follows In matrix mode any operations are unavailable except signal selection bank selection alpha time and black scene setting Default source 1 to monitor 1 source 2...

Page 58: ...on Mode Click the Presentation Mode and pop up window as follows Click OK the system will synchronize the data and it will finish about 5 seconds later click OK it will enter the interface as follows...

Page 59: ...to seamless switch or cut the preview signal to the LED display Note The adjustment for monitor is available when there is no any layer in PST or PGM window Input Settings Click the Input Settings and...

Page 60: ...custom mode alpha and color setting Click Set to confirm Source Backup Click the Source Backup and pop up window as follows Enable the hot backup function as shown in figure and set the backup signal...

Page 61: ...ck any valid input board for example select then select the merger mode for example select as shown in the figure below Click any layer then click any source and the layer source can be switched as sh...

Page 62: ...gement and rights management are included in access control specific as follows Role Management Click the Role Management and pop up window as follows Add Input the user name and password and select t...

Page 63: ...hts Management and pop up window as follows Select the admin or users in user s list then click the rights in Managements Detail Click OK after setting User can operate the rights that selected System...

Page 64: ...serial number IP address firmware version etc IP Settings Click the IP Settings and pop up window as follows Users can set equipment IP mask and gateway usually used if one computer control some devi...

Page 65: ...Click the Streaming IP Power On Setting and pop up window as follows H 264 Display Enable or disable the H 264 display function If select ON the interface will display the H 264 video when enter to th...

Page 66: ...of Inputs 3 Connector Standard DB15 Socket Supported Standard VGA UXGA Signal Level R G B Hsync Vsync 0 to1Vpp 3dB 0 7V Video 0 3v Sync 75 ohm black level 300mV Sync tip 0V Supported Resolution VGA UX...

Page 67: ...s 1 485Gb s 1 485 1 001Gb s and 270Mb s Supported Standard SMPTE 425M 3G Level A Supported Resolution SMPTE 425M 3G Level A 4 2 2 1920 1080 60 1 1 I 1920 1080 50 1 1 SMPTE 274M HD 1920 1080I 60 2 1 or...

Page 68: ...Level NTSC PAL TRI SYNC Blackmagic signal Supported Resolution 480i I 576i I 1080i50 59 94 60 I 720p50 59 94 60 I 1080P50 59 94 60 Genlock Input Number of Inputs 1 Connector HDMI standard type A inter...

Page 69: ...e owner Warranty related repairs include parts and labor but do not include faults resulting from user negligence special modification lighting strikes abuse drop crush and or other unusual damages Th...

Page 70: ...B disk and modify the file name to _update pkg 2 Plug into the power cord and make sure the VENUS X2 is in normal operation 3 Plug the USB disk into the USB interface in the front panel of VENUS X2 th...

Page 71: ...on steps of VENUS X2 and VENUS X3 are the same Here we take VENUS X3 for example specific steps are as follows Install the Optional Module 1 Unscrew the 2 captive screws in input modules block and pul...

Page 72: ...2 User Manual 72 DVI input module For the joined PCB input module with CVBS HDMI VGA USB or SDI interface fix the input module on the plate with 2 M3 4 flat screws and 2 M3 4 round head screws Micro S...

Page 73: ...VENUS X2 User Manual 73 HDMI input module VGA input module CVBS input module USB input module 3 Fix the input module block with fixed screws as shown in figure...

Page 74: ...4 4 Push the input modules into the device along the slide rail and screw the captive screws as shown in figure Note The install steps of output module installation and input output module replacement...

Reviews: