REVCAMUK MON16AHD Instructions Download Page 2

 2


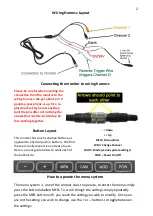
Connecting the monitor to wiring harness


Please be careful when inserting the 
connection from the monitor to the 
wiring harness. We get about 2 or 3 
people a year phone us up for a re-
placement wiring harness as they 
bent the pins after not noticing the 
arrows that need to be lined up be-
fore pushing together. 


Wiring Harness Layout


Button Layout


This monitor has touch sensitive buttons, as 
opposed to physical push in buttons.  We find 
these are really responsive and easy to use.  
Here is a quick guide below to what each of 
the buttons do. 


-

 = Down


+ = Up


MEN = Menu/Enter


CAM = Change Channel


MOD = Mode (various picture settings)


POW = Power On/Off


How to operate the menu system


The menu system is  one of the simpler ones to operate, to enter the menu simply 
press the button labelled MEN.  To scroll though the settings simply epeatedly 
press the MEN button until  you reach the setting you wish to modify.  Once you 
are on the setting you wish to change, use the + or 

--

 buttons to toggle between 

the settings.  


Summary of Contents for MON16AHD

Page 1: ... cameras can display strangely on AHD monitors In an ideal world we recommend using AHD cameras on AHD monitors and CVBS cameras on CVBS monitors 7 Colour LCD screen Power supply 12V 24V Power Consumption 6W Max Digital Screen Resolution 1024W x RGB x 600 Contrast 400 1 Brightness 300cd m2 Viewing Angle U D 50 70 R L 70 70 Active Area 154 08 W x 85 92 H mm Operating Temperature 20C to 65C Storage ...

Page 2: ... opposed to physical push in buttons We find these are really responsive and easy to use Here is a quick guide below to what each of the buttons do Down Up MEN Menu Enter CAM Change Channel MOD Mode various picture settings POW Power On Off How to operate the menu system The menu system is one of the simpler ones to operate to enter the menu simply press the button labelled MEN To scroll though th...

Page 3: ...lip the image upside down 1 Horizontal flip this will mirror the image this is the option should you wish to convert one of the cameras to a normal view ie let the monitor cancel the cameras mirror image out by adding another mirror YOU CAN SET EACH CHANNEL INDIVIDUALLY FOR ROTATION SIMPLY ENSURE YOU ARE ON THE CHANNEL YOU WANT TO MODIFY WHILST IN THE MENU VCOM We are currently not sure of this fu...

Page 4: ...th of the bolt to secure to the square washer If you position the bolt in to the wrong part of the channel then the monitor won t tighten sufficiently and could damage the plas tic back of the monitor See the below for details of other brackets available from our site Our other brackets allow more adjustment and don t require lining up to this indentation Optional Brackets for monitor ...

Reviews: