8.3 Lights
Front Turn Signal Lights
1. Remove the two fixing screws.
2. Rotate the bulb anticlockwise
and remove it.
3. Pull out the bulb from the bulb
holder.
4. Replace the bulb with a new one.
5. Install in the reverse order of
removal.
Tail Light, Brake Light, Turn
Signal and Reverse Indicator
Lights
1. Remove the 3 fixing screws [in case
of taillight & brake light] or the 2
screws [in case of turn indicator and
reverse lamp.]
2. Rotate the bulb anticlockwise and
remove it.
3. Pull out the bulb from the bulb
holder.
4. Replace the bulb with a new one.
5. Install in the reverse order of
removal.
Maintenance
Interior Light
1. Pull down on the rear part of the lens
to remove the cover.
2. To remove the bulb, pull it out
gently.
3. While replacing the bulb, make sure
that the contact springs are holding
the bulb correctly.
4. To install the cover, hook its front
end in and push it up.
68
8.3 Lights
Maintenance
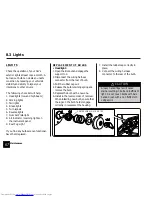
LIGHTS
Check the operation of your Car’s
exterior lights at least once a month. A
burned out bulb can create an unsafe
condition by reducing your vehicle’s
visibility and ability to signal your
intentions to other drivers.
The following check list will help:
1. Headlights (low and high beam)
2. Parking lights
3. Tail lights
4. Brake lights
5. Turn signals
6. Reverse lights
7. Number Plate light
8. All indicator / warning lights on
the instrument panel
9. Rear Fog Light
If you find any bulbs are nonfunctional,
have them replaced.
REPLACEMENT OF BULBS
• Headlight:
1. Open the Bonnet and engage the
support rod.
2. Disconnect the wiring harness
connector from the rear of bulb.
3. Pull the rubber cap out.
4. Release the bulb retaining spring and
remove the bulb.
5. Replace the bulb with a new one.
6. Install in the reverse order of removal.
When installing new bulb, ensure that
the lugs on the bulb holder engage
correctly in recesses of the housing.
Greasy hands/fingers will cause
stains, resulting in dull and inefficient
light. Do not touch bulbs with bare
hands. Clean with a non fluffy cloth
using spirit.
CAUTION
7. Install the rubber cap correctly in
place.
8. Connect the wiring harness
connector to the rear of the bulb.
CENTRAL PIN ALWAYS ON TOP
67
Downloaded from
www.Manualslib.com
manuals search engine
Summary of Contents for G-Wiz
Page 43: ...42 Downloaded from www Manualslib com manuals search engine...
Page 59: ...58 Downloaded from www Manualslib com manuals search engine...
Page 65: ...64 Downloaded from www Manualslib com manuals search engine...
Page 77: ...76 Downloaded from www Manualslib com manuals search engine...
Page 87: ...86 Downloaded from www Manualslib com manuals search engine...
Page 96: ...Vehicle identification numbers 14 95 Downloaded from www Manualslib com manuals search engine...
Page 98: ...Index 15 97 Downloaded from www Manualslib com manuals search engine...

