background image


11 

Chapter 8 How to Use Light Pen and Electronic Wand 

8.1 Operation Skills for Light Pen and Electronic Wand 
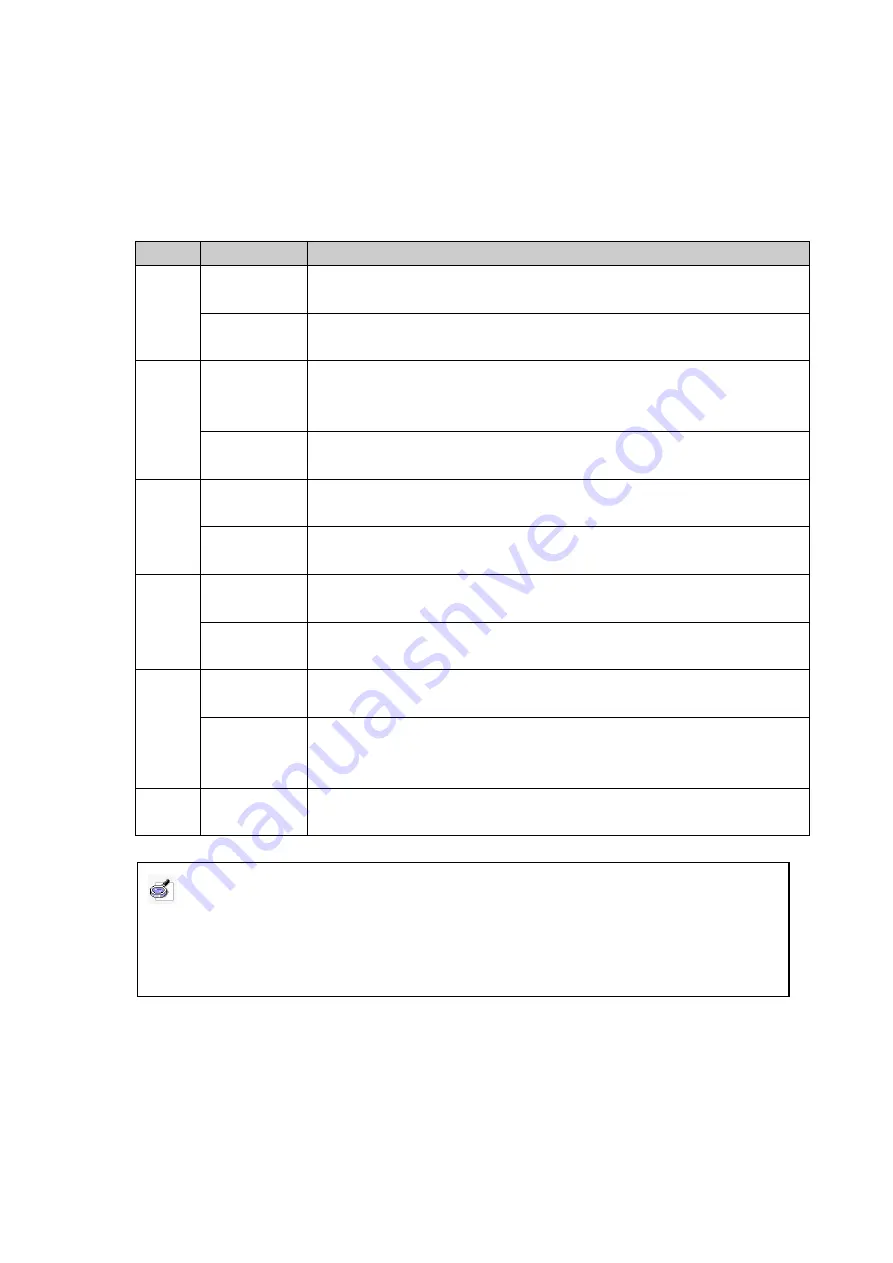
Action       Tool 

Operation 

Single 

Click 

Light Pen 

Raise Pen  Tip about 1-2mm  higher from the surface, then press the surface 

once. 

Electronic 

Wand 

Aim the wand tip to the surface, and then press the button on the wand once 

and release. 

Double 

Click 

Light Pen 

Raise Pen Tip about 1-2mm  higher from the surface,  then press the surface 

twice, or press the button on the pen body once. The time interval should not 

be too long. 

Electronic 

Wand 

Aim  the  wand  tip  to  the  surface,  and  then  press  the  button  on  the  wand 

twice. 

Right 

Click 

Light Pen 

Press  the  pen  on  the  surface  and  hold  for  2  seconds,  right-key  menu  will 

appear. 

Electronic 

Wand 

Press  the  button  on  the  wand  and  hold  for  2  seconds,  right-key  menu  will 

appear. 

Drag 

Light Pen 

Use the pen to press on an item and drag it to the appointed position (during 

which Pen Tip should not leave the surface). 

Electronic 

Wand 

Aim the wand tip to an item, press the button on the wand and hold, drag the 

item to the appointed position, then release the button. 

Write 

Light Pen 

If  you  use  IQBoard  Software,  switch  into  “Board”  mode,  select  a  writing 

tool, then you can use the pen to directly write on the surface. 

Electronic 

Wand 

If  you  use  IQBoard  Software,  switch  into  “Board”  mode,  select  a  writing 

tool, then you can use Electronic Wand to directly write on the surface (press 

the button on the wand and hold when writing). 

Remote 

Control 

Electronic 

Wand 

When you use Electronic Wand, the wand tip needn’t touch the surface, you 

can operate in a certain distance. Operations are the same as above. 


8.2 How to Use Buttons on Light Pen 

The Light Pen of IQBoard LT Series has 2 multi-functional interactive buttons. You can 

achieve dozens of functions by simply pressing the interactive buttons. Following are 

the operations of these interactive buttons.  When using these buttons, please touch 


Note:   

1.  Please take the battery out of Light Pen when you don

’t use it for a long time. 

2.  Hold the middle part of Light Pen and lean the pen at the angle of inclination of 50

°

when 

writing. 

Summary of Contents for IQBoard LT M1

Page 1: ...IQBoard LT Series User Manual Copyright C 2003 2012 Fuzhou Returnstar Technology Co Ltd Web www recoverystar com www iqboard net Tel 0086 591 87274373 Fax 0086 591 87274383 E mail master iqboard net...

Page 2: ...revision and update The information in this manual is subject to regular change without prior notice Returnstar will make no warranties with respect to this product and disclaims any warranties wheth...

Page 3: ...ter 5 Install and Uninstall Drivers 5 5 1 Install Drivers 5 5 2 Uninstall Drivers 5 Chapter 6 Mount Signal Receiver 5 6 1 Desktop Mounting 5 6 2 Ceiling Mounting 6 6 3 Recommended Distance between Rec...

Page 4: ...e erase label in character line dimension and angle drag zoom reveal screen spotlight screen capture and save screen record and playback handwriting recognition on screen keyboard text input text to s...

Page 5: ...power is not needed Orientation 9 or 20 points Power Consumption 1W Retractable Electronic Wand Digitalizing Technology Infrared Control Buttons 1 button Power Battery AA x2 Working Current 40 50 mA L...

Page 6: ...ctable body clockwise into the holder 4 2 How to Install Light Pen Replace pen tip When pen tip is worn out please unscrew the pen tip by turning it counterclockwise and replace the pen tip then screw...

Page 7: ...Signal Receiver with computer through USB Cable sucessfully this indicator will turn red Mini USB Port Connect Signal Receiver to computer with USB Cable 4 4 How to Connect Signal Receiver with PC 1...

Page 8: ...tically find a new hardware and install the drivers 5 2 Uninstall Drivers Select Start Programs IQBoard LT Series Universal Drivers V8 0 Uninstall to uninstall You can also open Control Panel select A...

Page 9: ...osition of the projector and receiver is not changed frequently you could use velcro to fix the receiver on the short throw projector 1 Fix Signal Receiver with stand by clamp on it 2 Stick one side o...

Page 10: ...Distance Screen Size Distance between Receiver and Screen 60 4 3 84cm 116cm 80 4 3 105cm 145cm 100 16 9 128cm 180cm 110 16 9 138cm 190cm 120 16 9 148cm 200cm 150 16 9 188cm 245cm Note If the projecto...

Page 11: ...niversal Drivers Hardware Calibration 2 Ajust position and angle of Signal Receiver to assure the whole projection area is inside the red frame see figure as follow Brightness brightness of the screen...

Page 12: ...Orient the Orient Window appears 2 Select Orient from Orient Window if you have set Signal Receiver on the correct position or please select Hardware Calibration to set Signal Receiver on the correct...

Page 13: ...older 6 After orientation interface of orientation will close automatically and IQBoard LT is ready to use Note 1 You can press ESC on the keyboard to close the orient window and start it again if you...

Page 14: ...lectronic Wand Aim the wand tip to an item press the button on the wand and hold drag the item to the appointed position then release the button Write Light Pen If you use IQBoard Software switch into...

Page 15: ...button functions See figure as follow 2 Default Options When in Windows Mode Front Button To simulate Mouse double click function Back Button Press the button once to execute right click function of M...

Page 16: ...stomization Options When in Windows Mode Front Button To simulate Mouse double click function Back Button Press the button once to execute right click function of Mouse When in Board Mode Annotating o...

Page 17: ...Next Page Press this key to go to the next page Mouse Press this key you can use electronic pen or writing pen finger to achieve click double click and drag function When using IQBoard Software press...

Page 18: ...ted 2 The functions of Frequently Used Tools Frequently Used Applications and Orient can be opened or closed by pressing the relevant hotkeys on the hotkey bar 3 For IQBoard LT D when at Split screen...

Page 19: ...osition Please adjust Signal Receiver according to its mounting way 3 When writing or operating by Light Pen or Electronic Wand the response is slow or inconsecutive 1 The computer is not under normal...

Page 20: ...e between Receiver and screen is not appropriate please readjust as per the recommended distance mentioned as above Chapter 6 2 The receiver and computer are not well connected Please check and re con...

Page 21: ...s so please keep them carefully If you use the whiteboard in the meeting room or class room please fix the cables along the cable alley 10 3 Projection Face the whiteboard when operating and writing o...

Page 22: ...19 authorized technician Make sure that you use our designated part or the one with same specification when replacing...

Reviews: