background image

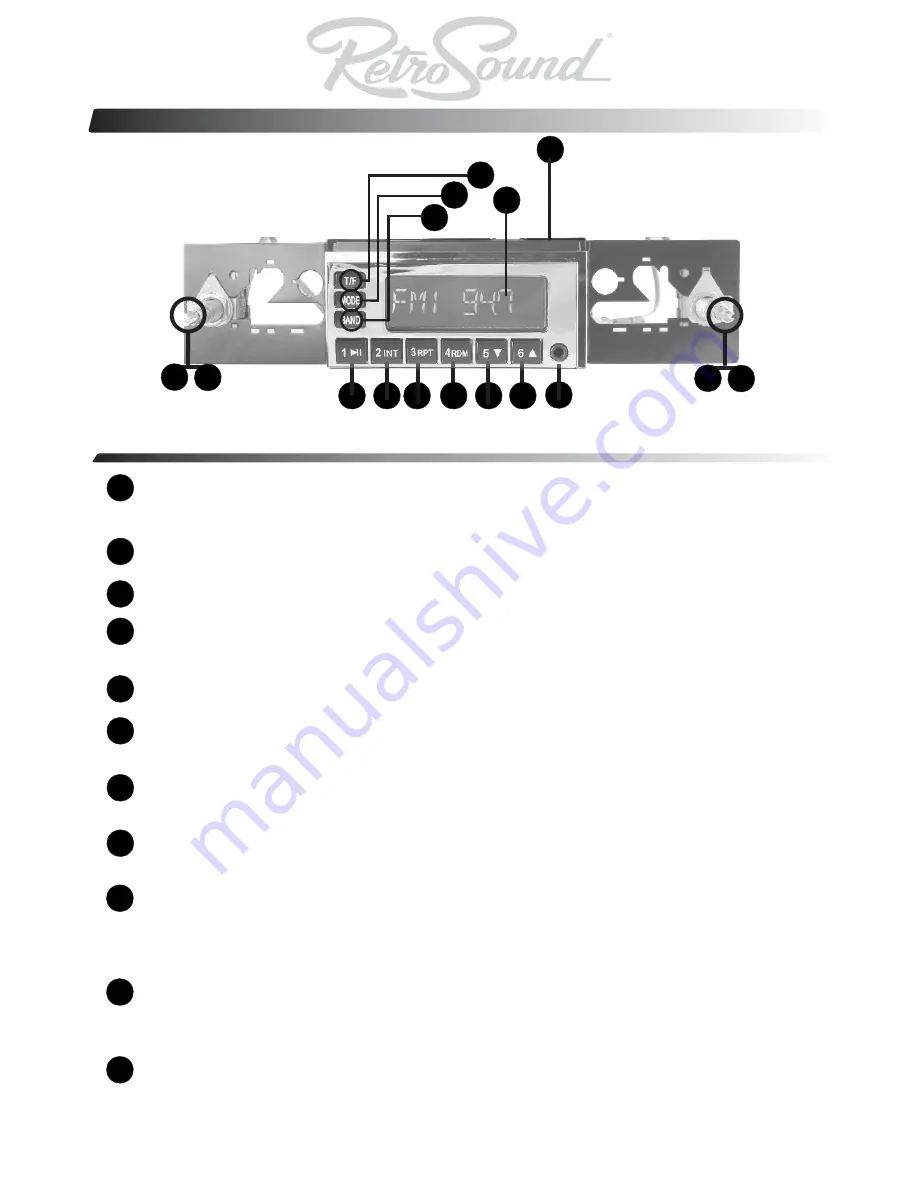
Location of Controls (Quick Start Guide) 

1

2
3
4

5
6

7

8

9

10

11

13

12

3

4 5 6 7 8 9

10 11

14

16

15

Please review this section for quick reference, as it contains information on the location of controls and 
basic operations. For specific details on the particular operation, please refer to the table of contents.

POWER on/off: Press the left center knob to turn the unit on. Press and hold the left center knob for 
2 seconds to turn the unit off. Turning the center left shaft controls  the volume attenuation  up and 
down. Note: Volume range is 0 - 50(Min/Max).

Pressing the left center shaft inward activates the SEL (Select) function. Press this repeatedly to 
cycle through the DSP (Digital Signal Processing) EQ, Bass, Treble, Balance & Fader function(s). 

Pressing the “1” button allows for selection of a radio preset. When a digital file is played in SD/USB 
mode, this becomes the play/pause button.
Pressing the “2” button allows for selection of a radio preset or when a  digital file is played in SD/ 
USB mode pressing this button, the radio will play 10 seconds of each track on the flash drive you 
have inserted. Press again to cancel this function.

Pressing the “3” button allows for selection of a radio preset

. When a digital file is played in SD/USB 

mode, pressing this button will allow you to repeatedly play the current track.

Pressing the “4” button allows for selection of a radio preset. When a digital file is played in SD/USB 
mode, 

pressing this button will allow you to randomly play all digital tracks on your flash drive or SD 

card.

Pressing the “5” button allows for selection of a radio preset. When a digital file is played in SD/USB 
mode, 

pressing this button this button allows you select folders on your flash drive or SD Card.

Pressing the “6” button allows for selection of a radio preset. When a digital file is played in SD/USB 
mode, 

pressing this button this button allows you select folders on your flash drive or SD card.

AUX Input(s):  Allows you to plug in any device with a headphone 1/8”(3.5mm) output, directly into 
the front face of the Model One (Example: Ipod, CD player, Satellite, Mp3 player, etc).  Use the 
MODE button to select Aux 1 (Front Aux input) or Aux 2 (Rear aux input). The rear mounted 3.5mm 
Aux input allows you to plug in another source unit, or plug the output of the included SD/USB 
remote mountable box to this input so you can enjoy remote operation of your rear Aux input.

Turning the right center knob to the right & left allows you to tune to the next or previous Am/Fm 
frequency.  When playing a digital file in SD/ USB mode, this right center shaft will allow you to 
change tracks (next/previous) when listening to Mp3 / WMA files on an attached USB flash drive or 
SD card. 

4.

Pushing in the right center knob for 2 seconds, will allow you to access the sub menu system  
where you can adjust: Auto/Manual tuning, RDS On/off, Clock or Frequency Priority, loudness 
on/off, beep on/off, US/EU tuning, stereo/mono, DX (distant)/local tuning volume on default level. 

1

2

Summary of Contents for One B/C

Page 1: ...USB SD MP3 Playback and Infinimount Shaft Bracket System Copyright 2011 Retro Manufacturing LLC No text illustrations or format of this manual in printed or electronic form may be copied without written permission from Retro Manufacturing LLC or any of its subsidiaries All Rights Reserved ...

Page 2: ...ur car in direct sunlight will result in a temperature rise Do not turn on the unit if the temperature inside the car is very high Always cool down the unit before usage If the unit does not turn on check the connections first Then check whether the fuse in your vehicle s fuse box is blown and check the fuse at the unit s wiring harness Carefully read this manual before using the unit If you encou...

Page 3: ...it 10 16 Model One Specifications Dimensions 17 Using Your Unit 18 26 Setting the Clock 18 Turning the Unit On Off 18 Volume Adjustment 18 Selecting Your Listening Source 18 Adjusting the Sound Properties 18 Special Modes of Operation Sub Menu 19 21 About RDS Using RDS functions 22 23 Selected Source Mode Radio 24 Selected Source Mode USB 25 26 Selected Source Mode Auxiliary Input 27 Limited Warra...

Page 4: ...m from getting caught in the vehicle chassis screws and moving parts such as seat rails Do not scratch pull bend or twist the leads Do not run them near heat sources or place heavy objects on them If leads must be routed around sharp metal edges protect the leads by winding them with vinyl tape or similar protection Use the designated parts and tools for installation Use the supplied or designated...

Page 5: ...n a digital file is played in SD USB mode pressing this button will allow you to randomly play all digital tracks on your flash drive or SD card Pressing the 5 button allows for selection of a radio preset When a digital file is played in SD USB mode pressing this button this button allows you select folders on your flash drive or SD Card Pressing the 6 button allows for selection of a radio prese...

Page 6: ...the headphone output of your ipod or iphone or any other device that has a headphone output into the aux inputs of this radio Backlit LCD Display Window 16 Included RF Remote Control Legend 1 7 4 10 2 8 5 11 3 9 14 6 13 12 Press to turn on off unit Press SEL repeatedly to cycle through the EQ Bass Treble Balance Fader function s Press and hold SEL to access Sub menu to adjust Loudness Beep Band et...

Page 7: ...WING PRESET BUTTONS 1122 LISTEN FOR BEEP GO TO STEP 4 4 PRESS ANY BUTTON ON THE REMOTE TO ALLOW THE RADIO TO RECOGNIZE THE REMOTE 2 PRESS HOLD FOR 2 SECONDS 1 TURN ON RADIO BY PRESSING LEFT CENTER SHAFT BUTTON 1 TURN ON RADIO 3 PRESS 1122 USING PRESET BUTTONS WAIT FOR BEEP GO TO STEP 4 Please note that some remotes included with our Model One radios may not come coded to the radio from the factory...

Page 8: ...ed SD USB AUX Remote Mountable box 4 RCA outputs for adding external amplification External Antenna Input Internal Amplifier Heatsink Threaded mount for metal backstrap included used for rear support of main body Female ISO wire harness connector w 1 male power ground harness 1 male speaker lead harness 7 ...

Page 9: ...del One unit can read mp3 and wma files directly from your flash drive NOTE THIS USB INPUT IS NOT FOR USE WITH IPOD SD Card Input Up to 32 gig can be plugged into this slot SD MMC SDHC AND Mini Micro SD Cards can be used with SD adapters SD USB CONNECTOR PLUGS INTO BACK OF MODEL ONE APACHE 3 5MM OUTPUT PLUGS INTO AUX INPUT IN BACK OF MODEL ONE APACHE RADIO Plug your Ipod or other portable Device i...

Page 10: ...t Brackets 2 Infinimount Shaft System 1 Metal backstrap w hardware used to secure main unit behind dash 2 ISO Wiring harness to connect to Model One 1 Remote Mountable SD USB Aux In Box misc Screws washers parts to mount Infinimount shafts brackets 1 5 2 6 3 7 4 8 Note Item 1 is not shown above but is included in the box Note if batter not in remote it is packaged separately in the box AUX 2 3 4 5...

Page 11: ...S IF YOU HAVE QUESTIONS Support retrosoundusa com Installation Notes To prevent damage to the unit do not connect the power connector until you have completed the wiring process This is a 12 Volt negative ground ONLY radio If you have a positive ground or a 6 volt system you need to either convert to 12 volts or purchase a separate inverter that would step up the voltage to 12 volts Please note th...

Page 12: ...e bracket using suppled shaft nuts and shaft mounting guide and finger tighten to prepare for the final installation see figure A below Once you are sure of proper width then tighten prior to final installation Be sure to plug the shafts into the side of the main unit to activate the shaft control functions see figure B below X 2 Mount Shaft to Bracket Plug Shaft into Side of Main Unit A B 11 Rect...

Page 13: ... is designed for Tighten shaft nuts and make sure that shaft depth works with your dash configuration the Retrosound Infinimount bracket shaft and bracket system are extremely adjustable and care should be taken to ensure proper final fit for the perfect installation Use supplied nuts washers to align bezel onto shaft Adjust nut height to allow bezel faceplate to be flush in your dash Note with th...

Page 14: ...ome Control Face Note One of the biggest questions we get is how can your radio fit my car Since our radio is essentially a universal solution one chassis for most vehicles our radio s control face is a fixed size 3 5 W x 1 5 H Most American cars fit the OE radio from behind the dash and they require a bezel meaning this bezel fits around our radio s control face to fill your original factory open...

Page 15: ...ilable dash bezels and faceplate adapters available Optional 67 68 Camaro Faceplate shown above Optional 68 85 VW Porsche Jaguar BMW faceplate mounts on top of the dash This solution shown with our exclusive all metal chrome euro style knobs Optional 70 72 Chevelle bezel mounts from behind the dash This solution shown with our exclusive all metal GM style black and chrome metal knobs Optional 59 6...

Page 16: ...hat the unit looks like with the control face removed connected by a ribbon cable from the body of the main unit to the radio s control face There is about 3 of cable length from the body to the radio control face After preparing for your installation and understanding your needs proceed to install the unit and connect the wiring and make sure you use the metal back strap to support the main body ...

Page 17: ... knob simply insert a blade screwdriver diagonally to slightly spread apart the secondary back knob position to allow the rear knob to fit snugly For the front knob use a pair of needle nose pliers and GENTLY crimp the front knob prongs closer together Please use caution not to make these too tight then mount the front knob and you re done Final Result Modern Sound for your Classic Preparing to In...

Page 18: ...5 3 7 D e e p O v e r a l l l e n g t h 1 5 H Radio Face 3 5 W Radio Face 17 ...

Page 19: ... Aux in 2 Note USB SD option will not appear unless media is plugged into the USB SD slot Press the T F Button on the face of the unit when the unit is turned on Press and hold the T F button When the clock is seen on screen blinking release the T F Button and use the left shaft center knob and turn knob right or left to adjust hours note AM PM is adjusted by changing hours Press the left shaft ce...

Page 20: ...he bass and treble settings This is suitable for bass heavy popular music The ROCK DSP setting accentuates the treble settings This is suitable for Rock Music The bass adjustment function allows you to boost or cut the low frequencies from 7 to 7 Note make sure DSP function is set to OFF in order for Bass Treble to operate The treble adjustment function allows you to boost or cut the high frequenc...

Page 21: ...ck Priority When Clock Priority PRI CLK is selected the clock function will remain on screen all the time when listening to the radio or USB PRI FREQ function SUB MENU FUNCTION RDS ON OFF SUB MENU FUNCTION AUTO MANUAL SUB MENU FUNCTION CLOCK FREQUENCY PRIORITY RDS ON auto PRI FREQ PRI CLK 20 SUB MENU FUNCTION US EU RADIO TUNING area usa area EUR AF The Retrosound Model One has the capability to re...

Page 22: ... vol last Sub Menu system Press and hold the SEL right center shaft knob Repeatedly press the center shaft to scroll through the sub menu turn the knob to the right to select VOL ADJ VOL LAST operation Factory default is VOL LAST this mode maintains the last volume the radio was at when you turned it off When you select VOL ADJ mode you can set the default turn on volume at any level you want no m...

Page 23: ...ng FM stations to see what programming type they are broadcasting If the programming type is found the radio will select it To use this function press and hold BAND button for 2 seconds Use the Preset buttons 1 6 to choose from 10 different program categories 2 per preset then hold the BAND button for another 2 seconds to access another bank of 10 program categories Once the program type has been ...

Page 24: ...ike this NEWS search TA SEEK PTY TA SEARCHING FOR NEWS STATIONS PRESS AND HOLD BAND ONCE FOR 2 SECONDS TO ACCESS THESE PROGRAM TYPES AF FUNCTION AVAILABLE ONLY IN AREA EUR TUNER MODE TA FUNCTION AVAILABLE IN US EU TUNING MODES PRESS AND HOLD BAND ONCE AGAIN FOR ANOTHER 2 SECONDS TO ACCESS THESE PROGRAM TYPES 1 Preset POP M ROCK M 2 Preset EASY M LIGHT M 3 Preset CLASSICS OTHER M 4 Preset JAZZ COUN...

Page 25: ... each song INT or repeat the track you re listening to RPT or randomly select from all songs on the attached thumb flash drive NOTE The unit MUST be in USB or SD MMC mode for it to read the USB files on your flash thumb drive or SD card USB SD MODE To save a preset tune to the station using the right shaft knob then choose the preset number you wish to assign to that station Press and hold the but...

Page 26: ...flash drives or SD cards up to 32 gigs in size The radio will NOT read NTFS formatted drives or cards The Model One will read files placed in the root directory first before playing files in the folder structure of the drive Please note that files are read in order of creation NOT alphabetically or numerically Older files will get read first in a folder Note To access the clock when in USB mode pr...

Page 27: ...s present on the drive Please see the modes below that show how they will appear on your display Press 1 to Play Pause the current track Press 2 INT to listen to 10 seconds of each track in the current folder Press INT again to cancel this mode Press 3 RPT to Repeat the currently playing track Press RPT again to cancel this mode Press 4 RDM to allow the unit to randomly play tracks on your USB dri...

Page 28: ...r of the unit There are two separate auxiliary inputs on this radio Aux 1 Front and Aux 2 Rear input Select the AUX 1 or AUX 2 mode by pressing the MODE button until you see AUX IN 1 OR AUX IN 2 on the Model One s screen see photos below AUX IN 1 AUX IN 1 AUX IN 1 FRONT PANEL AUX IN AUX IN 2 REAR OF MODEL ONE OR VIA USB SD AUX BOX SD USB CONNECTOR PLUGS INTO BACK OF MODEL ONE APACHE 3 5MM OUTPUT P...

Page 29: ...VERS failures due to defects in materials and workmanship and DOES NOT COVER normal wear and tear or cosmetic damage The warranty ALSO DOES NOT COVER damages which occurred during shipment failures which are caused by products not supplied by the warrantor failures which result from accident misuse abuse neglect bug infestation mishandling misapplication alteration faulty installation set up adjus...

Page 30: ...MODERN SOUND FOR YOUR CLASSIC Retro Manufacturing LLC 7370 Eastgate Road Suite 125 Henderson NV 89011 p 888 325 1555 f 702 483 2229 www retromanufacturing com ...

Reviews: