background image

12

13

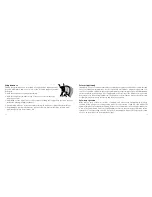
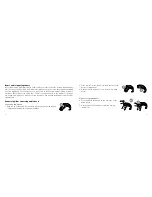
3.  Turn the top part of the earmould gently backwards and forwards so that it 

tucks behind the fold of skin above your ear canal.

4.  Move the earmould up and down and gently press to ensure it is positioned 

correctly in the ear. Opening and closing your mouth can ease insertion.

5.  Make sure the hearing instrument is seated behind the ear.

By experimenting, an easier method may be discovered. With proper insertion,  
hearing  instruments  should  fit  snugly  but  comfortably.  If  hearing  instruments 
cause  irritation  of  the  ears,  contact  your  hearing  care  professional.  Never  
attempt to modify the shape of the hearing instrument, earmoulds, or tubing 
yourself.
Tip: It may be helpful to pull your ear up and outward with your opposite hand 
during insertion. 

low battery indicator

Your hearing care professional can activate a low battery indicator in your hearing instruments.  
The hearing instrument will reduce amplification and emit a beep signal if battery power gets too 
low. This signal will recur every five minutes until the hearing instrument automatically switches 
off. The low battery indicator can vary slightly, depending on the type of battery used. It is rec-
ommended that you keep spare batteries on hand.

inserting/removing hearing instruments

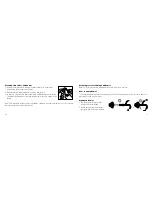
Insertion (custom earmoulds)

1.  Hold the earmould between your thumb and index finger and position its sound outlet in 

your ear canal.

2.   Slide the earmould all the way into your ear with a gentle, twisting movement. 

Summary of Contents for Mini RIE

Page 1: ...USER GUIDE Behind the ear BTE Models Standard Tube Thin Tube Receiver in the ear RIE Mini RIE...

Page 2: ...ed according to your individual hearing loss and needs Some people adjust quickly to wearing hearing instruments in their ears and hearing new sounds other people may need more time Please read this m...

Page 3: ...earing instruments 6 Getting started 10 On Off function 10 SmartStart 10 Inserting Replacing the battery 11 Low battery indicator 12 Inserting removing hearing instruments 12 Operation of the hearing...

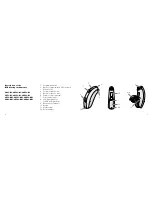
Page 4: ...I LV71 DVI LV771 DVI LV571 DVI LV81 DVI LV781 DVI LV581 DVI 1 Programme button 2 Battery compartment On Off switch 3 Sound outlet 4 Front microphone inlet 5 Back microphone inlet 6 Volume control opti...

Page 5: ...0 DVIR LV570 DVIR RIE Mini BTEs DTT360 DTT260 DTT160 1 Receiver tube 2 Receiver Open Dome 3 Receiver Tulip Dome 4 Receiver Power Dome 5 RIE mould 6 Sports lock 7 Battery compartment 8 Receiver 9 Progr...

Page 6: ...riod of time removing the batteries may help prevent corrosion of the battery compartment and ensure that battery life is not shortened Getting started On Off function 1 When the battery door is close...

Page 7: ...ulds or tubing yourself Tip It may be helpful to pull your ear up and outward with your opposite hand during insertion Low battery indicator Your hearing care professional can activate a low battery i...

Page 8: ...the removal string and pull the earmould outward 3 Consult your hearing care professional if you have difficulties removing the hearing instrument Insertion domes custom earmoulds 1 Hold the thin tub...

Page 9: ...lt setting programme one Operation of the hearing instrument Volume control optional The volume control will allow the volume of hearing instruments to be increased or decreased 1 To increase the volu...

Page 10: ...causes them to not process or amplify sound The stand by function can be accessed by pressing and holding the programme button for five seconds A series of beeps will be presented prior to activation...

Page 11: ...ve speech understanding If there is no sound from the hearing instruments in a tele loop system and with a telecoil programme activated the tele loop system may not be turned on or is not operating co...

Page 12: ...the bottom of the hear ing instruments and once properly clicked into place the hearing instruments switch to DAI automatically Connecting Disconnecting audio boots Connecting audio boots 1 Align the...

Page 13: ...ome stiff brittle or discoloured over time Contact your hearing care professional regarding tube changes Care and maintenance Proper handling 1 Never immerse hearing instruments in water or other liqu...

Page 14: ...be 2 Make sure that the new dome is properly and securely mounted Cleaning thin tubes and domes 1 Remove thin tubes from hearing instruments before cleaning by unscrewing them counter clockwise 2 Wipe...

Page 15: ...ended that these are changed as needed To change these filters the following steps are needed 1 Remove and discard the used dome and brush the receiver area with the receiver pointed down Tulip domes...

Page 16: ...ly pull and rock back and forth until the new receiver is in place Tip Pressing on the new filter with the flat side of the HF3 filter tool can give extra insurance that the filter is correctly in pla...

Page 17: ...strange sounds from hearing instruments 3 Do not wear hearing instruments in mines oil fields or other explosive areas unless those areas are certified for hearing instrument use 4 Do not allow other...

Page 18: ...tery warning information 1 Do not put batteries in your mouth as they can be harmful if swallowed If swallowed seek medical help immediately 2 Keep batteries away from children and mentally challenged...

Page 19: ...n Dead battery Battery door will not close Blocked earmould or tube Blocked wax filter POSSIBLE REMEDY Turn on by closing the battery door Replace battery Insert battery properly Clean earmould or tub...

Page 20: ...ange in hearing sensitivity Excessive ear wax Volume set too low POSSIBLE REMEDY Reinsert earmould Clean earmould replace dome replace filter Change filter or consult your hearing care professional Co...

Page 21: ...nt Earmould tubing worn or damaged Thin tube connection loose Hearing instrument settings not optimal POSSIBLE REMEDY Re insert earmould carefully Re insert dome Consult your hearing care professional...

Page 22: ...bleshooting Guide SYMPTOM CAUSE Sound Weak battery distorted Improper earmould or dome fit not clear Hearing instrument damaged Hearing instrument settings not optimal POSSIBLE REMEDY Replace battery...

Page 23: ...SPL typical Thin tube LV61 DI LV761 DI LV561 DI 123dB SPL typical LV71 DI LV771 DI LV571 DI 129dB SPL typical LV71 DVI LV771 DVI LV571 DVI 129dB SPL typical Technical Data Hearing Instrument Maximum...

Page 24: ...d hearing instruments that malfunction must be repaired by a qualified technician Do not attempt to open the case of hearing instruments as this will invalidate the warranty For hearing instruments th...

Page 25: ...48 49...

Page 26: ...50 51...

Page 27: ...4 1869 343 466 www gnresound co uk Australia GN ReSound Pty Ltd Unit R1 Regents Park Estate 391 Park Road Regents Park NSW 2143 Tel free 1800 658 955 Fax 61 2 9743 7472 www gnresound com au New Zealan...

Reviews: