background image

5

en

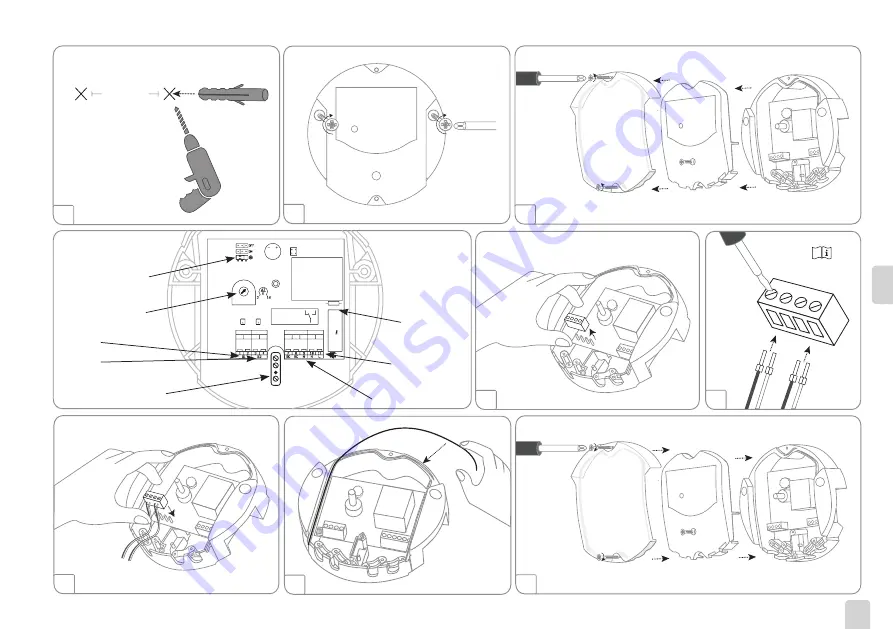
In order to mount the device to the wall, carry out the following steps:

2.2

1

112mm

2

4

5

6

7

3

8

T4A fuse

Power supply 
connection

Relay (load)

Grounding terminal  
(common terminal block)

Jumper  
antifreeze function

Potentiometer
Temperature limitation 

Sensor 2

Sensor 1

Summary of Contents for DeltaSol A

Page 1: ...arefully to get the best performance from this unit Please keep this manual safe DeltaSol A Mounting Connection Operation Troubleshooting Differential temperature controller for solar heating air cond...

Page 2: ...d to strong electromagnetic fields Subject to technical change Errors excepted Target group These instructions are exclusively addressed to authorized skilled personnel Only qualified electricians are...

Page 3: ...cone sealing cord guarantees a protection against dripping water 130 45 Drill hole positions 112 mm Contents 1 Overview 4 2 Installation 4 2 1 Mounting 4 2 2 Electrical connection 6 3 Operation and fu...

Page 4: ...LED Operation 1 potentiometer and 1 jumper Protection type IP 20 DIN EN 60529 with seal IP 22 Protection class II Ambient temperature 0 40 C 32 104 F Degree of pollution 2 Dimensions 139 mm 5 2 depth...

Page 5: ...to the wall carry out the following steps 2 2 1 112mm 2 4 5 6 7 3 8 T4A fuse Power supply connection Relay load Grounding terminal common terminal block Jumper antifreeze function Potentiometer Temper...

Page 6: ...th power via a power supply cable The power supply of the device must be 115V The controller is equipped with 1 electromechanical relay to which a load such as a pump a valve etc can be connected Rela...

Page 7: ...rature difference falls by 1 6K 2 9 Ra non adjustable hysteresis below the adjusted temperature difference the pump will be switched off S1 Collector sensor S2 Tank sensor RO Solar pump 1 S1 S2 2 3 4...

Page 8: ...usted temperature difference the valve will be put into its initial position S1 Tank sensor S2 Heating circuit return sensor RO 3 port valve S1 RO S2 1 S1 S2 2 3 4 7 RO RC N N L 8 9 10 11 2 2 3 3 Powe...

Page 9: ...econ nect it The fuse of the controller could be blown The fuse holder which holds the spare fuse becomes accessible when the cover is removed The fuse can then be replaced Check the power supply of t...

Page 10: ...10 en...

Page 11: ...11 en...

Page 12: ...r the completeness of the drawings and texts of this manual they only represent some examples They can only be used at your own risk No liability is assumed for incorrect incomplete or false informati...

Reviews: