


8
WARNING
•
Do not use the bacterial/viral filter (product code 24966) with the H4i.
•
Regularly check the bacterial/viral filter for signs of moisture or other contaminants, particularly
during humidification. Failure to do so could result in increased breathing system resistance.
•
Only use bacterial/viral filters that comply with the relevant safety standards, including
ISO 23328-1 and ISO 23328-2.
Refer to illustration H.
1.
Fit the bacterial/viral filter to the air outlet of the device.
2.
Attach the air tubing to the other side of the filter.
3.
Attach the mask system to the free end of the air tubing.
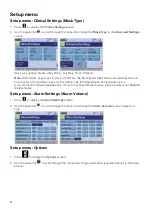
4.
Perform the Learn Circuit function (refer to Setup menu: Options (see page 14)). From the
Setup
menu,
select
Options
. This enables the device to compensate for the impedance introduced by the filters.
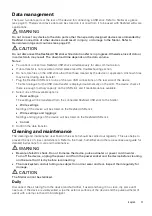
Using water traps
When using a water trap, check the air circuit regularly for accumulated water. Follow the manufacturer’s
recommendations for frequency of inspection of water traps.
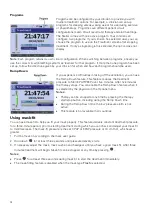
Stellar basics
About the control panel
Refer to illustration L.
1.
Mains power LED—On when operating on
mains power.
2.
LCD screen
3.
Monitoring menu
4.
Setup menu
5.
Info menu
6.
Push dial (rotate/click)
7.
Therapy LED—On during treatment (flashes
during mask-fitting operation)
8.
Start/stop button
9.
Alarm mute button LED—On when
is
pressed. Red or yellow during an alarm or during
alarm testing.
10.
Alarm LED—Red or yellow during an alarm or
during alarm testing.
11.
Internal battery—On when internal battery is in
use. Flashes when device is turned off and
battery is charging.
12.
External power supply—On when external
battery is connected.
Key
Function
Start/Stop
•
Starts or stops treatment.
•
Extended hold for at least three seconds starts the mask-fitting
feature.
Alarm mute
•
During therapy: Press once to mute an alarm. Press a second time to
un-mute an alarm. If the problem is still present, the alarm will sound
again after two minutes. Refer to Working with alarms (see page 11)
•
In stand-by mode: Extended hold for at least three seconds starts the
alarm LED and alarm buzzer test.
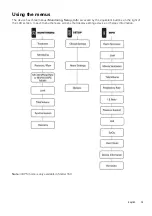
Menu keys
Press the appropriate menu button (Monitoring, Setup, Info) to enter and
scroll through the relevant menu.
Push dial
Turning the dial allows you to scroll through the menu and change
settings. Pushing the dial allows you to enter into a menu or confirm
your choice.
Summary of Contents for Stellar 100
Page 212: ...2 1 I 2 1 J 1 2 3 4 5 K ...


