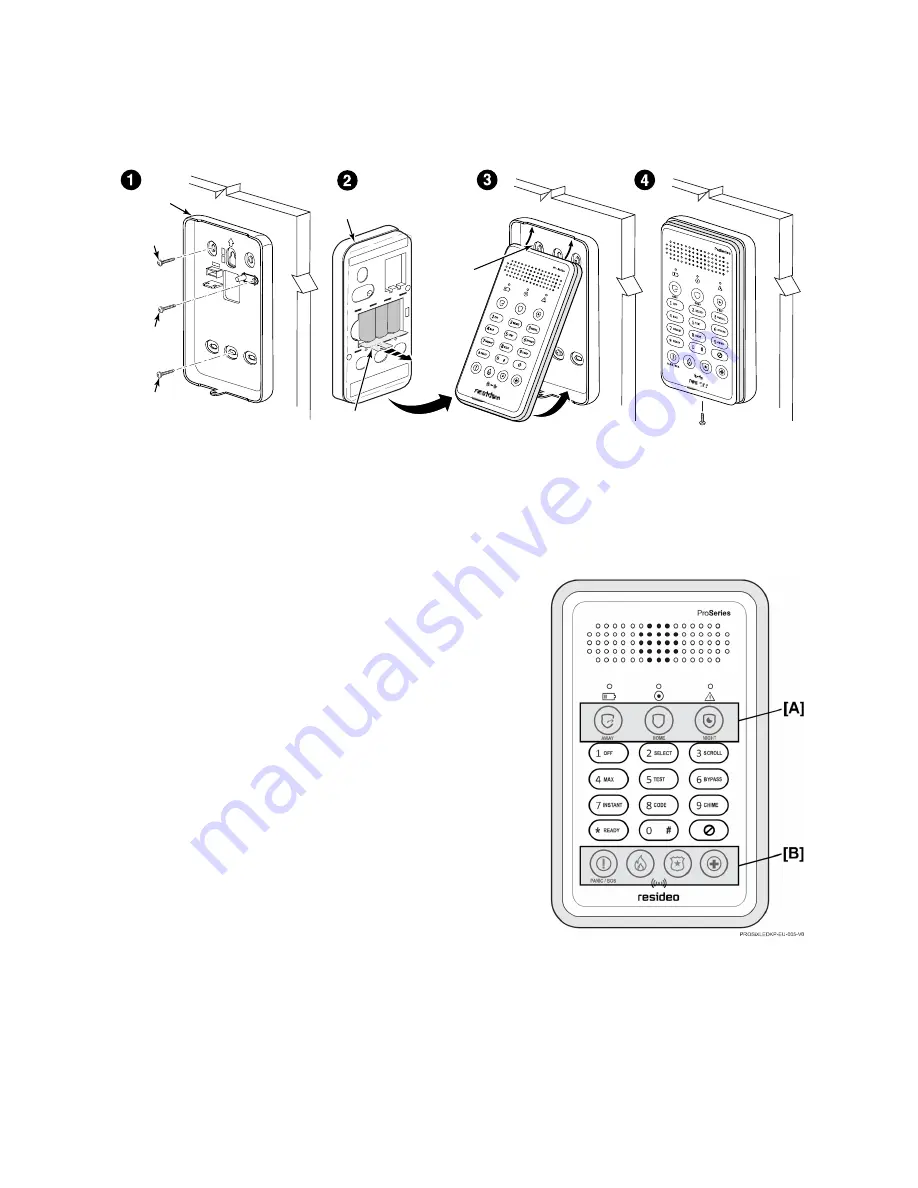
KEYPAD MOUNTING
The keypads can be surface mounted directly to a wall as follows:
1. Separate the keypad front panel
[A]
to the rear mounting plate
[B]
.
2. Mount the mounting plate to the wall using the screws
[C]
. Insert the tamper screw
[D]
as shown.
Note:
Mounting screws not provided. Use 3.5mm – 4mm wood screws (with plastic wall anchors, if necessary).
3. Pull out the battery activation tab
[E]
from the back of the keypad front panel.
4. Align the case with the cleats
[F]
and snap into place and secure with bottom screw
[G]
(provided).
AUTHENTICATING KEYPAD USER
For security purposes, a user (or installer) of the keypad must be authenticated prior to being able to access/view any of the keypad
status indicators. To authenticate a user, perform the following steps.
Note:
No status indicators will be displayed, even if the system is armed, until a valid PIN (or Prox Tag) is entered.
1. At the keypad, enter the PIN (or swipe the Prox Tag) for the user.
2. After a successful authentication, enter the command starting with "1" = arm if the panel is DISARMED or "5" if the panel is
ARMED.
ENROLLING KEYPAD
The keypad must be enrolled in the Control Panel before it can be used.
Registration and programming are conducted through the AlarmNet 360™
cloud-based management platform, using the Resideo Pro App. After
accessing the customer account, perform the following steps.
1. From the Select “KEYPADS”.
2. Select “ADD KEYPAD”.
3. Select “Learn” and wait for the Control Panel to be in learning mode.
4. Activate the keypad by pressing any key:
The keypad automatically attempts to pair with the Control Panel.
The top three status LEDs
[A]
and bottom four Panic keys
[B]
will
come on (red).
If enrollment is not successful, press any of the keys on the keypad to
restart the pairing process or disconnect and reconnect power.
5. After a successful pairing, the top three status LEDs and bottom four
Panic keys will go off and two beeps will sound to confirm the pairing.
6. After enrollment, program and save the keypad’s zone options (zone
descriptor, etc.)
Note:
Make sure to assign a descriptor to the keypad for easy identification
when keypad events occur.
IMPORTANT
: After enrolled, the keypad cannot be used with another
Control Panel until it is un-enrolled (deleted) from the current
panel through the AlarmNet 360™ cloud-based management platform.
Note:
For detailed programming instructions refer to the Installation
Instructions for the Control Panel with which this device is used.
[C]
PR
O
S
iXL
E
D
K
P-
E
U
-0
0
2
-V
0
[D]
[F]
[C]
[B]
[E]
[A]
[G]


