3
LAMINIEREN ● LAMINATING ● PLASTIFICADO ● PLASTIFICATION
1
A
2
3
4
5
6
7
8
9
10
11
12
13
14
15
16
B
C
D
E
F
G
H
I
J
K
L
1
2
3
4
5
6
7
8
9
10
11
12
13
14
15
16
A
B
C
D
E
F
G
H
I
J
K
L
-0.5
Verwendungsbereich
Oberfläche
-[.2]
m²
Masse
20.434
kg
SRW 360
-
Material
Rohmass
.
Datum
Name
Benennung
Konstr.
14.03.13
Schmid
SRW 360
Zeichner
14.03.13
Machowska
Norm
BAAN-Nr. 6BASTEL41
Chr. RENZ
GmbH
Zeichnungsnummer
Blatt
6
BAS.TEL.4-1
7
Bl.
Zust.
Änderung
Datum Name
Allgemeintoleranz DIN ISO 2768-m-K
D
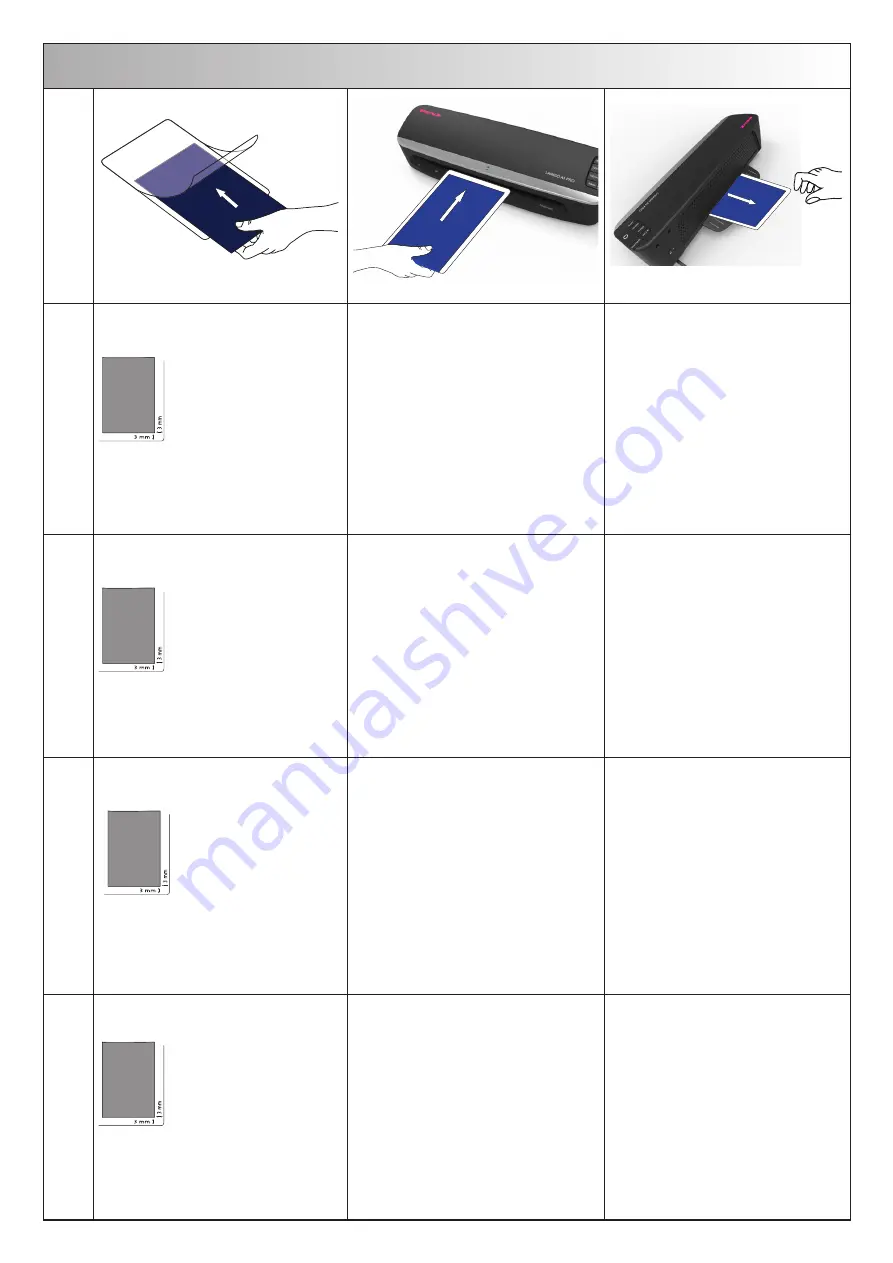
Die Laminiervorlage in eine entsprechende
Folientasche stecken und auf gleichmäßigen
Folienrand achten. Optimal sind 3 mm Folienrand.
Überrüfen Sie, ob die gewünschte
Laminiertemperatur erreicht wurde:
dies ist der Fall, wenn die
Bereitschaftsanzeige „READY“ grün leuchtet.
Schieben Sie die Folientasche mit der
geschlossenen Seite voran, gerade in den
Einlaufschacht, bis das Dokument von den
Laminierwalzen erfasst und eingezogen wird.
Das Dokument wird durch das Gerät gezogen
und auf der Rückseite hinaus transportiert.
Achtung:
Schieben Sie immer zuerst die bereits
geschlossene Seite der Folientasche ein.
A3 - kurze Seite
A4 - Hochformat - kurze Seite
A4 - Querformat (Express A4) - lange Seite
A5 - kurze Seite
Entnehmen Sie das fertig laminierte Dokument
von der Ablage, bevor Sie das nächste
Dokument laminieren, um Stau
und evtl. Verschmutzung zu vermeiden.
E
Put the original to be laminated into the correct
pouch and make sure to have an equal edge
on all sides. Ideal would be 3 mm at each side.
Check if the desired laminating temperature is
reached. This is the case if the temperature light
„READY“ lights permanently green.
Insert the laminating pouch with the closed side
first into the entry slot until the document is
seized by the laminating rollers and is
transported into the laminator.
The document is transported through the laminator
and comes out at the back of the machine.
Attention:
Always insert the already closed side
of the foil pouch in first.
A3 - short side
A4 - portrait - short side
A4 - horizontal format (Express A4) - long side
A5 - short side
Pull out the laminated foil pouch immediately
and gently after it comes out of the outlet
and stops moving to avoid overheat
(smudging and blistering).
ESP
Insertar el modelo de plastificado en una funda
para plastificar adecuada y asegurarse de que
el borde de la lámina sea uniforme. El borde de
lámina óptimo asciende a 3 mm.
Verifique si se ha alcanzado la temperatura de
plastificado deseada: éste es el caso si el indicador
de disponibilidad “READY“ luce en verde
.
Empuje la funda para plastificar hasta la bandeja
de entrada con el lado cerrado hacia adelante,
hasta que el documento sea agarrado por los
rodillos de plastificado e introducido.
El documento es extraído por el aparato
y transportado hacia fuera por la parte posterior.
Atención:
Empuje siempre primero el lado ya cerrado
de la funda para plastificar.
A3 - lado corto
A4 - Formato alto - lado corto
A4 - Formato transversal (Express A4) - lado largo
A5 - lado largo
Antes de plastificar el documento siguiente,
retire el documento plastificado de la bandeja,
para evitar atascos y eventual suciedad.
F
Introduisez le document à plastifier dans une
pochette à plastifier adéquate et veillez
à ce que la marge de la feuille soit régulière.
Une marge de 3 mm serait parfaite.
Vérifiez si la température de plastification
souhaitée a été atteinte : C‘est le cas lorsque
l‘indicateur de température (4) est allumé en vert.
Glissez la pochette transparente, son côté fermé
étant devant, tout droit dans la fente
d‘alimentation jusqu’à ce que le document soit
saisi par les rouleaux de transport et ressorte
par l’arriéré de la machine.
Attention:
Inserez en premier la partie fermée de la
pochette:
A3 - coté court
A4 - Portrait: coté court
A4 - Paysage: coté long
A5 - coté court
Retirez le document plastifié se trouvant sur
le support de sortie avant d’engager la
nouvelle plastification pour éviter tout risque
de bourrage ou encrassement.


