background image

Users Manual

IMPORTANT SAFETY INSTRUCTIONS

1. Read these instructions.
2. Keep these instructions.
3. Heed all warnings.
4. Follow all instructions 
5. Do not use this apparatus near water.  The apparatus shall 

QRWEHH[SRVHGWRGULSSLQJRUVSODVKLQJDQGQRREMHFWV¿OOHGZLWK

liquids, such as vases, shall be placed on it.
6. Clean only with dry cloth.
7. Do not block any ventilation openings.  Install in accordance with 
the manufacturer’s instructions.
8. Do not install near any heat sources such as radiators, heat 

UHJLVWHUVVWRYHVRURWKHUDSSDUDWXVLQFOXGLQJDPSOL¿HUVWKDW

produce heat.
9. Do not defeat the safety purpose of the polarized or grounding-
type plug.  A polarized plug has two blades with one wider than the 
other.  A grounding type plug has two blades and a third grounding 
prong.  The wide blade or the third prong is provided for your safety.  

,IWKHSURYLGHGSOXJGRHVQRW¿WLQWR\RXURXWOHWFRQVXOWDQHOHFWUL

-

cian for replacement of the obsolete outlet.
10. Protect the power cord from being walked on or pinched 
particularly at plugs, convenience receptacles, and the point where 
they exit from the apparatus.
11. Make sure the power cord remains readily accessible at all 
times.
12. The AC Power Cord is the AC Mains disconnect. 

2QO\XVHDWWDFKPHQWVDFFHVVRULHVVSHFL¿HGE\WKHPDQXIDF

-

turer. 
14. Disconnect this apparatus during lightning storms or when 
unused for long periods of time.

5HIHUDOOVHUYLFLQJWRTXDOL¿HGVHUYLFHSHUVRQQHO6HUYLFLQJLV

required when the apparatus has been damaged in any way, such 
as power-supply cord or plug is damaged, liquid has been spilled 
or objects have fallen into the apparatus, the apparatus has been 
exposed to rain or moisture, does not operate normally, or has been 
dropped.

“WARNING - TO REDUCE THE RISK OF FIRE OR ELECTRIC 
SHOCK, DO NOT EXPOSE THIS APPARATUS TO RAIN OR 
MOISTURE”

“CAUTION:  THESE SERVICING INSTRUCTIONS ARE FOR USE 
BY QUALIFIED SERVICE PERSONNEL ONLY.  TO REDUCE THE 
RISK OF ELECTRIC SHOCK DO NOT PERFORM ANY SERVIC-
ING OTHER THAN THAT CONTAINED IN THE OPERATING 
INSTRUCTIONS UNLESS YOU ARE QUALIFIED TO DO SO”.

CAUTION

To reiterate the above warnings: servicing instructions are for

use by qualified personnel only. To avoid electric shock, do

not perform any servicing other than that contained in the Ope-

ration Instructions unless you are qualified to do so.  Refer all

servicing to qualified personnel.

Eindrigliche Warnung:  Wartungsvorschriften dienen nur der

Benutzung durch qualifizieres Personal.  Zur Vermeidung eines

elektrischen Schlages keine anderen als die in den Betriebsvor-

schriften beschriebenen Wartungsarbeiten ausführen, es sei denn 

Sie sind dafür qualifiziert.  Wartungsarbeiten auszuführen.

The lightning flash with arrowhead symbol,

within an equilateral triangle, is intended to

alert the use to the presence of uninsulated

"Dangerous Voltage" within the product's en-

closure that may be of sufficient magnitude

to constitute a risk of electric shock to hu-

mans.

The exclamanation point, within an equilateral

presence of important operating and mainte-

nance (servicing) instructions in the literature

accompanying the product.

VORSICHT

RISK OF ELECTRONIC SHOCK:

OPEN ONLY IF QUALIFIED AS

SERVICE PERSONNEL

GEFAHR EINES ELEKTRISCHEN SCHLAGES:

NUR VON QUALIFIZIEREM WARTUNGSPERSONAL

ZU ÖFFNEN

Der Blitz mit nach untenzielendem Pfeil in

einem gleichseitigen Dreieck weist den

Benutzer auf das Vorhandensein einer

unisolierten, "gefährlichen Spannung" im

Gehäuse hin, die stark genug sein kann, einer

Person einen gefährlichen elektrischen Schlag

zu versetzen.

Das Ausrufezeichen in einem gleichseitigen

Dreieck weist den Benutzer auf wichtige

Betriebs- und Wartungsvorschriften in den

beiliegenden Unterlagen des Gerätes hin.

Erklärung der graphischen Symbole

Explanation of Graphical Symbols

IMPORTANT

Your Iconyx Steerable Column Loudspeaker contains no user-serviceable

SDUWVDQGDOOVHUYLFHVKRXOGEHUHIHUUHGWRTXDOLÀHGVHUYLFHSHUVRQQHO

2

Summary of Contents for CF Series RHAON

Page 1: ...lation Operating Instructions For all Renkus Heinz RHAON Empowered Loudspeaker Systems Users of Renkus Heinz Iconyx IC R ICL R digitally steered arrays should refer to the Users Manual supplied with t...

Page 2: ...NS ARE FOR USE BY QUALIFIED SERVICE PERSONNEL ONLY TO REDUCE THE RISK OF ELECTRIC SHOCK DO NOT PERFORM ANY SERVIC ING OTHER THAN THAT CONTAINED IN THE OPERATING INSTRUCTIONS UNLESS YOU ARE QUALIFIED T...

Page 3: ...nal Routing 18 Control Mode 20 8VHU RQ JXUDEOH 63 XQFWLRQV Saving Changes 22 All Loudspeakers Control 23 Group Control 23 Copy Paste Shortcut 25 Supervise Mode 26 YHQW RJJLQJ 1RWL FDWLRQ General Prefe...

Page 4: ...1HWZRUN LV WKH UVW SUDFWLFDO V VWHP WR FRPELQH GLJLWDO DXGLR GLVWULEXWLRQ ZLWK precise control and supervision of self powered loudspeakers RHAON uses standard Ethernet hardware advanced CobraNet tec...

Page 5: ...of the Connect and RQWURO PRGH IXQFWLRQV GHSHQGLQJ RQ KRZ WKH DFFHVV FRQWURO V VWHP LV FRQ JXUHG RU IXUWKHU LQIRUPDWLRQ RQ SDVVZRUG SURWHFWLRQ UHIHU WR page 44 of this manual or contact the person res...

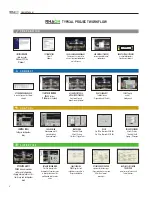
Page 6: ...T R O L CONTROL PANEL Configure Loudspeaker Array EQUALIZATION 8 band parametric EQ hi and lo shelving hi pass and lo pass COMPRESSION Threshold Ratio Attack Release Soft Knee Trigger Point DELAY 0 t...

Page 7: ...automatically During the installation you will need to select either the 32 bit or the 64 bit install RHAON 1 6 is downwards compatible with earlier ver VLRQV RI 5 21 0LFURFRQWUROOHU DQG 63 UPZDUH VR...

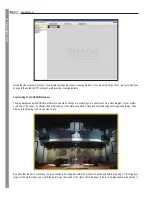
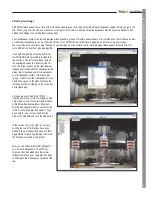
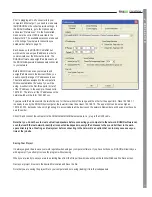
Page 8: ...seful such as a block diagram of your system or a photo of the venue To change the background go to the Options pull down menu and select Background Image Load Image Then browse to the drawing or phot...

Page 9: ...anel lists all the available devices in a directory tree for mat The larger section on the right displays loudspeaker icons and other specialized work areas the All Loudspeakers icon represents your l...

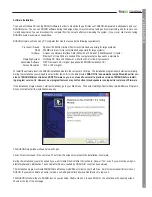
Page 10: ...ows 7 go to Start Control Panel All Control Panel Items Network and Sharing Center Find the connection you wish to use It will likely be called Local Area Connection unless you have renamed it Also no...

Page 11: ...HU IRU WKH XSSHU OLPLW 6LQFH is already in use by the RHAON host computer the lower limit must be at least 192 168 1 2 The upper limit can be set as high as 192 168 1 255 but needs to be only high eno...

Page 12: ...or RHAON problems Your Renkus Heinz loudspeaker was factory tested before it left our factory and barring shipping damage should be in perfect operating condition The RHAON Network Manager allows you...

Page 13: ...al loudspeakers I 5 21 FDQ W QG DQ REUD1HW GHYLFHV RQ WKH QHW work the prompt shown to the right will appear to let you know that something is wrong and to offer trouble shooting hints For more detail...

Page 14: ...PXWH RU XQ PXWH WKH ORXGVSHDNHU 7KH JUHHQ WULDQJOHV RQ WKH IDU ULJKW UHSUHVHQW REUD1HW 7UDQVPLWWHUV 7 DFK REUD1HW 7UDQVPLWWHU can transmit one channel of information from the DSP out to the CobraNet n...

Page 15: ...connect the multiple inputs of Rhaon empowered ORXGVSHDNHUV WR WKH DPSOL HU V 2 Select and send input signals to the CobraNet network 3 Select one of the CobraNet digital audio channels if Co braNet s...

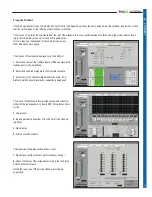
Page 16: ...at zero regardless of the input level Loudspeakers model number or name Input signal level bar graph 0 indicates the onset of input clipping Analog inputs clip at 12 dBu without the 10 dB input pad 2...

Page 17: ...l Present indicators turn green whenever a signal is present You can activate any of the analog and CobraNet digital inputs in the upper group If you select either of the AES EBU inputs in the lower g...

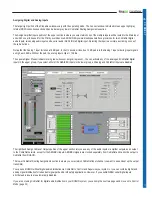
Page 18: ...Net network using RHAON software 7KH UVW VWHS LQ VHWWLQJ XS REUD1HW URXWLQJ LV to drag the CobraNet Source that was detected by Scan Network into the system The CobraNet Source and the devices connect...

Page 19: ...er Icon and select Disable Receiver from the menu that pops up Either method will break the con nection and allow you to make a new one Since each CobraNet bundle can carry 8 channels of digital audio...

Page 20: ...this manual When you enter Control mode in the main workspace the directory tree on the left remains the same However notice that the icons themselves have changed The CobraNet Rx and Tx arrows are go...

Page 21: ...LJQDOV TXLFNO OO OWHU SDUDPHWHUV FDQ EH FRQWUROOHG ZLWK WKH VFUROO ZKHHO RQ RXU PRXVH OLFN LQVLGH WKH FRQWURO HOG DQG VFUROO WR VHW DLQ Bandwidth Frequency etc HORZ WKH 4 VHFWLRQ LQ WKH OHIW VLGH RI W...

Page 22: ...d the Threshold Level Saving Changes Although any changes you made in either the Connect or Control windows have been sent to the associated loudspeaker they have not been saved to the loudspeakers s...

Page 23: ...their sound level with just one control Group Control functions in the same manner only it exerts control only over the arrays included in the Group To add a Group select Add Group to add a Group fold...

Page 24: ...a operate in the same way these controls operate for individual loudspeakers but control all loudspeakers in the Group A Group Control mode window is identical to the one used for individual loudspeak...

Page 25: ...ic to the right Selecting Copy Settings copies all that loudspeaker s DSP settings and allows you to copy these settings to another array by selecting its Icon and using Paste Settings Right clicking...

Page 26: ...R SDQG LW DQG VKRZ DOO RI LWV RXGVSHDNHU LFRQV 2QH RI PRUH RI WKHVH LFRQV ZLOO GLVSOD the same alert double clicking on it will open the loudspeaker s Properties window in Supervise mode and provide a...

Page 27: ...o easily identify each array module and verify that its address number switches are properly set If you press the Wink light for the top module and the wink light on the middle module comes on you kno...

Page 28: ...HQW RJJLQJ 7KH ORJ OH ZLOO EH ZULWWHQ WR WKH FRPSXWHU V KDUG GULYH LQ D 5 21 ORJ OH LQ WKH 3URJUDP LOHV Renkus Heinz directory 5 21 FDQ DOVR DXWRPDWLFDOO H PDLO HYHQWV WR DQRWKHU FRPSXWHU RU FHOOXODU...

Page 29: ...XQLWV RI WHPSHUDWXUH IURP 0HWULF HQWLJUDGH WR PSHULDO DKUHQKHLW 8QGHU URXS 6HWWLQJV RX can set up a Power On Sequencing Delay for all grouped loudspeakers This will help avoid a voltage surge that ca...

Page 30: ...vel of access We suggest giving an Operator access to all Control Mode functions that would nor PDOO EH XVHG ZKLOH UXQQLQJ D VKRZ RU RSHUDWLQJ WKH V VWHP Q D HG LQVWDOODWLRQ 2SHUDWRU OHYHO SHUVRQQHO Z...

Page 31: ...FRPSXWHU XVHG WR VHWXS WKH SDVVZRUG SURWHFWLRQ XVXDOO WKH RXVH FRPSXWHU DQG GRQ W prevent you or someone else from connecting to the network with a RHAON equipped PC and changing the settings The Spe...

Page 32: ...fails Continuous Performance Monitoring 7KH SHUIRUPDQFH RI DOO 5 21 PSRZHUHG PSOL HUV DQG RXGVSHDNHUV LV FRQVWDQWO PRQLWRUHG IRU IDXOWV DQG DEQRUPDOLWLHV YHQW RJJLQJ DQG 1RWL FDWLRQ 3UH VHOHFWHG HYHQW...

Page 33: ...HG VZLWFKHV DVH7 PLQLPXP LJDELW DVH7 UHFRPPHQGHG 2 7KH QXPEHU RI ORXGVSHDNHUV LV GHWHUPLQHG E WKH QXPEHU RI RXWSXW SRUWV SURYLGHG E WKH VZLWFKHV 7KH FRPSXWHU V FDQ EH FRQQHFWHG to any Port on the Ethe...

Page 34: ...ct all the loudspeakers WRJHWKHU W FRXOG IRU H DPSOH EH EURNHQ LQWR VHYHUDO VHSDUDWH DQDORJ FLUFXLWV IRU RQH SDJLQJ DSSOLFDWLRQV IRU PRQLWRUV OOV HWF 2 The analog to CobraNet converter would not be ne...

Page 35: ...ution are available when AES EBU digital audio distribution is being XVHG WKH 6 8 DXGLR FKDQQHOV RFFXS WKH DPSOL HU V DQDORJ LQSXW FKDQQHOV 3 7KH 6 8 LQSXWV RQ DOO FRQ DPSOL HUV DQG RQ 30 5 VHULHV DPS...

Page 36: ...dB pad for Primary Analog Input allows input signals of up to 24 dBu when inserted Power LED ORZV ZKHQ DPSOL HU SRZHU LV 2Q Thermal LED Lights to indicate that an over temperature VHQVRU KDV VKXW GRZQ...

Page 37: ...ta is streaming Green LEDs glow when connected but inactive turn Orange to indicate a faulty connection Push Button Volume Controls Also function as a manual Standby On control Mute Buttons Turn louds...

Page 38: ...ded listing of Renkus HLQ ORXGVSHDNHUV Q RWKHU ZRUGV IROORZ WKH LI LW LVQ W EURNH GRQ W WU WR LW SROLF 7KHUH DUH WZR HDV ZD V WR QG RXW ZKDW YHUVLRQ RI 5 21 LV LQVWDOOHG RQ RXU FRPSXWHU VR RX FDQ GHWH...

Page 39: ...verwrites v 1 4 or higher versions of RHAON If you have an earlier version of RHAON on your computer you do not have to uninstall it If you want to remove it you will need to use Start Control Panel a...

Page 40: ...H ZLOO SRS XS 1RWH WKDW LW DOVR LQFOXGHV FRPPDQGV IRU WXUQLQJ RQ the loudspeakers Wink light and for sending pink noise to the loudspeaker to help you identify which loudspeaker you have selected The...

Page 41: ...that the window tells you what Microcontroller Firmware version is installed in the loudspeaker Selecting Download will LQVWDOO WKH QHZ UPZDUH LQ WKH ORXGVSHDNHU Step 3 DLW IRU WKH LUPZDUH WUDQVIHU WR...

Page 42: ...OHV QDPHV ZKLFK VWDUW ZLWK 5 DUH N OHV N OHV VWDUW ZLWK 5 PSRUWDQW KHQ XSJUDGLQJ SUHYLRXV YHUVLRQV RI WKH 0LFURFRQWUROOHU DQG 63 UPZDUH WR WKH ODWHVW YHUVLRQ LW LV FULWLFDO WKDW WKH 0LFURFRQWUROOHU UP...

Page 43: ...tes and may need to be reset GENERAL INFORMATION RXU 5HQNXV HLQ ORXGVSHDNHU FRQWDLQV QR XVHU VHUYLFHDEOH SDUWV DQG DOO VHUYLFH VKRXOG EH UHIHUUHG WR TXDOL HG VHUYLFH SHUVRQQHO Hum and Noise Problems I...

Page 44: ...ition Nevertheless it is always a good idea to run a quick check on each loudspeaker before taking it out to the job site and installing it If you should run into a problem at the site it s good to kn...

Page 45: ...SOH WKH OHWWHU VWDUWV LQ RXU PDLOER DQG LV SLFNHG XS E RXU PDLOPDQ ZKR WKHQ WUDQVSRUWV RXU OHWWHU WR WKH SRVW RI FH ZKHUH LW LV sorted and given to Gertrude s mailman who then drops it off in her mail...

Page 46: ...W HDFK VWDJH LQ WKH SURFHVV RI KDQGOLQJ D packet the previous layer is left behind Once a payload type is determined just that payload is handed off to the appropriate handler To better understand wh...

Page 47: ...array obviously has a problem while two other devices are showing an occasional glitch The Age column shows in milliseconds how long it has been since the device was checked by the Network Manager It...

Page 48: ...blank and press OK b If you are running Windows XP go to Start Settings Control Panel Network Con nections LocalArea Connection click on Properties then select Internet Protocol 7 3 3 DQG FOLFN RQ 3U...

Page 49: ...luding switches Check the communication lights on the CobraNet devices input SRUW UDSLG DVKLQJ JUHHQ LQGLFDWHV D FRQQHFWLRQ Note you may require a crossover cable for this direct connection but probab...

Page 50: ...log 1 but some other input is selected on the Connect tab As an aid to troubleshooting the Analog 1 input will always pass audio but if some other input is selected Analog 2 for example the signal to...

Page 51: ...G EULQJ XS WKH LQGRZV 7DVN 0DQDJHU WUO OW HOHWH 8QGHU WKH 3URFHVVHV WDE ORRN IRU 3 1 6 2 DQG 3 66 5 LQGRZV PD WKH QDPHV DQG DGG a 6HOHFW WKHP DQG FOLFN QG 3URFHVV 3URFHHG WR UH RSHQ 5 21 DQG RU REUD1H...

Page 52: ...RU PRUH LQIRUPDWLRQ SOHDVH YLVLW KWWS HQ ZLNLSHGLD RUJ ZLNL H PDLOBDGGUHVV Symptom I need to change the sample rate of my Array from 48 kHz to 96 kHz How do I do this RX QHHG WR LQVWDOO QHZ N 63 UPZD...

Page 53: ...ow 15 Control Mode 6 20 to 25 Control Mode Icon 20 Control Properties Window 15 21 22 Copy Settings 25 D Delay 21 Designer 30 31 Digital Audio 5 AES EBU 17 Firmware 39 to 43 Signal Routing 18 19 Group...

Page 54: ...rity Override 22 3URMHFW RUN RZ Preparations 7 to 12 R RHAON 5 Block Diagrams 33 to 35 Firmware 38 to 43 General Preferences 29 Organization 5 6 Software Installation 8 39 S Safety Instructions 2 Samp...

Page 55: ......

Page 56: ...19201 Cook Street Foothill Ranch CA USA 3KRQH D VDOHV UHQNXV KHLQ FRP ZZZ UHQNXV KHLQ FRP RH 611 Rev M September 2011...

Reviews: