


4. Programming and Debug
26
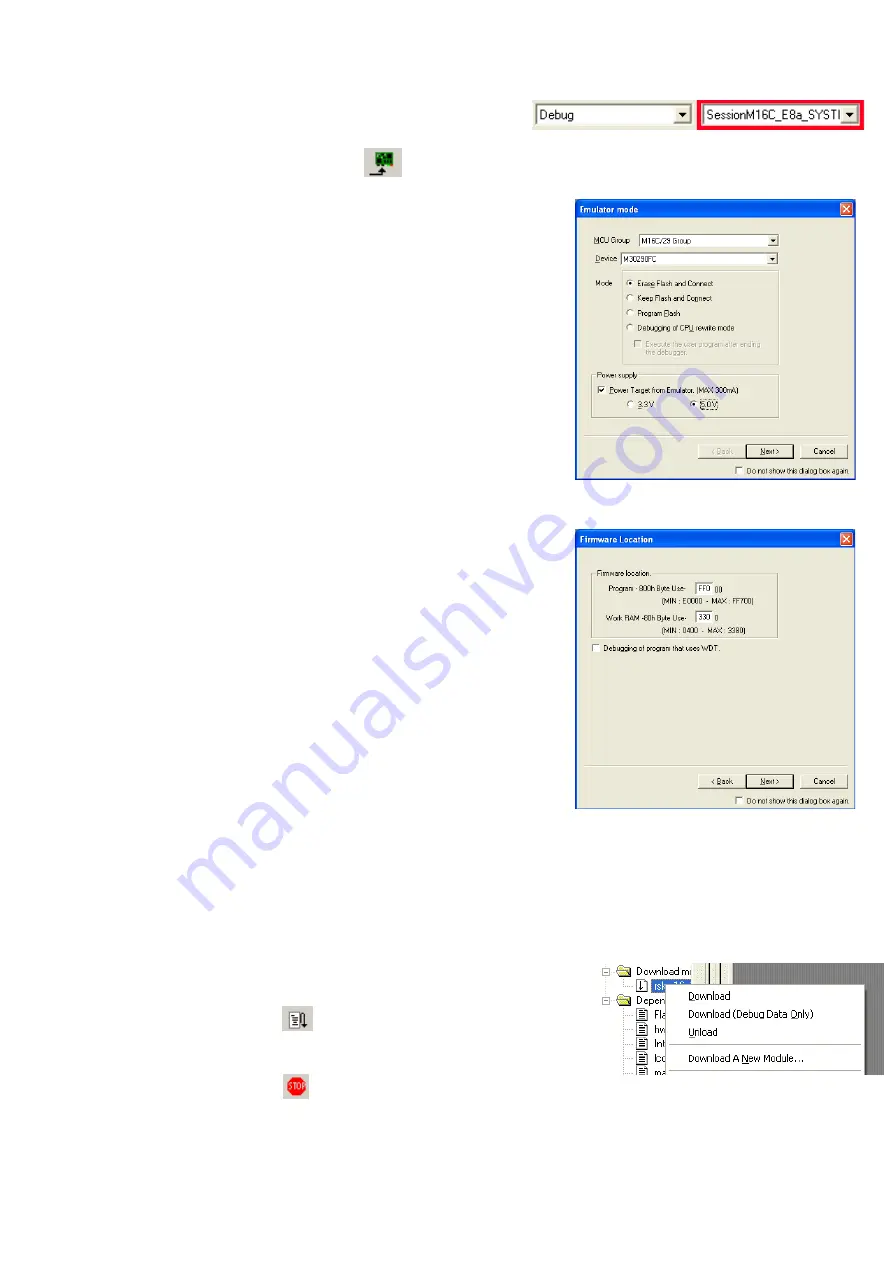
Ensure the “SessionM16C_E8a_SYSTEM” session in the right hand drop down list
on the tool bar is selected.
27
Click the <Connect> button on the debug toolbar
28
The “Emulator mode” wizard will be shown.
Select the correct MCU group (M16C/29) and device type
(e.g. M30290FC for RSKM16C29 )
Please note that the “Emulator mode” view shown here will only appear the FIRST time you
connect to the target within a project. On subsequent connections the “Emulator setting”
dialog will appear, please choose the same options to connect – refer to the RSKM16C29
Tutorial manual for details.
29
Select “Erase Flash and Connect”. If the E8a is to provide power to the CPU board, select
“Power Target from Emulator” and choose the “5.0V” option. Otherwise connect a 5V centre
positive supply.
30
Click <Next>
31
Enter FF000 for the firmware location. It is recommended that the E8a firmware location
is towards the top of the memory map.
32
Enter 3300 for the Work RAM location. It is recommended that the Work RAM is towards the
top of the memory map.
33
Ensure that the checkbox“Debugging of program that uses WDT” is not checked.
34
Click <Next>.
35
The “MCU Setting” view will be shown. Leave the default options as shown.
36
Click <Finish>.
Note: The first time the E8a is connected, you may be asked to choose a driver, select
“Renesas Communications”, after a few seconds the “Interface” and “Channel” numbers will be automatically displayed, click <Close>
on the dialog.
37
Accept any dialog warning that another version of E8a firmware is necessary to work with the application. Allow download of firmware to complete,
this may take several seconds.
38
Right click on the download module listed in the left hand pane and select ‘Download’. The code
will be downloaded to the microcontroller. This may take several seconds.
39
Click the <Reset – Go> button.
The code will run and you will see the LEDs flash on the board.
40
Click the <Stop> button.
The code will stop and the source code will be opened at the current program counter.
D006174_11_S01_V04


